SYSPRO Workflow Services enables you to create and manage your business processes. It provides you with visual design tools to create custom activities and workflows unique to your business environment that allows you to streamline end-to-end business processes within SYSPRO.
For example, you can create a workflow that will track where a sales order is in the business process which can help prevent bottlenecks, or a workflow in which you will be notified by email whenever a new customer is created in the Customers program.
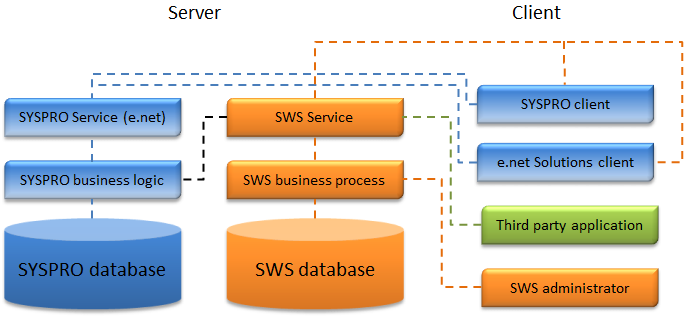
SYSPRO Workflow Services is comprised of:
-
Workflow Administrator - a client-side application that allows you to design, administer and deploy workflow processes to the enterprise
-
Workflow Services - a server-side Windows Communication Foundation service that hosts and coordinates the collaboration between the SYSPRO core processes and the defined workflow process.
All programs in SYSPRO are workflow enabled.
The workflow processes are hosted by the SYSPRO Workflow Services (SWS) service, which is a generic Windows Communication Foundation (WCF) service provided by SYSPRO to host any workflow processes created by the SWS Administrator. The SWS service maintains the state of the workflow by persisting data to the SWS database.
Once the workflow process has been deployed to the SWS service, it is ready to consume events from almost any type of application. There are various ways of communicating with the SWS service, some of which include HTTP, SOAP, and .NET service discovery.
The SYSPRO client uses VBScript to communicate with the deployed workflow processes. For example, when adding a customer you can trap the OnSubmit event. Using simple VBScript syntax you can start the workflow process, as well as move the workflow process to different states. You can also add additional VBScript-enabled buttons to the toolbar, or form, allowing you to move the workflow process through its various states.
e.net Solutions applications can leverage the workflow processes hosted by the SWS service. For example, if an e.net Solutions application is designed to add a customer, then once the customer has been added the developer can target the same workflow process that the SYSPRO client used to start the workflow process.
|
|
You need to follow a number of procedures in the following sequence before you can begin using SYSPRO Workflow Services:
-
Add a SYSPRO Workflow Services operator
-
Install SYSPRO Workflow Services
-
Start the SYSPRO Workflow Service
-
Enable operator access to the SYSPRO Workflow Services Administrator program
-
Configure SQL
-
Configure Workflow Service settings
-
Create a Workflow database
Adding a SYSPRO Workflow Services operator
-
Open the Operators program .
-
Select Add from the Edit menu.
-
Enter the new operator details.
-
We recommend that you enter an operator code of __SWS (i.e. underscore underscore SWS). This __SWS operator is used for the SWS service and cannot be used to log in to SYSPRO.
-
Ensure that you assign the operator to a group that has System Administrator rights.
-
Assign a default company to the operator at the Company field on the Defaults tab and ensure that this is a valid company ID that contains an SWS license.
-
-
Save your changes.
Installing SYSPRO Workflow Services
-
Select the SYSPRO Workflow Services option from the Installation DVD.
Alternatively, the SYSPROWorkflowHostSetup.msi executable can be located in the SWS folder on the installation DVD.
-
Select SYSPRO Workflow Services to install the application.
-
Follow the instructions presented by the installation wizard.
-
You will need to indicate the SYSPRO Workflow Service configuration that will allow communication between the client applications and the SYSPRO Workflow Service. We recommend that you accept the default settings.
-
The Base Address refers to the base address of the SYSPRO Workflow Service. The localhost part of the string can be changed to the IP address of the server to which you are installing.
-
Soap Binding is the type of binding that the SYSPRO Workflow Service must use.
If the installation has been successful, then the Installation Complete window is displayed.
-
Enabling operator access to the Administrator program
-
Open the Operators program .
The Operators window is displayed.
-
Select the operator that requires access to SYSPRO Workflow Services.
-
Select Change from the Edit menu.
-
Select the Security tab.
-
Expand the Activities section.
-
Select List at the Selection field.
-
Select Edit at the Configure activities field.
-
Enable SWS Maintain Workflows and Activities and SWS Maintain Service Settings.
-
Save your changes.
-
Exit the program.
Configuring SQL settings for SYSPRO Workflow Services
-
Open the SYSPRO Workflow Administrator program .
-
Open the Workflow Manager.
All the companies to which you have access are displayed in the Workflow Manager treeview.
-
Select Database Settings.
-
Expand the SQL Server Details section in the Summary pane.
-
Enter the instance of SQL Server that SYSPRO Workflow Services must update.
-
Define the authentication method required.
A Windows Authentication or SQL Authentication is required. If you select SQL Authentication, you will have to provide a user name and password.
-
Select Test SQL Connection to verify your settings.
-
Save the settings.
Configuring SYSPRO Workflow Services settings
-
Open the SYSPRO Workflow Administrator program .
-
Open the Workflow Manager.
All the companies to which you have access are displayed.
-
Expand the Workflow Service Connection Settings section on the Summary pane.
-
Select the SWS service at the Base address field.
This is where you will find all the available Workflow Service's base addresses. Select the address that points to your machine.
![[Note]](images/note.png)
If the name of your service is not available from the drop-down option at the Base address field, then your service has probably not been configured or started.
-
Select the instance of SYSPRO.
-
Expand the Deployment Details section on the Summary pane.
-
Enter the path in the Server workflow deployment path field.
-
Enable the Email notification option, if required.
This will allow you to enter the email addresses to which workflow notifications will be sent.
-
Enable the SYSPRO user notification option, if required.
This will allow you to enter a user that is to be notified of any changes made to the workflow.
-
Save your changes.
-
Restart the service for these changes to take effect.
Creating a SQL workflow database
-
Open the SYSPRO Workflow Administrator program .
The SYSPRO Workflow Services window is displayed.
-
Open the Workflow Manager.
All the companies to which you have access are displayed.
-
Select Database Settings.
-
Expand the Database Details section in the Summary pane.
-
Select Create New Database.
The SQL scripts that are going to run against the specified SQL Server are displayed in the Create New Database pane.
-
Select Create Database.
The workflow database is created after the relevant scripts are run.
-
Create the SQL workflow database that is required.