You use this program to:
- record, authorize and post General Ledger transactions which do not originate from integrated modules, including those created from entries imported from a third-party software application.
- rectify errors on ledger journals created from the sub-modules. Refer to General Ledger Integration Error Handling for additional information.
The program enables you to process Normal journals, whereas the GL Recurring Journals and GL Standard Journals programs enable you to process Recurring and Standard journals respectively.
- Toolbar and menu
- Journal Header
- Journal Notes
- Journal Details
- Authorize Journals
- GL Journal Detail Custom Fields
- Operator Journal Access Tables
- Posting Entries to the Previous Year
- Notes and warnings
| Field | Description |
|---|---|
| New | Select this to process a new journal. |
| New Journal | Select this to process a new journal. |
| New from Standard Journal |
Select this to create a Normal journal from a Standard journal (see Copy From Standard Journal). This option is not available for Statistical or Inter-company journals. |
| New from Existing Journal | Select this to reverse an existing journal or to create
a new journal by copying an existing journal. The new journal is created with the same journal type as the journal being copied (see Copy an Existing Journal), unless you are copying a sub-module journal. When you copy a sub-module journal, the new journal is created as a Normal journal. |
| Save | Select this to save the currently displayed
journal. You can only save the journal once the Undistributed amount is zero (i.e. When the journal balances). If zero value lines exist on the journal, a message is displayed indicating that these lines will be discarded. If you select OK, the journal is saved, but the zero value lines are deleted. If you select Cancel, you are returned to the journal. |
| Select this to print a journal. | |
| Print Current Jnl | Select this to print the journal currently displayed. |
| Print Multiple Jnl | Select this to print multiple journals according to the selection criteria you define (see Print General Ledger Journals). |
| Year |
Indicates the financial year into which the journal must be posted. This defaults to the year in which your company is working and may not correspond to the calendar year. Although this field defaults to your current ledger year, you can post entries to the previous ledger year. As a precautionary measure, you can run the Balance function of the GL Period End program and select the option: Balance a prior year. This enables you to establish whether the ledger is in balance for the prior year into which you want to process the journal, before actually posting the journal. Once you have posted the journal into the prior year, you then rerun the Balance function for the prior year to ensure that the ledger is still in balance. When posting into the previous year the transactions are posted into period 13 if you are using 12 accounting periods and into period 14 if you are using 13 accounting periods (Company Setup ). The reason for this is that your General Ledger year is already closed. If the transaction was posted into period 12, then your revenue and expense accounts would have a closing balance for the year which would be incorrect. SYSPRO therefore posts the transaction into period 13 or 14 and automatically clears the expense and revenue accounts to the Retained Earnings account. The International Accounting Standards rule IAS8 governs the posting of entries into prior periods/years. |
| Period |
Indicates the financial period, within the Year indicted, into which the journal must be posted in the General Ledger. This defaults to your current ledger period, but can be changed. You cannot select a ledger period which is closed. A previous period cannot be selected when processing Inter-company, Provisional, or Weighted Transfer journals, as these must be posted into the current financial period. The posting period does not necessarily correspond to the calendar month. e.g. If you have a 12 period financial year which starts on 1 March, then March is defined as period 1, April as period 2, May as period 3, etc. If you post a journal to a period in the previous year after you have run the Year end function of the GL Period End program, then the system automatically updates the current year opening balances for the affected accounts and also the Retained Earnings account where applicable. i.e. It is not necessary to manually adjust account balances in the current year for such journals. Inter-company journals cannot be posted into period 13 if you are using 12 accounting periods or into period 14 if you are using 13 accounting periods (Company Setup). |
| GL journal | Indicates the number allocated to the journal.
Journal numbers are automatically assigned by the system, beginning with 0000000000 for the first journal of the financial year, through to 9999999999. Journals are successively numbered from 0000000000 to 9999999999 for each period when the Next journal number by period option is enabled (General Ledger Setup). When maintaining existing journals, you use this field to enter the journal number to maintain. You can only add or maintain journals for the current year, next year and previous year 1. You cannot maintain a journal which is Cancelled, On hold or Posted. You can, however view the journal details. |
| Line |
Select this to add or remove a line from the current journal. Journals that are on hold or have been posted cannot be maintained. |
| Add Line | Select this to add a line to the Journal Details list of entries for the journal. |
| Remove Line | Select this to delete the currently highlighted entry from the Journal Details list of entries for the journal. |
| Functions | |
| Post Current Journal | Select this to post the currently displayed journal
into the General Ledger. The journal must be authorized before you can post it into the ledger when the Authorization of journals before posting option is enabled (General Ledger Setup). If zero value lines exist on the journal, a message is displayed indicating that these lines will be discarded. If you select OK, the journal is saved, but the zero value lines are deleted. If you select Cancel, you are returned to the journal. The journal cannot be posted if any of its ledger codes are on hold (General Ledger Codes). |
| Hold Journal | Select this to place the current journal on
hold. A journal which is on hold can only be printed or released from hold. |
| Release Journal | Select this to release a journal which is currently on hold. |
| Cancel Journal | Select this to cancel the entire current journal. |
| Authorize Journal |
Select this to authorize journals that have been captured but not yet posted (see Authorize Journals). This only applies when the Authorization of journals before posting option is enabled (General Ledger Setup). |
| Cancel Authorization | Select this to cancel the previous authorization of the current journal. This changes the status of the journal from Authorized to Unauthorized. This option is only enabled when the status of the current journal is Authorized. |
| Undistributed | Select this to apply the amount displayed in the Undistributed amount field to the currently highlighted line in the Journal Details pane. |
This screen is displayed when you select the New > From Standard Journal option from the File menu.
| Field | Description |
|---|---|
| Standard journal code |
Indicates the code of the Standard journal from which to create the normal journal. Standard journal codes are maintained using the GL Browse on Standard Journals program. |
| Posting period |
Indicates the posting period into which to create the normal journal. |
| View G/L Periods |
Uses the Change Posting Period program to view the periods' Open/Closed status flags for the Current or Previous year in the relevant module. You cannot change the status of the period. This can only be performed from within the each module's setup options. |
| Posting year | Indicates the posting year into which to create the normal journal. |
| Copy |
Select this to create the normal journal from the standard journal you selected. Once the journal is copied, the G/L Journal Entry screen is displayed enabling you to perform various functions for this newly created journal. |
| Cancel | Select this to return to the previous screen without copying the journal. |
This screen is displayed When you select the New > From Existing Journal option from the File menu. The options enable you to create a new journal as either an exact copy of an existing journal or as the reverse of an existing journal.
| Field | Description |
|---|---|
| From Journal | These options enable you to define the details of the
journal from which to create the new journal. This can be a sub-module journal, but the new journal created is a Normal journal, not a sub-module journal. |
| Year | Indicate the year in which the original journal was
captured. Although only the current, previous 1 and future year are displayed in the dropdown, you can enter any year. The program only validates the journal selected once you have entered a journal number, because the year, period and journal number are required for validation. |
| Period | Indicate the period in which the original journal was captured. |
| Journal | Indicate the journal number to copy. You can select the Browse icon to use the GL Browse on Normal Journals program to select the required journal number. |
| To Journal | Indicate the details of the new journal that must be created. |
| Year | Indicate the year in which the new journal must be
created. You can only create a GL journal in the current, previous 1 or future financial year. |
| Period | Indicate the period into which the new journal must be created. |
| Date | Enter the capture date for the new journal. |
| Group Box | |
| Reverse journal | Select this to create the new journal as a reversal of the journal you selected in the From journal fields. |
| Copy | Select this to create the journal from the journal
you selected. If you selected the option: Reverse journal, then the new journal is created as a reversal of the original journal (i.e. all debit amounts in the original journal are created as credit amounts and all credit amounts in the original journal are created as debit amounts in the new journal). |
| Cancel | Select this to return to the previous screen without creating a new journal. |
This screen is displayed When you select the Print > Print Multiple Journal option from the File menu.
| Field | Description | ||||
|---|---|---|---|---|---|
| Ledger year | This indicates the financial year for which to print the journals. | ||||
| Ledger period selection | Indicate the financial period(s), within the financial year selected, for which to print the journals. | ||||
| All | Select this to print the journals for all ledger periods within the ledger year you selected. | ||||
| Single | Select this to print the journals for a single ledger period within the ledger year you selected. | ||||
| Ledger period | Indicate the single ledger period for which to print the journals. | ||||
| Journal number selection | Indicate a selection of journal numbers to include in the report. | ||||
| Authorized journals | This is only enabled if the Authorization of journals before posting option is enabled (General Ledger Setup). | ||||
| Both | Select this to include both authorized and unauthorized journals in the report. | ||||
| Only authorized | Select this to include only authorized journals in the report. | ||||
| Only unauthorized | Select this to include only unauthorized journals in the report. | ||||
| Journal type selection |
Indicate the types of journals to include in the report. All journal types are selected by default and you can deselect those that you do not require. At least one journal type must be selected. Journals captured in a sub-module prior to SYSPRO 6.1 are considered to be Normal journals. |
||||
| Sub module journals | Indicate the sub-module journals to include in the
report. The sub-module journals are created by the GL Integration programs in each sub-module. These options are only enabled When you select the Journal type selection - Sub module journals.
|
||||
| Journal status selection |
Indicate the journal statuses to include in the report. All journal statuses are selected by default and you can deselect those that you do not require. At least one journal status must be selected. |
||||
|
Prints the journals according to your selections. Only the journals that you captured are printed when the Limit view of journals to capturer option is enabled (General Ledger Setup). |
|||||
| Close | Returns to the previous screen without printing the journals. | ||||
| Field | Description |
|---|---|
| Journal type | Before processing a journal, you must define a Retained earnings account in the General Ledger Integration program. This account is usually defined as a capital account. It cannot be defined as an expense or revenue type account. |
| Normal journal | Select this to process a Normal journal. Normal journals are traditional journals which you post once only to the General Ledger. These journals are posted to the Ledger Detail file with a source code of JE. |
| Provisional journal | A provisional journal is the same as a normal journal,
except that it is reversed at period and/or year end and it
can only be posted into your current period. Provisional
journals are automatically reversed by the system at
period/year end when the Reverse out provision
journals option is enabled (General Ledger Setup) A provisional journal is posted to the ledger detail file with a source code of PV. The reversing journal is posted with a source code of RV when the option to automatically reverse provisional journals at period/year end is enabled (General Ledger Setup). Provisional journals are typically processed for income accrued but not yet received, or expenses incurred but not yet paid in a specific accounting period. Alternatively, they can be used for accruals of prepaid expenses. For example: Your financial year runs from Jan 05 to Dec 05 and you pay a R400 license fee in Dec 05 for the next 4 months (i.e. Dec 05 to Mar 06). The entry When paying would be: Debit License fees (expense a/c) R400 and Credit Creditors or Bank (Balance Sheet a/c)) R400. When you process a year end in December 05, your profit/retained earnings will be understated by R300 as 3/4 of the R400 relates to 2006, not 2005. You need a "mechanism" to take the R300 out of the expense account and into the balance sheet over the year-end. To do this, you can use a provisional journal as follows: Debit Prepaid expenses (Balance Sheet a/c) R300 and Credit License fees (expense a/c) R300. The year-end procedure sets all expense accounts to zero and transfers the balances to the Retained Earnings account. In this case, R100 is deducted from the profit for 2005 - which is correct. After year end, in period 1 of 06, the provisional journal is reversed and the remaining R300 is put back into the expense account. Debit License fees (expense a/c) R300 and Credit Prepaid expenses (Balance Sheet a/c) R300. Having a provisional journal over year-end which affects income statement accounts only, makes no sense as the year end reduces the account' balances to zero anyway. |
| Inter-company journal | Select this to process an Inter-Company
journal. This type of journal enables you to post entries to your current company and the matched debit and/or credit to one or more other companies. The journal is posted to the ledger detail file with a source code of IC. The following rules apply:
|
| User-defined journal | Select this to process a User Defined journal. A user-defined journal is the same as a normal journal, except that you can specify your own source code for the journal. User defined journal source codes are maintained using the GL Browse on Journal Source Codes program. |
| Period end adjustments | Select this to process a Period End Adjustment
journal. This journal enables you to post adjustments to a prior period. The journal is posted to the ledger detail file with a source code of PE. |
| Auditor's adjustments | Select this to process an Auditor's adjustment
journal. This journal enables you to process the final ledger adjustments for the year when you are in the last period of your General Ledger. The journal is posted to the ledger detail file with a source code of AU. This journal can be password-protected. |
| Statistical journal | Select this to process a Statistical journal. If you select this, then you can only process entries to accounts defined as Statistical in the General Ledger Codes program. Statistical journals are used for reporting purposes only. Therefore, When processing statistical journals, these journals do not have to balance (i.e. total debits do not have to equal total credits). When you create alternate currencies using the GL Alternative Currency Setup program, statistical journals are created in the alternate currency with an exchange rate of 1. If you are using alternate currency ledgers, then statistical journals update the alternate currency tables at an exchange rate of 1. |
| Alternate currency jnl | Select this to process a normal journal in one of the
alternate currency ledgers. You must define the alternate currency ledger to which to process the journal. The available alternate currencies are those created using the GL Alternative Currency Setup program. Alternate currency journals can be processed into any open GL period in the current or previous year. The source code for alternate currency journals is AC. Transactions processed in alternate currency journals are only posted to the alternate currency ledger selected. The local currency ledger is not updated with these journals. The entries are posted at the exchange rate currently defined in the currencies table in the Currencies program. The series of journal reference numbers created for alternate currency journals are the same as those for all other normal journals. This means that if you created alternate currency journals, that those journal numbers will not appear in your local currency ledger. |
| Journal date |
Indicate the date to use as the transaction date for the journal. This defaults to your current system date. |
| Reference |
Indicate the reference to attach to the journal. The entry made here is printed on the GL Journal Report and can be viewed within the GL Query program. |
| Notation |
Enter additional text as a notation against the journal. This entry is printed on the GL Journal Report and can be viewed within the GL Query program. |
| Batch total required | Select this to enter the total value of the debit
entries for the journal you are about to process. A message is displayed if you try to end the journal and the debit entries do not match the batch total entered. |
| Batch total |
Enter the debit value to be validated against the total debit entries in the journal When you end the journal. This field is only enabled if you selected the Batch total required option. |
| Currency | Select the currency in which the journal must be
processed. This option is only enabled for Alternate currency journals. You can use the Browse on Currencies program to select the alternate currency in which to process the journal. |
| Source |
The source code indicates the source of transactions in the General Ledger. The source code is defined by the system for all normal journals except for User-defined and Recurring journals. This field is therefore only available if you selected to process a user-defined or a recurring journal. A User-defined source code and description must be created for user-defined and recurring journals using the GL Browse on Journal Source Codes program. The source code cannot be one of the standard source codes held on file. |
| Status | This indicates the status of the journal (see Journal Status). |
| Authorized | This indicates whether the journal has been authorized for posting. This is only applicable when the Authorization of journals before posting option is enabled (General Ledger Setup). |
| Undistributed amount |
This displays the difference between the value totals of the debit and credit entries. When this value is zero, then the journal is in balance and can be posted. This check is not applied to Statistical type journals. i.e. Statistical journals need not balance before they can be posted. |
| Message | A message is displayed in this field if the journal is out of balance. |
The status field indicates the status of the journal, which can be one of the following:
- Not posted
- On Hold
- Cancelled
- Posted
You cannot maintain a journal in a status of Cancelled, On hold or Posted. You can, however view the journal details.
The functions available for the journal depend on the journal status as follows:
| Status | Functions Available |
|---|---|
| Not Posted | Post | Hold | Cancel | Print | Journal Details |
| On Hold | Release | Print |
| Cancelled | |
| Posted |
The fields on this pane enable you to enter or maintain the journal lines.
![[Note]](images/note.png)
|
|
|
Although the grid is enabled, you cannot edit any fields for journals that are in a Status of Posted, Cancelled or on Hold. |
|
| Field | Description | ||||
|---|---|---|---|---|---|
| Ledger code | Indicate the Ledger code to which to post the journal amount. If you enter a Statistical type ledger code, then a warning indicating that the account code you entered is a control account is displayed. This is because all statistical type accounts are automatically defined as control accounts to ensure that transactions are only posted to them from the General Ledger module. If you are processing a statistical journal, then you can only enter a ledger code that is defined as a statistical account in the General Ledger Codes program. If the ledger code is a Template account type, the template account itself is never updated. Transaction values are posted only to the accounts linked to the template account, based on the percentages defined against these linked accounts (see Template). Details of these postings are printed on the SRS version of the GL Journal Report providing you select the Report option: Include template details.
If a sub module journal could not be posted due to a missing ledger code, then **missing** is displayed in this column. You need to release the journal from hold before you can edit the line and enter the correct Ledger code. You use the Release Journal option from the Function menu to release the journal. The journal status is displayed in the Status field in the Journal Header pane. |
||||
| Description | This displays the description for the ledger code entered in the previous field. | ||||
| Transaction date |
This indicates the transaction date for the specific entry within the journal. The date defaults from the Journal Header screen, but can be changed. |
||||
| Reference |
The entry made here is printed on the GL Trial Balance and can be viewed within the GL Query program. This indicates the reference attached to the specific entry within the journal. |
||||
| Debit amount | Enter the debit value for the journal line. | ||||
| Credit amount | Enter the credit value for the journal line. | ||||
| Comment |
The entry made here (up to 60 characters) is printed on the GL Trial Balance and can be viewed within the GL Query program. This comment is relative to the current entry being made. |
||||
| Unit of measure |
This is only displayed when processing a Statistical journal and indicates the unit of measure defined against the statistical account code. |
||||
| G/L analysis | If the Ledger code you entered requires General Ledger analysis (General Ledger Codes or GL Structure Definition), then you select the Edit option to use the Capture GL Analysis Entries program to enter the analysis details. | ||||
| Inter company | Select this to post this entry to another company.
This only applies to Inter-company journals. |
||||
| Company | This indicates the company into which to post the
transaction. You need to specify both the debit and the credit ledger code for the journal to be processed in the selected inter company. You can only enter a company to which you have access. |
||||
| Debit ledger | This indicates the ledger code in the company selected
that must be debited with the amount entered. This field is mandatory for an inter company journal. |
||||
| Credit ledger | This indicates the ledger code in the company selected
that must be credited with the amount entered. This field is mandatory for an inter company journal. |
||||
| Rows | This indicates the total number of entries in the journal. | ||||
| Total | These fields indicate the total value of debit entries and the total value of credit entries for the journal. | ||||
Details are displayed in this pane when you select the Authorize Journal option from the Functions menu.
| Field | Description |
|---|---|
| Year |
Select the financial year for which to authorize the journals. This field defaults to the current financial year. |
| Select All | Select all journals displayed in the listview for authorization. |
| Unselect All | Deselect all journals displayed in the listview from authorization. |
| Apply Authorization | Authorize those journals displayed in the listview which you selected for authorization (A tick in the first column of the listview indicates that the journal is selected for authorization). |
| Options icon | Indicate the journals to display in the listview. |
| Refresh | Refresh the details in the listview. |
Once you have selected a financial year, the following information is displayed in the listview:
| Column | Description |
|---|---|
| Col 1 | A tick in the first column indicates that the journal is selected for authorization. |
| Journal | Indicates the journal number. |
| Date | Indicates the date captured on the journal header. |
| Period | Indicates the ledger period to which the journal details must be posted. This is the period defined against the journal header. |
| Journal type | Indicates the type of normal journal. |
| Status | Indicates the current status of the journal (see Journal Status). |
| Printed | Indicates whether or not the journal was printed. |
| Reference | Indicates the reference entered on the journal header. |
| Captured by | Indicates the operator who captured or last changed the journal. |
| Journal details | Select the View option to use the GL Journal Zoom program to view details of the source entries for the journal. |
This screen is displayed when you select the Options icon from the Authorize Journals pane.
| Field | Description |
|---|---|
| Period selection | Indicate the financial periods for which to include journals in the listview. |
| Journal selection | Indicate the journal numbers, within the selected period(s), to include in the listview. |
| Include | |
| Authorized | Select this to display only authorized journals in the listview. |
| Unauthorized | Select this to display only unauthorized journals in the listview. |
| Both | Select this to display both authorized and unauthorized journals in the listview. |
| Apply | Apply the options you selected and to return to the listview. Only those journals you selected are displayed. |
| Cancel | Select this to ignore any options you defined and to return to the listview. |
This pane displays any custom form data defined against the journal.
Select Add Fields to this Form to load the Custom Form Data Entry program to enter custom form data against the journal.
The following tables define operator access within the GL Journal Entry program, according to the access to activities defined against the operator code and your selections in the Journals section of the General Ledger Setup program.
Table A defines operator access when the Journal options are set as follows:
- Authorization of journals before posting - not selected
- Limit view of journals to capturer - not selected
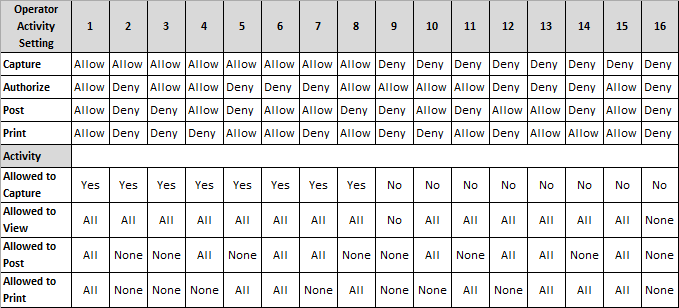
Table B defines operator access when the Journal options are set as follows:
- Authorization of journals before posting - not selected
- Limit view of journals to capturer - selected
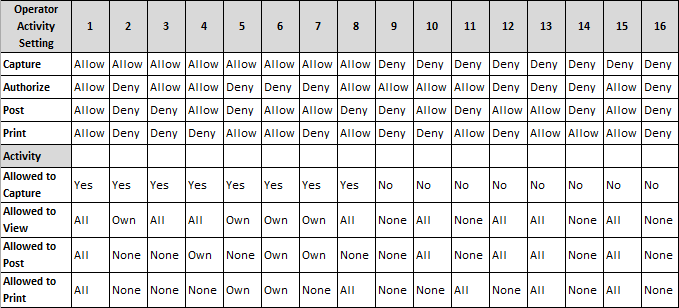
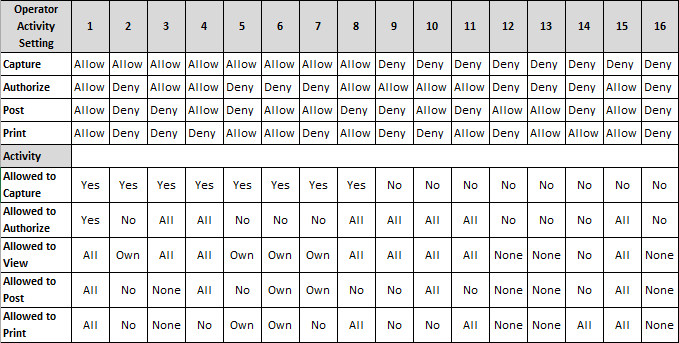
Table C defines operator access when the Journal options are set as follows:
- Authorization of journals before posting - selected
- Limit view of journals to capturer - not selected

This section provides information on posting transactions into a year other than the current year using SYSPRO.
The only reason you should need to post an entry into the previous year is to account for a change in Accounting Policies or Accounting Estimates, or to fix errors. The International Accounting Standard that deals with this issue is IAS8. There are very strict accounting rules around posting to a previous year and this should only happen in very rare circumstances. Generally, only auditor's entries should need to be posted into the previous year.
The way SYSPRO deals with posting to a non-current year is as follows:
- You can post General Ledger journals to the previous year. Entries cannot be posted into any year prior to the previous year.
-
For the sub ledgers, which should rarely be affected by the change/correction and/or could have been purged and cannot affect the General Ledger longer, you can only post back to previous period 1 and previous period 2.
Refer to Multi-period accounting and Change Posting Period for information on posting entries to prior periods.
-
The General Ledger system allows you to capture journals for a future period either in the current year or the next year.
However, journals captured for a future period (for the current or next year) can only be posted when the General Ledger is in that period (i.e. when the journal becomes current).
Within SYSPRO, you need to close off the previous General Ledger year before you can post any of the subsidiary ledger entries into the new year.
Usually, however, auditors will not to have completed the previous year's financial reconciliations before the start of the new year. Once they have completed their audit, they will most likely require you to process additional entries into your General Ledger. However, most companies cannot wait for their auditors as they need to see their new year's Income Statement and other financial reports on a regular basis. The General Ledger year end will therefore have been run to roll the General Ledger into the new year. This means that the auditor's entries will have to be posted into the previous year.
|
|
|
|
It is important that posting entries into the previous year is only done in agreement with management, as it obviously has an effect on the financial reports for the previous year end. |
|
The process for posting journals into the previous year is as follows:
-
Navigate to the General Ledger Setup program.
Re-open the period into which to post the journal(s).
-
Use the GL Journal Entry program to process the journal.
Remember to select the previous financial year and the period required. This is usually the last period of the financial year (i.e. the 13th period - in a 12 period year), which is normally used for auditor's adjustments.
Although the journal can be posted to any period, the changes mean that financial reports need to be re-printed from the period into which the journals were posted, so that they reflect the correct figures.
-
Any entries posted to a revenue or expense account are automatically transferred into the Retained Earnings Account in the Balance Sheet, as they do not form part of the current year's revenue or expenses.
-
Entries posted to a Balance Sheet account cause the account's closing balance and subsequent period's opening and closing balances to be adjusted. These entries have no effect on the previous year's Income Statement.
-
The Retained Earnings account is adjusted accordingly for the previous and current year.
For postings to Expense and Revenue account types, the Retained earnings account defined against the Ledger code is used (General Ledger Codes). If this is not defined, or is invalid, then the retained earnings account defined in the General Ledger Integration program is used.
-
Once the journals are posted, you need to navigate to the General Ledger Setup program and close the previous year periods currently open. This prevents further journal entries from being processed into the previous year.
The following example indicates the effect of posting a journal into the previous year:
You processed a Year end in December 2000 and your General Ledger is therefore now in Period 1 of 2001.
You now post a journal for 888.00 into Period 10 of 2000. You Credit an Expense account and Debit a Balance Sheet account.
The following journal entries are created:
| Period/ year | Account | Debit Amount | Credit Amount | Comment |
|---|---|---|---|---|
| 10 / 2000 | Expense | 888.00 | Journal processed | |
| 10 / 2000 | Balance Sheet account | 888.00 | Journal processed | |
| 13 / 2000 (or 14 if running 13 accounting periods) | Expense | 888.00 | Transfer balance of Expense account to Retained
Earnings account. Balance of Expense account for year 2000 now zero. |
|
| 13 / 2000 (or 14 if running 13 accounting periods) | Retained Earnings | 888.00 | Transfer balance from Expense account |
In addition, the Opening and Closing balances of the Balance sheet account and the Retained Earnings account are adjusted as follows:
| Period/ year | Account | Opening Balance | Closing Balance | Comment |
|---|---|---|---|---|
| 10 / 2000 | Balance Sheet account | Add Debit of 888.00 | Adjust Closing balance | |
| 11 / 2000 | Balance Sheet account | Add Debit of 888.00 | Add Debit of 888.00 | Adjust Opening and Closing balance |
| 12 / 2000 | Balance Sheet account | Add Debit of 888.00 | Add Debit of 888.00 | Adjust Opening and Closing balance |
| 13 / 2000 | Balance Sheet account | Add Debit of 888.00 | Add Debit of 888.00 | Adjust Opening and Closing balance |
| 14 / 2000 (only if running 13 accounting periods) | Balance Sheet account | Add Debit of 888.00 | Add Debit of 888.00 | Adjust Opening and Closing balance |
| 1 / 2001 | Balance Sheet account | Add Debit of 888.00 | Adjust Opening for current year | |
| 13 / 2000 (or 14 if running 13 accounting periods) | Retained Earnings | Add Credit of 888.00 | Adjust Closing balance for previous year | |
| 1 / 2001 | Retained Earnings | Add Credit of 888.00 | Adjust Opening balance for current year |
-
When you use the GL Journal Entry program to process a journal into the previous year (after you have run the Year end function of the GL Period End program) the system automatically updates the current year's opening balances for the affected accounts and also adjusts the Retained Earnings account where applicable. It is therefore not necessary to manually adjust account balances in the current year for such journals.
-
You can only print journals if you have access to the GL Journal Report program.
-
Passwords defined against ledger codes in the General Ledger Codes program are not requested when copying or reversing journals. The logic is that the password would have been entered when the journal was originally created and saved.
You could, however, use eSignatures to provide the required security.
-
If the GL analysis required option is enabled for a ledger account used in this program (General Ledger Codes or GL Structure Definition) then the Capture GL Analysis Entries program is displayed when you post the transaction, so that you can enter the analysis details. For a sub module transaction, the sub module must also be linked to the General Ledger in Detail at company level (General Ledger Integration) or at ledger account code level (General Ledger Codes or GL Structure Definition). GL analysis entries cannot be entered from sub modules if the sub module is linked to the General Ledger in Summary at company level or at ledger account code level.
Note that the GL analysis required option is ignored for all GL codes which are defined in General Ledger Integration. This applies even when the GL code is manually entered in a posting program. Although GL integration programs may be entered manually, they may also be called automatically by other programs or may be automated, which means that they can never be stopped to allow GL analysis entries to be captured.
If the GL analysis code used does not exist in the GenAnalysisCat table, then a message to this effect is displayed and the program will not prompt for analysis again. The GL journal will be created but not posted until the GL code, GL analysis code and GL journal are corrected.
The Ask Me Later function is only available when the option: Force GL Analysis - GL journal posting is enabled for the sub-module (General Ledger Integration).
General Ledger analysis entries are always distributed in the local currency, regardless of the currency in which the original transaction is processed.
-
General Ledger analysis entries cannot be distributed to accounts in the target company when processing Inter Company journals.
-
When you create or maintain a GL Journal, you do not have to fully allocate the analysis entries before being able to continue with the journal. The reason is that the GL Journal Entry program only validates that the analysis is fully distributed when you save the journal.
This only applies to this program and not to other programs that require GL analysis to be distributed.
Electronic Signatures provide security access, transaction logging and event triggering. This enables you to increase control over your system changes.
Access to the following eSignature transactions within this program can be restricted at Operator, Group, Role or Company level. You configure this using the eSignature Setup program.
| eSignature Transaction | Description |
|---|---|
| GL Normal journal added |
Controls access to the New functions in the GL Journal Entry program. |
| GL Normal journal maintained |
Controls access to the maintenance of journals in the GL Journal Entry program. |
| GL Normal journal authorize |
Controls access to the Authorize Journal functions in the GL Journal Entry program. |
| GL Normal journal print |
Controls access to the Print functions in the GL Journal Entry program. |
| GL Normal journal unauthorize |
Controls access to the Cancel Authorization function in the GL Journal Entry program. |
| GL Normal journal hold |
Controls access to the Hold Journal function in the GL Journal Entry program. |
| GL Normal journal cancel |
Controls access to the Cancel Journal function in the GL Journal Entry program. |
| GL Normal journal release |
Controls access to the Release Journal function in the GL Journal Entry program. |
| GL Normal journal post |
Controls access to the Post functions in the GL Journal Entry and GL Post Multiple Normal Journals programs. |
| GL Recurring journal add |
Controls access to the addition of recurring journals in the GL Journal Entry program. |
| GL Recurring journal maintained |
Controls access to the maintenance of recurring journals in the GL Journal Entry program. |
| GL Recurring journal authorized |
Controls access to the authorization of recurring journals in the GL Journal Entry and GL Recurring Journals programs. |
| GL Recurring journal print |
Controls access to the print functions for recurring journals in the GL Journal Entry and GL Recurring Journals programs. |
| GL Recurring journal unauthorize |
Controls access to the cancelling of authorizations for recurring journals in the GL Journal Entry and GL Recurring Journals programs. |
| GL Recurring journal deleted |
Controls access to the deletion of recurring journals in the GL Journal Entry and GL Recurring Journals programs. |
| GL Recurring journal posted |
Controls access to the Post functions for recurring journals in the GL Journal Entry, GL Post Recurring Journals and GL Recurring Journals programs. |
Operator access to the following activities within this program can be restricted. You configure this using the Operators program.
| Activity | Description | ||||
|---|---|---|---|---|---|
| GL journal capture |
Controls the adding, copying and changing of journals using the GL Journal Entry program. This activity is ignored when capturing journals using a business object (i.e. using e.net). |
||||
| GL Journal post |
Controls the posting of journals using the GL Journal Entry and GL Post Multiple Normal Journals programs. The Post function of the GL Journal Entry program is disabled and the GL Post Multiple Normal Journals program cannot be loaded. This activity is ignored when posting journals using a business object (i.e. using e.net). |
||||
| GL Journal authorize |
Controls the authorizing and de-authorizing of journals in the GL Journal Entry and GL Recurring Journals programs. The Authorize Journal and Cancel Authorization functions of the GL Journal Entry and GL Recurring Journals programs are disabled.
|
||||
| GL Journal print |
Controls the printing of journals using the GL Journal Entry and GL Journal Report programs.
|
||||
Password access to the following functions in this program may be defined in the Password Definition program. When defined, the password must be entered before you can access the function.
| Field | Description |
|---|---|
| GL Maintenance of auditors' adjustment journals | This password restricts access to adding and maintaining Auditor's adjustment type journals using the GL Journal Entry program. |
Inserting Application Help
You would typically follow this procedure to display help for the current program in a customized pane that can be pinned to the program window.
Information includes step-by-step instructions for the various functions available within the program, including a brief overview of what the program does, what setup options are required and how to personalize the program.
-
Open the program for which you want to insert application help into a customized pane.
This functionality is only available for a program that has panes.
-
Right-click any form field.
You can also click the triangle menu icon that appears in the title area of a pane.
-
Select Insert Application Help from the context-sensitive menu.

The application help appears in a pane within your program. You can reposition the pane using the docking stickers or pin it to the program window.
Removing the Application Help pane
If you no longer want to display application help in a pane for your current program, you can simply remove it.
-
Select the Close icon in the right-hand corner of the application help pane.

-
Confirm that you want to delete the pane.