SQL Managed Instance

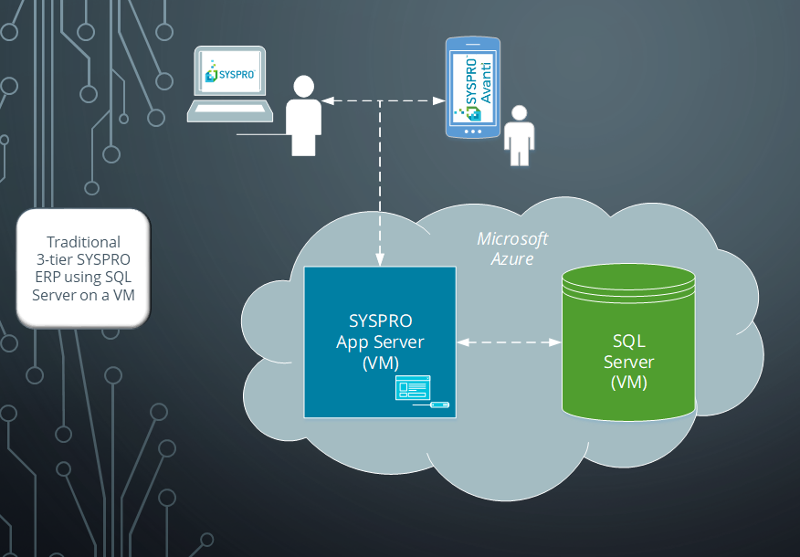
SYSPRO running on Azure provides you with a choice of running SQL Managed Instance or SQL Server running on a Virtual Machine (VM).
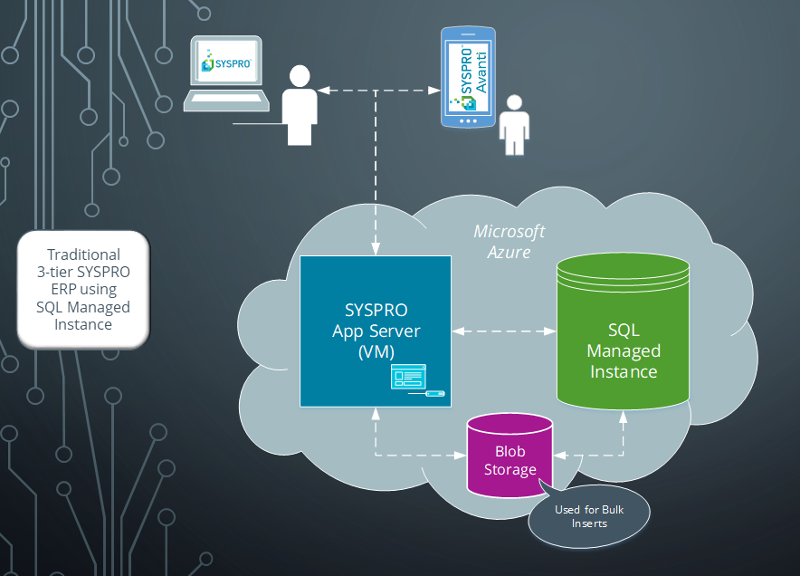
With SQL Managed Instance – a cloud-based managed database - you provision the SQL environment based on CPUs, Memory and Disk usage, and SQL Server is automatically configured and enabled for you. There is, therefore, no need for you to provision a separate Windows Server VM and then install and configure SQL Server.
Exploring
SYSPRO 8 supports SQL Database Managed Instance (hereafter referred to as SQL Managed Instance).
SQL Managed Instance is a Microsoft Azure cloud-based environment that provides compatibility with the SQL Server on-premise Enterprise Edition database engine.
SYSPRO customers already running on a Microsoft Azure cloud-based environment can replace their SQL Server Enterprise edition running on a Virtual Machine (VM) with SQL Managed Instance.
Alternatively, existing SYSPRO customers can lift and shift their on-premise server environments to the Azure cloud, taking advantage of SQL Managed Instance to handle their database workloads.
With Software Assurance you can exchange existing SQL Server licenses for discounted rates on SQL Managed Instance.
SQL Managed Instance preserves all the Platform as a Service (PaaS) capabilities (such as automated patching and version updates, automated backups and high-availability) that drastically reduces management overhead and Total Cost of Ownership (TCO) of an enterprise database environment.
-
Simplified SQL environment setup.
-
PaaS environment - Automated patching and version updates, automated backups and high availability.
-
Reduced management overhead and TCO – Improved IT flexibility and responsiveness.
-
Flexibility to scale-up (and down) as required.
-
Ability to exchange existing SQL Server licenses for discounted rates on SQL Managed Instance.
The following explanation is extracted directly from Microsoft's website: https://docs.microsoft.com/en-us/azure/sql-database/sql-database-managed-instance
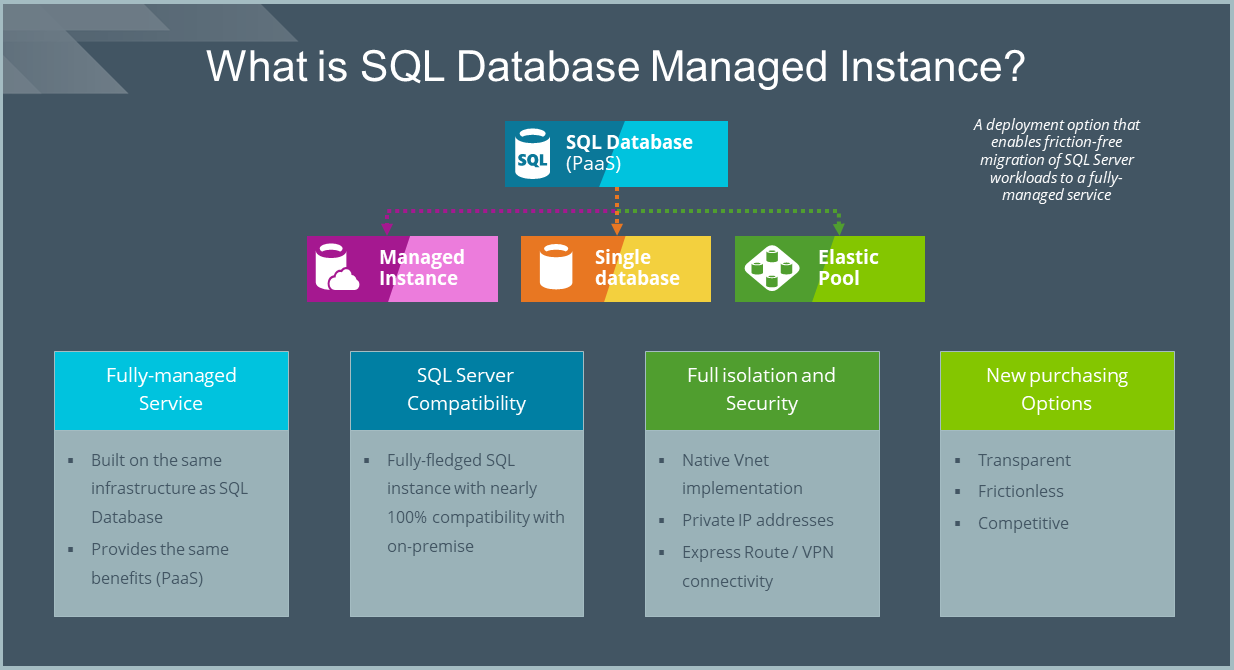
Azure SQL Database Managed Instance is a new deployment model of Azure SQL Database, providing near 100% compatibility with the latest SQL Server on-premises (Enterprise Edition) Database Engine, providing a native virtual network (VNet) implementation that addresses common security concerns, and a business model favorable for on-premises SQL Server customers.
Managed Instance allows existing SQL Server customers to lift and shift their on-premises applications to the cloud with minimal application and database changes.At the same time, Managed Instance preserves all PaaS capabilities (automatic patching and version updates, automated backups, high-availability ), that drastically reduces management overhead and TCO.
Azure Blob Storage provides SYSPRO with an intermediate storage area for the uploading of data into your SQL Managed Instance.
Managed instance is a new resource type in SQL database that streamlines the migration of SQL Server workloads and combines the best of SQL Server with all the benefits of a fully-managed database service.
Microsoft Azure is a cloud computing service created by Microsoft to build, test, deploy, and manage applications and services through Microsoft-managed data centers.
It caters for:
-
Software as a service (SaaS)
-
Platform as a service (PaaS)
-
Infrastructure as a service (IaaS)
In addition, Microsoft Azure supports different programming languages, tools and frameworks (including Microsoft-specific and third-party software and systems).
Peering is the arrangement of traffic exchange between Internet service providers.
In the context of SYSPRO SQL Managed Instances, peering is the direct interconnection between the Microsoft network and another network for the purpose of exchanging traffic between the networks.
Starting
- Microsoft Azure administration knowledge
The actions required to set up a SQL Managed Instance, depend on whether you are a new or existing SYSPRO user.
-
Create the SQL Managed Instance within the Microsoft Azure Portal.
-
Configure SYSPRO to access your newly-created SQL Managed Instance.
-
Create the SQL Managed Instance within the Microsoft Azure Portal.
-
Upload and install your databases.
-
Configure SYSPRO to access your newly-created SQL Managed Instance.
Solving
-
Access the Azure portal (https://portal.azure.com/) to create your SQL Managed Instance.
Considerations:
-
The SQL Managed Instance must reside on the same resource group as your SYSPRO Application Server.
-
The SQL Managed Instance must reside in the same location as your SYSPRO Application server.
-
Take note of the following information which will be used later in the setup process:
-
The virtual network card that you will be using.
-
The SQL credentials that will be used during your setup.
-
-
The deployment of a SQL Managed Instance can take up to 12 hours to complete.
-
-
Once the instance is deployed, ensure that your SYSPRO Application server can access the SQL Managed Instance:
-
Create Peerings against each of the Virtual Network cards, so that they are connected to each other.
-
Select the network card from the virtual machine.
-
Access the Peering configuration.
-
Create a Peering to the network card used against the SQL Managed Instance.
-
-
Create Peerings on the SQL Managed Instance that will connect to the SYSPRO Application server network.
-
Select the network card from the virtual machine.
-
Access the Peering configuration.
-
Create a Peering to the network card used against the SQL managed instance.
-
-
-
Open SQL Server Management Studio to connect to your newly created SQL Managed Instance.
You will need to use the Instance name generated when you created the instance (e.g. tcp:xxxxxxxx.database.windows.net,1433).
-
Access the Microsoft portal for detailed information about database migration:
https://docs.microsoft.com/en-us/azure/sql-database/sql-database-managed-instance-migrate.
-
Review and select your preferred migration method based on your requirements and system setup.
The following database migration methods are currently supported:
-
Azure Database Migration Service
Migration with near-zero downtime.
Review the Microsoft tutorial:
https://docs.microsoft.com/en-us/azure/dms/tutorial-sql-server-to-managed-instance.
-
Native RESTORE database from URL
Migration using native backups from SQL Server (requires some downtime).
Review the Microsoft tutorial:
https://docs.microsoft.com/en-us/sql/relational-databases/backup-restore/sql-server-backup-to-url?view=sql-server-2017
-
-
Upload and install your databases, following the instructions based on the migration method you selected.
Once you have successfully restored your database(s) proceed with configuring SYSPRO.
-
Open your IMPACT.INI file (located in the \Work folder) and edit the SQLSSN entry to point to the newly-created SQL Managed Instance (e.g. SQLSSN=tcp:xxxxxxx.database.windows.net,1433.
-
Optionally change the SQLADM entry in the IMPACT.INI file to be SQLADM=[reset] to reset the SQL credentials. When you next open SYSPRO, the system will prompt you to enter the new credentials for the SQL databases.
-
Open SYSPRO and navigate to the System Setup program (Program List > Administration > General Setup), to enter the Azure Storage account details that SYSPRO uses for Bulk Insert commands.
Enter the appropriate information in the following fields of the Database tab:
Field Description Azure Managed Instance Configuration Use managed instance This lets you use a SQL Managed Instance created in Azure (i.e. this makes programs use logic written specially for SQL Managed Instance). Blob storage container address This is the address that is used to store objects in Azure. Shared access signature This indicates the credentials that will be used when accessing resources in the Azure Blob storage container. External data source This is the Azure external data source name (used by SYSPRO for Bulk Inserts). -
Save your changes and exit the program.
-
Restart SYSPRO.
Copyright © 2025 SYSPRO PTY Ltd.


