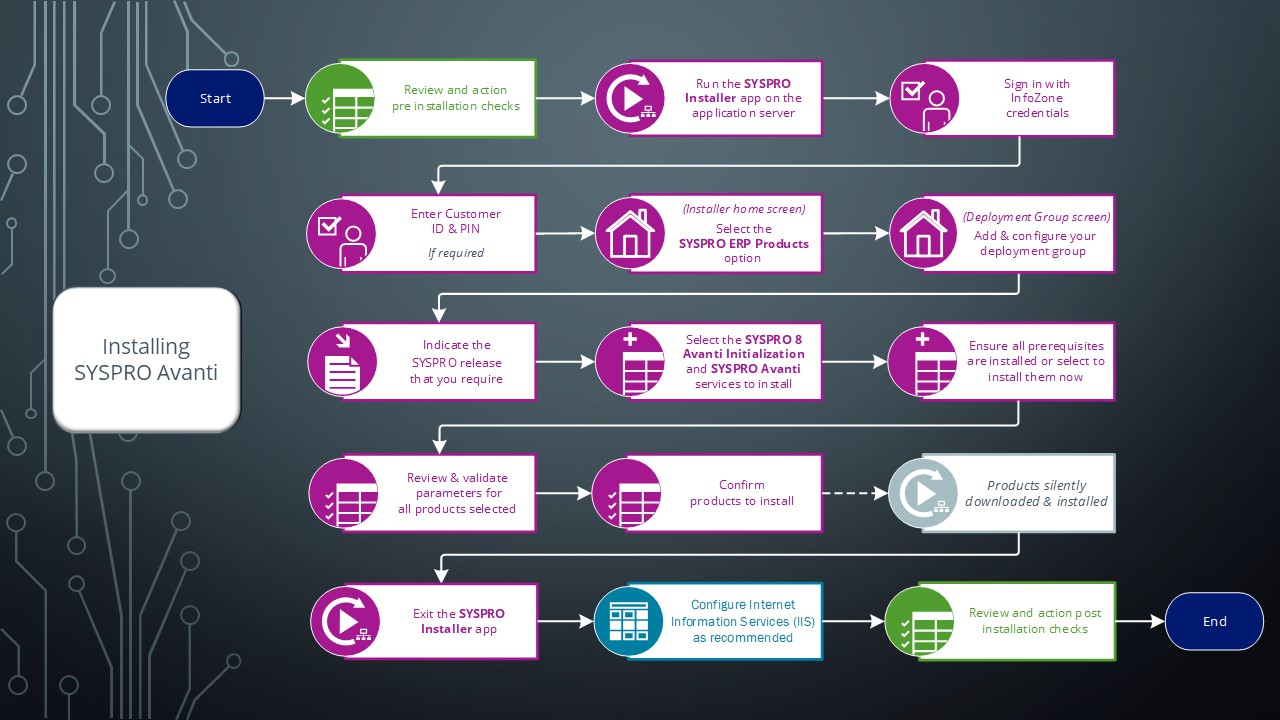
SYSPRO Avanti Installation

SYSPRO Avanti is SYSPRO's web-based software offering. Avanti (an Italian word meaning forward or ahead) is designed to run SYSPRO's applications in the private or public cloud, but can also be deployed on-premise.
SYSPRO Avanti can be used in parallel with the SYSPRO Windows Client version, allowing a user to use either version to complete the same task - they both use the same user credentials and concurrency licensing models.

Exploring
This installation guide covers the aspects that pertain to the installation of SYSPRO Avanti using the SYSPRO Installer Application.
View the SYSPRO Installer topic on the SYSPRO Help and Reference website for more information regarding the SYSPRO Installer Application.
SYSPRO Avanti is built using modern web technologies and technically has the following characteristics:
-
SYSPRO Avanti is a single-page application (SPA)
This allows SYSPRO Avanti to provide an experience akin to a native application on either a mobile device or a desktop browser. SYSPRO Avanti improves performance because only data is transmitted to the browser, which takes less time and bandwidth than constantly sending fully constructed HTML pages.
-
SYSPRO Avanti is a responsive web application
The design of the user interface is fluid, meaning the web page content automatically fits into the available screen size, whether you are using a desktop browser or a smart phone. In short, SYSPRO Avanti ensures that it is effective and easy to use on any device.
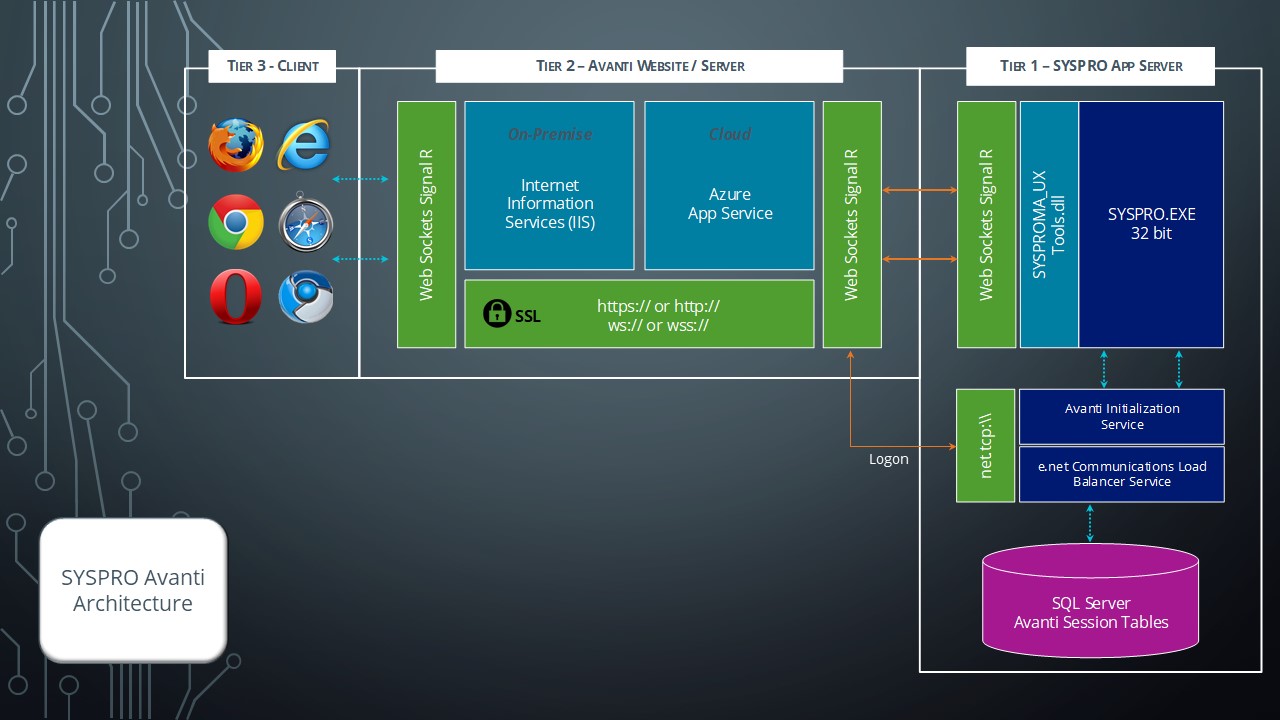
The following provides a high-level technical overview of the SYSPRO Avanti architecture. It details the different deployment tiers as well as the technologies used by SYSPRO Avanti along with the key benefits.
The technologies discussed are both from an on-premise and cloud deployment perspective.
The following process describes how SYSPRO Avanti authenticates and how information is passed from one tier of the architecture to the other:
- A user accesses SYSPRO Avanti through a web browser using an address specifically setup by the SYSPRO administrator for the installation of SYSPRO.
- Once the address of the SYSPRO Avanti website is entered into the browser, a login screen is displayed, allowing the user to capture their user name, password and company details.
-
When the user selects the Sign in button a request is sent to the SYSPRO Avanti website, which in turn sends a request to the SYSPRO 8 Avanti Initialization Service for the credentials to be validated.
The SYSPRO 8 Avanti Initialization Service does not have any authentication built into it as it relies on the standard authentication model of core SYSPRO.
- Once authenticated there are no further workloads for the SYSPRO 8 Avanti Initialization Service until another user logs on. From there on in the SYSPRO executable responds to any requests made by the web browser.
- All requests and responses made from web browser are routed to the SYSPRO Avanti website then relayed to the SYSPRO App server, then back to the SYSPRO Avanti website and finally back to the browser.
Tier 3 - Client (The Browser)
The client tier is the initial touch point for any users wanting to make use of SYSPRO Avanti.
-
Using a web browser that supports HTML 5, a user can browse to the website where SYSPRO Avanti has been installed.
-
All user interface elements in SYSPRO Avanti have been built using modern web based technologies such as HTML 5, JavaScript and CSS3.
-
SYSPRO Avanti has been developed from the ground up to adhere to responsive web designs, which enables it to run on any device and any platform, regardless of form or size factor. As the size of the device or web browser increases or decreases, SYSPRO Avanti automatically adjusts itself to best suit its environment.
-
SYSPRO Avanti has also followed the SPA (Single Page Application) design philosophy. This allows data to be dynamically bound to a page instead of the page being regenerated all the time, thus saving time, bandwidth and increasing the overall performance. This modern design also avoids disruption in the users experience within the application.
-
SYSPRO Avanti is delivered via a web browser and requires no prerequisites or software to be installed on the user’s machine, making SYSPRO Avanti have a zero footprint on the client.
Tier 2 - Avanti Website / Server
Tier 2 handles the requests and responses from the SYSPRO Avanti web browser to the SYSPRO Application Server.
-
This tier can be installed on a traditional Windows Server running Internet Information Services (IIS), or it can be installed to an Azure App Service. It is purposefully designed to run in the cloud, but can run on premise just as effectively.
-
When running SYSPRO Avanti on-premise, it has been optimized to have an auto update setting. This allows any new SYSPRO Avanti features released to be updated on the SYSPRO Avanti website automatically, without the need of the administrator.
-
When running SYSPRO Avanti in the cloud and making use of the Azure App Service infrastructure, we also make use of a technology call ARM (Azure Resource Manager) templates that allows the SYSPRO Avanti website to be updated automatically.
-
The SYSPRO Avanti website can be secured by the administrator using SSL. The data in transit from the website to the web browser and vice versa is compressed by the SYSPRO Avanti infrastructure and provides compression levels of up to 95%, thus adding to the overall performance.
-
A web technology called WebSockets in conjunction with Signal R allows for robust communication between the SYSPRO Avanti website and the web browser.
With this technology, SYSPRO Avanti can reconnect to the SYSPRO App Server and web browsers when there is a drop-in network connectivity, once again adding to the reliability of SYSPRO Avanti.
Along with this, there are several out of the box benefits that customers inherit with running in the cloud:
-
Cost
It is much cheaper to run in an Azure App Service as they make use of server less compute, so you only pay for the compute.
-
Scaling
You can scale the infrastructure up or down depending or your requirements. There is also an auto scale feature that will detect the workloads on the website and will automatically scale the infrastructure accordingly.
-
Phishing/DSA
The Azure App Service infrastructure has intelligent machine learning algorithms that can detect Phishing attacks as well as Denial of Service attacks and can notify administrators before any major harm is done.
Tier 1 - SYSPRO App Server
The sole responsibility of the SYSPRO 8 Avanti Initialization Service is to perform a handshake between the SYSPRO executable and the website for each user that has logged on.
A few new tables are included in the SYSPRO SQL Server company wide database which are used to maintain state for the users using SYSPRO Avanti.

This is the area in which the SYSPRO teams develop the product with enhancements and hotfixes required for the current SYSPRO version.
The following are produced in this area and pushed through to the SYSPRO Azure environment:
- Product install files (MSI)
- Hotfixes (MSP)
- Metadata definition files (XML)
The SYSPRO Azure environment comprises:
- SYSPRO Deployment Database
- SYSPRO Software
This SYSPRO Azure database contains information about all SYSPRO products and hotfixes available.
The MSI, MSP and XML files developed by SYSPRO are available here for download through the SYSPRO Deployment Service to the SYSPRO Installer Application.
The Client environment comprises:
-
The SYSPRO Deployment Service enables communication (i.e. retrieving and downloading information and files) from the SYSPRO Azure environment to the client’s local environment.
This service is installed once per network and must be installed on a discoverable machine that is on 24/7 and which has constant Internet connectivity.
-
The Local Deployment Database is created when the SYSPRO Installer Application is first run and contains a list of all software and files available in the SYSPRO Azure environment.
-
The SYSPRO Installer Application is used for installing all required deployment groups with the relevant products.
Starting
The following technology prerequisites are applicable to using SYSPRO Avanti:
-
SYSPRO 8 Avanti Initialization Service
Service prerequisites:
This service must be installed on the same application server as the SYSPRO 8 Server.
-
Microsoft .NET Framework 4.6
-
SYSPRO 8 Service Upgrade Manager
-
SYSPRO 8 e.net Communications Load Balancer
A valid endpoint must be configured in the Setup Options program of SYSPRO 8.
-
-
SYSPRO Avanti
Web application prerequisites:
We recommend that you use Windows Server 2019 (or higher) when running SYSPRO Avanti.
-
Microsoft .NET Framework 4.6
-
SYSPRO 8 Server
-
SYSPRO 8 Service Upgrade Manager
-
SYSPRO 8 e.net Communications Load Balancer
A valid endpoint must be configured in the Setup Options program of SYSPRO 8.
-
SYSPRO 8 Avanti Initialization Service connection
-
Internet Information Services (IIS) 7.0 Core Web Engine Feature
-
Internet Information Services (IIS) 7.0 World Wide Web Publishing Feature
-
Internet Information Services (IIS) WebSocket Protocol Feature
-
The following prerequisites are required to run the SYSPRO Installer application:
-
Valid InfoZone login credentials on www.syspro.com.
-
Admin privileges on the computer(s) that will be used.
-
The deployment service is installed once per network and must be installed on a discoverable machine that is on 24/7 and which has constant Internet connectivity.
Please take note of the following important warnings when using the SYSPRO Installer Application:
-
At any stage during the installation, you may be required to reboot your system to complete the installation.
If there are pending reboots, a Toast Message informing you of this is displayed upon starting the app.
-
You cannot run the SYSPRO Installer Application on a machine for which Federal Information Processing Standard (FIPS) has been enabled.
Solving
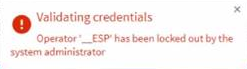
This message is displayed in SYSPRO Avanti when you attempt to use the Change password function, if the _ESP operator has been locked out by the system administrator.
For the Change password feature to function correctly, the system administrator must disable the Operator locked out option against the _ESP operator in the Operator Maintenance program.
No special license is required to use SYSPRO Avanti.
Loading SYSPRO Avanti is equivalent to loading the SYSPRO Windows Client version (i.e. it uses the same user credentials and the same concurrency licensing model). This means that (provided you are allowed concurrent use), you can use SYSPRO Avanti and the SYSPRO Windows Client version at the same time.
Security and other options defined for the user apply equally, regardless of whether you load SYSPRO Avanti or the SYSPRO Windows Client version. Similarly, the security principles and options apply in SYSPRO Avanti for the company you select.
SYSPRO Avanti uses the same security and permissions that are configured in the SYSPRO Windows Client version. This means that all user permissions and security settings must be enabled/disabled within SYSPRO.
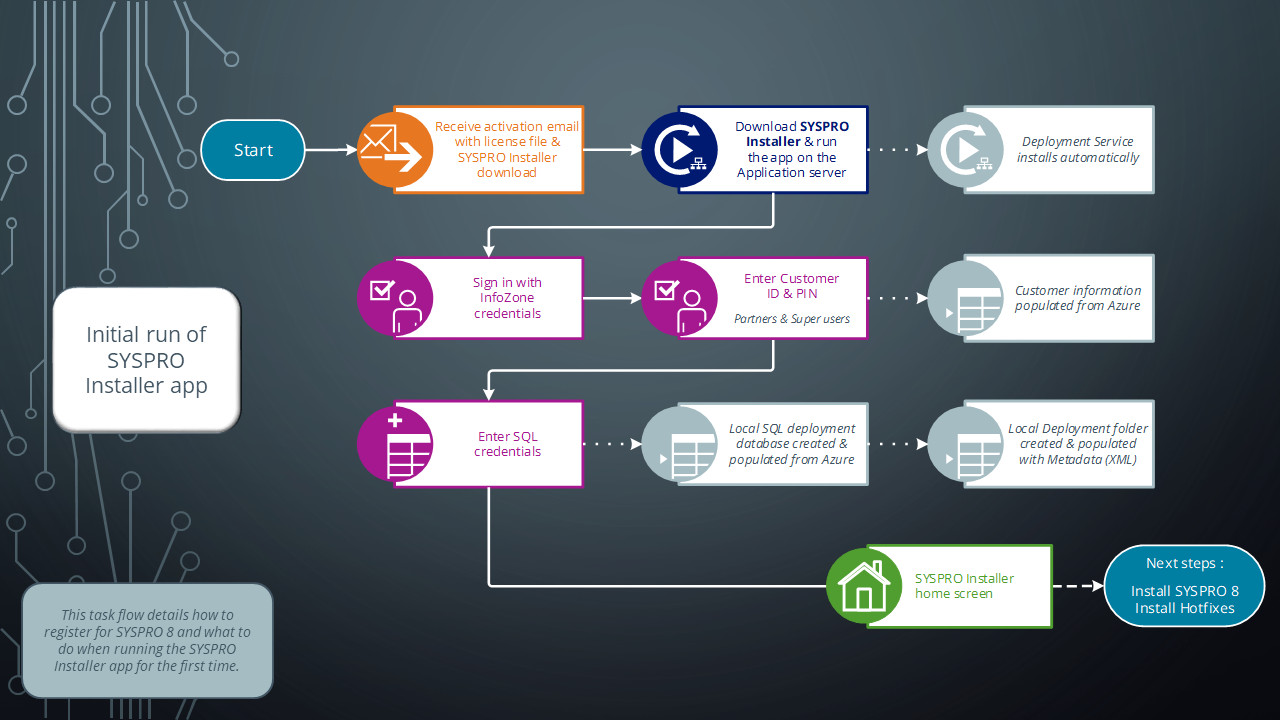
The SYSPRO Installer Application lets you install SYSPRO 8 and its required software components, as well as deploy hotfixes.
After you have applied for SYSPRO 8 you will receive a notification email confirming your registration.
After your registration has been approved and the applicable license generated, you will receive an email with your new SYSPRO 8 license XML file and a link to the SYSPRO Installer Application download.
A 6-digit pin is included in your license file and in the email, which will be used when logging into your customer code within the Installer application.
A deployment group comprises a complete SYSPRO environment: from the application server, through all the necessary services, to any client machines that connect to the various servers in order to run a specific version of SYSPRO, together with any relevant hotfixes.
Deployment groups examples include:
-
Live environment:
Where SYSPRO is used for every facet of running a business.
-
Test environment:
Where new software is configured and evaluated in order to find the best way of applying it in the live environment.
-
Disaster Recovery environment:
Where the software is configured exactly as it is in the live environment, with backups from the live server restored on a daily basis. This ensures the minimum downtime should the live environment encounter a hardware failure.
You can only have one deployment group per machine.
A hotfix is the minimum software required to provide a solution for a specific problem experienced by one or more customers. These can also include any relevant dependencies.
SYSPRO provides hotfixes as a way of deploying software updates during the release of SYSPRO 8.
Types of hotfixes available include:
-
Mandatory Hotfix
-
Optional/Customer-specific Hotfix
-
Consolidated Hotfix
-
Diagnostic Hotfix
-
Restricted Hotfix
-
Withdrawn Hotfix
Please refer to the SYSPRO Hotfixes reference guide for a detailed explanation.
When you request a SYSPRO 8 license, you will receive an email containing the XML license file attachment.
Both of these codes are contained in the license file.
SYSPRO ERP needs access to the SYSPRO Deployment Service and the SYSPRO Deployment Service needs access to the internet 24/7 and Microsoft SQL Server.
You don't have to install the deployment service on the SYSPRO application server, but it must be on a machine that is visible to all the SYSPRO machines involved.
Ideally, the machine should have permanent internet access to communicate with Azure.
SYSPRO Installer Application version 1.0.0.44 onwards:
You can speed up the installation process by first downloading the installation files to a folder that the SYSPRO Installer Application can use.
Use the Product File Downloads function within the app.
View the Product File Downloads task within the Using section of this guide for more information.
SYSPRO Installer Application version 1.0.0.44 and prior:
You can speed up the installation process by copying previously downloaded installation files to a folder that the SYSPRO Installer Application can use.
Copy the latest files C:\SYSPRO Deployment\SYSPRO Release\* from a computer which has already downloaded the installs, to the target computer folder with the same name.
Each installation file has a corresponding XML file which provides a security checksum that is validated against the install.
If the checksum doesn’t match, the install will not continue until it has been resolved.
In addition, every installation has been digitally signed by SYSPRO from EXEs to MSIs. Therefore, the digital signature is broken as soon as a file is edited and re-saved in any way.
SYSPRO Software is published to the Azure Content Delivery Network (CDN). Downloading software is optimized to obtain software based on point-of-presence (POP). The benefits of this include:
-
Software is always current
-
Local downloads result in faster speed and higher performance
-
Large file support
-
Available 24/7 (If one region should fail for any reason, the software is then sourced from another POP.)
-
No more DVD installs
SYSPRO 8 must be installed on a 64-bit server becuase all the SYSPRO services are now 64-bit.
If the SYSPRO Installer Application detects that the machine on which it is setup is renamed, it will attempt to self-heal with an automatic reconfiguration process, in order to update the deployment details.
You can only have one deployment group per machine.
Therefore, if the SELECT button against the deployment group is grayed out, it means that this machine already has a deployment group configured against it and existing SYSPRO software installed.
-
If you are running the SYSPRO Installer Application for the first time:
From the Endpoint Address screen, disable the Install service using defaults option.
This enables you to enter the installation parameters and domain credentials required to run the service.
For more information about this process, view the Initial run of SYSPRO Installer section of the Help. -
If you are not running the SYSPRO Installer Application for the first time:
From the Sign In Page, select the config icon (
 ) located in the top right-hand corner.
This enables you to configure the service to use a named user.
For more information about this process, view the Update Deployment Service Credentials section of the Help.
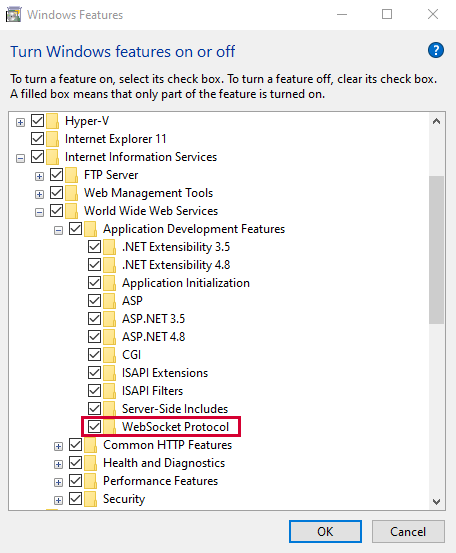
The Internet Information Services (IIS) WebSocket Protocol feature is required when installing one of the following:
-
SYSPRO Avanti
-
SYSPRO Point of Sale
Therefore, before installing either of these products, you can enable the Internet Information Services (IIS) WebSocket Protocol feature as follows:
-
Open the Turn Windows Features on or off program.
-
Navigate as follows:
Internet Information Services > World Wide Web Services > Application Development Features
-
Enable the WebSocket Protocol option.

-
Save your changes.
The following SQL Server users must exist with the appropriate permissions enabled:
| User type | Rules |
|---|---|
|
Administration SQL user |
The user entered here must have the following SQL permissions assigned:
|
|
|
|
The user cannot be the same account as the Standard SQL user and the User name cannot contain any spaces. |
|
|
Standard SQL user |
The user entered here must have the following SQL permissions enabled for both system-wide and company databases:
The user cannot be the same account as the Administrative SQL user and the User name cannot contain any spaces. |
Yes, you can.
The only difference is during your SQL Configuration when running the SYSPRO Installer app for the first time.
At the SQL Server Name field, ensure that you enter the full instance name (e.g. INSTANCENAME\SQLEXPRESS).
You can check this entry if you run SQL Server Management Studio and view the instance to which you are logging in.
Use the SQL Server Credentials function within the app.
For more information on this, view the help section Updating SQL Server Credentials, located under Configuring the app.
When the SYSPRO Deployment Service is installed, ports 30250 (Endpoint port) and 3702 (Endpoint discovery) are enabled on the Windows firewall.
If you have additional firewall software, you need to open these ports within the software to enable the SYSPRO Installer app to function.
For sites with proxy servers, the following URLs must be open for the SYSPRO Deployment Service to retrieve software and communicate with the SYSPRO Azure service:
-
SYSPRO 8 downloads (from Microsoft Azure CDN):
https://syspro8install.azureedge.net/*
-
Azure service calls:
https://sysprodeploymentazlive.azurewebsites.net/*
-
InfoZone:
https://izauthservicedev.syspro.com/*
The SYSPRO Deployment Service provides support to be discoverable at runtime. Therefore, for WCF Discovery to work correctly, all NICs (Network Interface Controller) should only have one IP address.
Ports that must be open:
-
UDP discovery: Port 3702
-
Default listening endpoint: Port 30250
This is the port to which the service responds.
You can always manually enter the endpoint if discovery is not enabled.
Each application utilizes a portion of reserved memory called “desktop heap”. As a resource it is finite and so can be exhausted, at which point the following may occur:
-
Programs may show erratic behavior and no longer function as expected.
-
Processes end for no apparent, obvious or consistent reason (i.e. the error message is not always the same when one is received).
-
error messages may appear when you attempt to start new programs or try to use programs that are already running.
Unfortunately there are no longer tools available to monitor this. The last version of Windows that was capable of monitoring desktop heap usage was Windows XP/Server 2003, after which Microsoft deprecated the kernel system driver that could be used to analyse and monitor this (in conjunction with a tool called “dheapmon”).
This memory does not relate or change with the addition or removal of physical memory, and so should not be confused with this in any way.
-
64-bit Windows has a default interactive desktop heap size of 20MB.
-
Lower values increase performance at the risk of crashing any process which can run out of resources.
-
Microsoft do not recommend that you set a value that is over 20480 for the interactive desktop heap.
-
Because the non-interactive desktop heap is mapped into the address space of each and every process', this value should not be set to an arbitrarily high value, but should only be increased sufficiently to allow all the desired applications to run.
-
Many server applications will spawn multiple processes for each user request. SYSPRO is one such application where each client session has one or more processes running on the server for that client.
-
Every increment of 512 K will support approximately 2,500 windows, menus, pens, icons, etc.
-
Windows has a system wide memory limit of 48Mb for all the above desktop heaps. If this limit is exceeded there might not be enough memory to create an error message dialog box. As a result, the requested operation fails without any indication.
-
It is best to ensure that the number being specified is divisible by 64.
-
Once the value is changed the operating system will need to be restarted in order for the changes to take effect.
The size of each desktop heap allocation is controlled by the following registry value:
HKEY_LOCAL_MACHINE\System\CurrentControlSet\Control\Session Manager\SubSystems\Windows
The default data for this registry value will look something like the following (all on one line):
%SystemRoot%\system32\csrss.exe ObjectDirectory=\Windows SharedSection=1024,20480,768 Windows=On SubSystemType=Windows ServerDll=basesrv,1 ServerDll=winsrv:UserServerDllInitialization,3 ServerDll=sxssrv,4 ProfileControl=Off MaxRequestThreads=16
In a SYSPRO client/server environment the SYSPRO services on the server are allocated resources in the desktop heap of the server. More specifically, the SYSPRO services are associated with the non-interactive desktop heap of the server.
When each user calls up SYSPRO using either the client, or by running SYSPRO Avanti, then an instance of SYSPRO.exe is executed on the server for this user.
Each process loaded in this way consumes some of the non-interactive desktop heap. As tasks are performed in SYSPRO by each user, then more of this allocation may be consumed. When a user is finished and closes SYSPRO the respective process on the server is ended and so the heap memory used is released.
If the non-interactive desktop heap becomes exhausted and were to run out of resources, this would prevent additional SYSPRO clients from connecting, and existing SYSPRO client/server connections may not be affected.
When this happens restarting of the respective services (e.g. SYSPRO Communications Service) will not resolve the issue because all of the existing processes associated with it (such as the users that are already logged in) are still running and consuming memory, therefore these processes would also need to be terminated.
We recommend that, in order for SYSPRO to run as expected, the non-interactive desktop heap on the SYSPRO application server be configured to 20480.
Ensure that you have adequate system backups in place before changing this value, as an incorrectly set value could cause system instability.
The numeric values following SharedSection= control how desktop heap is allocated. These SharedSection values are specified in kilobytes:
-
The first value (1024) defines the system heap size.
-
The second value (20480) controls the size of the interactive desktop heap (used for Windows objects).
-
If a third value is present (e.g. “1024,20480,768”) then this covers the non-interactive desktop heap.
If the third value is not present then non-interactive desktops will default to the same value as interactive desktops.
With each succeeding version of Windows, the interactive desktop heap allocations have increased significantly, whereas the non-interactive portion has not.
Using
Ensure to run the SYSPRO Installer Application on the SYSPRO application server.
When you launch the SYSPRO Installer, it checks your registry to detect if there is a saved endpoint address for the SYSPRO Deployment Service:
- If the application finds an address entry in your registry, it uses this to find the SYSPRO Deployment Service at that address.
-
If a registry entry is not found, the application performs discovery for the SYSPRO Deployment Service.
If the service is found, the application writes this address to your registry and continues.
This discovery phase is not performed when using the support version of the application (SYSPRO Installer Support). Instead, you are taken directly to the Endpoint Address screen. - If the SYSPRO Deployment Service is not discovered:
The app checks whether the service has been installed on your machine.
If the service is installed, and discovery failed, it could be that the service is not running.
If the deployment service is not installed, a link is provided to allow you to download the service.
The deployment service setup installation file is automatically downloaded from Azure and installed on your machine.
- Once the deployment service is installed, the application verifies the connecting endpoint.
- Once the deployment service is discovered, it is silently installed in the background by default.
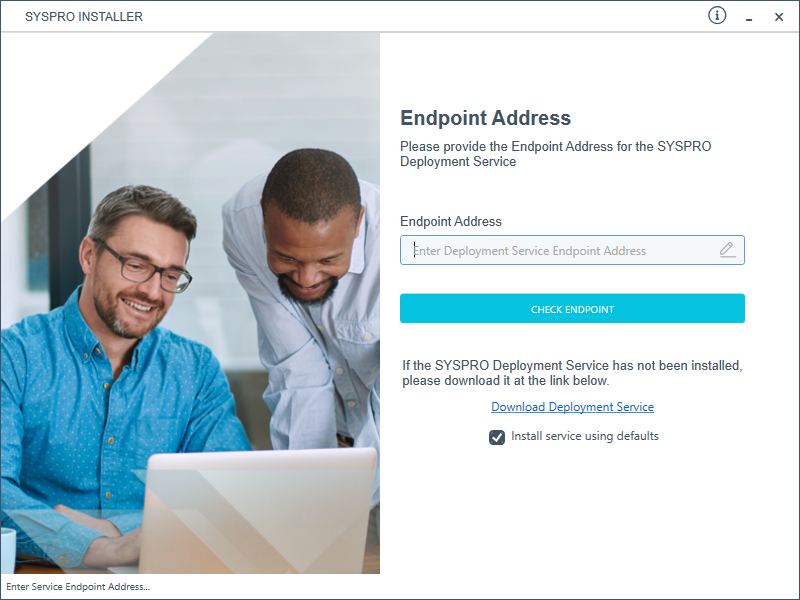
The Endpoint Address screen is only displayed if the SYSPRO Deployment Service has never been installed on your machine.
If no download link is displayed, then the service is installed, but may not be currently running.
Select the Insert default Endpoint icon inside the Endpoint Address text block to populate the block with the current machine DNS name and default Deployment Service SOAP Port.
You can use the Check Endpoint option to start discovery for the service again, if required, however this only works if the Endpoint Address text block is already populated. This is useful if your deployment service has been restarted.
When using the support version of the application, you will need to enter the endpoint address manually during start up. To locate this endpoint address, open the relevant configuration file and view the baseAddress entry:
C:\Program Files\SYSPRO\SYSPRO Deployment Support Service\SYSPRODeployServiceHost.exe
Install service using defaults option
The Install service using defaults option enables you to decide how to install the service.
This option is enabled by default and (if left enabled) results in the Deployment service being downloaded and installed silently to a default location on your C: drive.
If you disable this option, the Deployment service will download and you can select how and where you want to install the service.
When the option is disabled, the following screen will allow you to enter the installation parameters and domain credentials required to run the service:
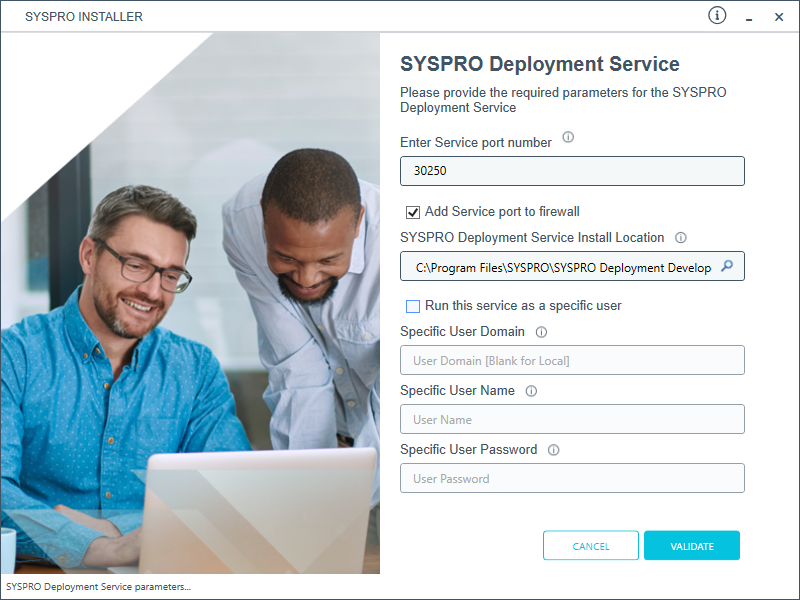
You would typically disable this option in one of the following situations:
- You want to run the SYSPRO Deployment Service as a specific user.
- You want to change the installation options for the SYSPRO Deployment Service.
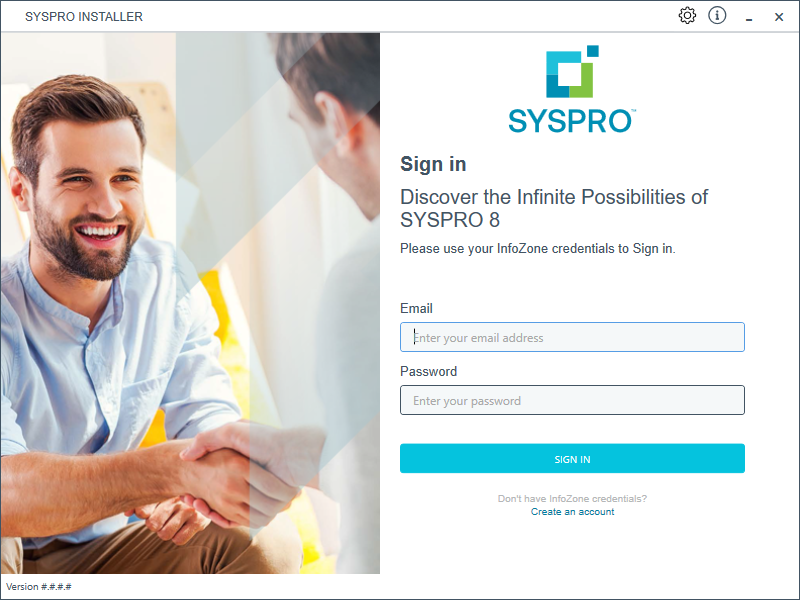
Once a connection is made to the SYSPRO Deployment Service, you need to login using your InfoZone credentials.
A valid InfoZone account is required to continue.
Enable the Save Customer Details checkbox option if you want the app to save your Customer Code and Customer PIN when logging in.
If you are not listed as a customer on the InfoZone (i.e. you are a Partner or Super-user) an additional screen is displayed for you to enter the relevant customer code for the customer you want to install.
Partners and Super-users
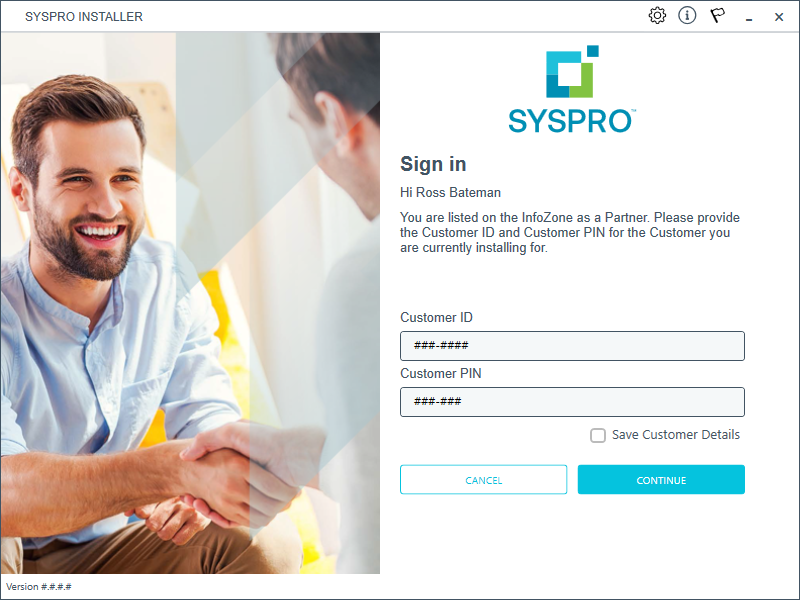
Ensure that you enter the Customer ID for the customer being installed.
The Customer ID defaults to the customer code defined within your InfoZone profile, therefore you must ensure that it matches the SYSPRO account that you are installing.
The Customer PIN is the 6-digit code included in the email you received that contained your SYSPRO 8 license.
You can verify your customer ID and PIN against the CustomerId and CustomerPin elements of the license XML file.
The SYSPRO Installer application requires access to a SQL Server Instance on your network.
The application uses this SQL instance from now onwards to download and record your installation preferences and configuration; including information about your deployment groups, software component versions and installed hotfixes.
Capturing requirements
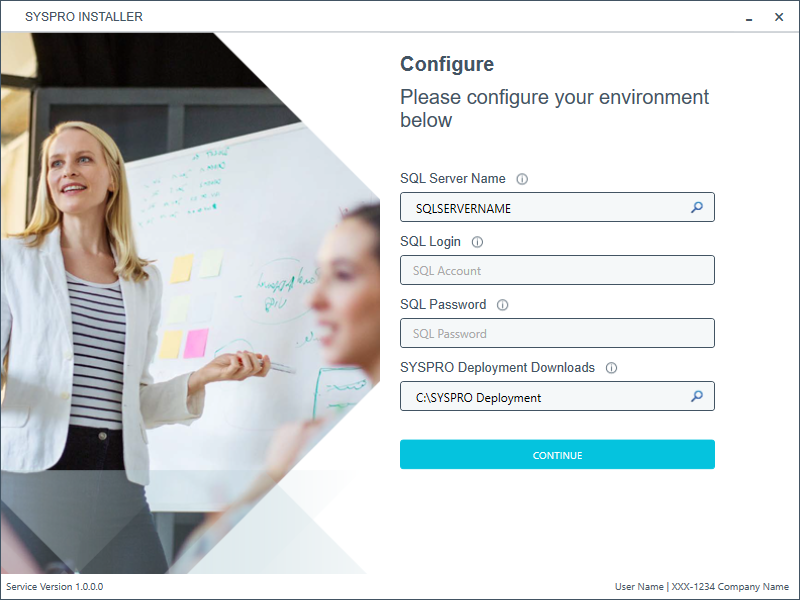
You are required to set up your SQL authentication and the name of the SQL Server which will store the SYSPRO Deployment database.
| Field | Description |
|---|---|
|
SQL Server Name |
This entry defaults to the DNS name of the current machine.
If you are using SQL Express, ensure that you enter the correct and full instance name (e.g. INSTANCENAME\SQLEXPRESS).
You can check this entry if you run SQL Server Management Studio and view the instance to which you are logging in. |
|
SQL Login |
Enter your SQL Server login credentials. |
|
SQL Password |
Enter your SQL Server password credentials. |
|
SYSPRO Deployment Downloads |
This folder is the physical location to which all software components and hotfixes are downloaded, and subsequently run from during each installation process. All downloads, being either the Parameter XML files or the actual install files are downloaded here and stored in the Release subfolder. The entry defaults to C:\SYSPRO Deployment, but can be changed if required. However, once the folder name is set during this stage of the app, please ensure that no changes are made to the folder name, location, contents or structure. Any subsequent change to the folder will result in checksum errors and the app not being able to download any files. A share is created for this folder that must be available to the network.
|
Background processes
At this point, the application checks Azure to determine which products are available. It then proceeds to configure an on-premise database and downloads the relevant XML definition files and runtime components (for later use during the install).
As part of your preparation for installing SYSPRO 8, please ensure the following:
| Step | Description |
|---|---|
|
1. |
Ensure that you have access to a SQL Server Administrative user name and password (e.g. 'sa'). This user must have the following administrative permissions enabled:
|
|
2. |
Ensure that you have access to administrative privileges for all servers to which you will be installing SYSPRO 8 and its components. |
|
3. |
Confirm you have a valid SYSPRO license: Ensure that you have valid licenses for the software you will be installing. In particular, ensure that your new SYSPRO 8 license is valid for the modules you will be using. |
|
4. |
Verify third party products to ensure that the product or application is available and compatible with SYSPRO 8. In addition, ensure that you have the appropriate installation and licensing information required (particularly relating to SYSPRO 8). |
As part of your preparation for upgrading to SYSPRO 8, please ensure the following:
| Step | Description |
|---|---|
|
1. |
Confirm your SYSPRO companies have been migrated to SQL: If you are upgrading from SYSPRO 7 Update 1 and your company data has been migrated to SQL, then you can migrate directly to SYSPRO 8. If you are on any prior releases you have to upgrade version-by-version until you reach SYSPRO 7 Update 1. All company data needs to be in SQL before you can upgrade to SYSPRO 8.
|
|
2. |
Ensure that you have access to a SYSPRO Administrator user name and password (e.g. ADMIN). |
|
3. |
Ensure that you have access to a SQL Server Administrative user name and password (e.g. 'sa'). This user must have the following administrative permissions enabled:
|
|
4. |
Confirm you have a valid SYSPRO license: Ensure that you have valid licenses for the software you will be installing. In particular, ensure that your new SYSPRO 8 license is valid for the modules you will be using. |
|
5. |
Run financial checks on your existing SYSPRO 7 Update 1 system:
|
|
6. |
Log out all users (i.e. SYSPRO operators and e.net users). |
|
7. |
Stop all SYSPRO services. This step is only required if you are upgrading to SYSPRO 8 and not running parallel to SYSPRO 7 Update 1.
|
|
8. |
Check port numbers assigned to services: As part of the installation process for existing sites, a number of services will need to be reinstalled. During the installation you have the option to either assign new ports or use the existing SYSPRO 7 Update 1 ports. Reasons why you would select to use the SYSPRO 7 Update 1 ports include:
When these services are reinstalled, you will need to review any connection issues as the new default port numbers might have changed (e.g. either reinstate the original port number or update the configuration of any calling applications to reflect the new port number). |
|
9. |
Verify third party products to ensure that the product or application is available and compatible with SYSPRO 8. In addition, ensure that you have the appropriate installation and licensing information required (particularly relating to SYSPRO 8). |
|
10. |
Disable SYSPRO users from logging into each company, until after installation and migration is complete. |
The vast majority of Customization and Power Tailoring will work unchanged after migrating to SYSPRO 8. However, as the scope for customization is vast and could have been developed in a 'non-version independent' way, we recommend that your customizations are tested post migration to SYSPRO 8.
The use of VBScripts to customize the user interface will work, as long as the appropriate parameters and variables were used.
Calling business objects using the standard CallBo function will also work unchanged.
Many of the VBScript and e.net customization, and other Power Tailoring Customization, will work unchanged in the SYSPRO Avanti interface.
However, if the customizations incorporated components specifically developed for the .NET framework (such as a .NET user control) this will not automatically work in the SYSPRO Avanti interface as it makes use of HTML5 and JavaScript - languages specific to a web UI instead of a windows client UI.
In all cases where you intend to use both interfaces, it is recommended that the customizations are tested in both user interfaces.
Once a connection is made to the SYSPRO Deployment Service, you need to login using your InfoZone credentials.
A valid InfoZone account is required to continue.
Enable the Save Customer Details checkbox option if you want the app to save your Customer Code and Customer PIN when logging in.
If you are not listed as a customer on the InfoZone (i.e. you are a Partner or Super-user) an additional screen is displayed for you to enter the relevant customer code for the customer you want to install.
Partners and Super-users
Ensure that you enter the Customer ID for the customer being installed.
The Customer ID defaults to the customer code defined within your InfoZone profile, therefore you must ensure that it matches the SYSPRO account that you are installing.
The Customer PIN is the 6-digit code included in the email you received that contained your SYSPRO 8 license.
You can verify your customer ID and PIN against the CustomerId and CustomerPin elements of the license XML file.

From the SYSPRO Installer Application home screen, select the SYSPRO ERP Software option.
You can navigate back to this home page from any point in the app by selecting the home icon (![]() ) from the toolbar at the top of each screen.
) from the toolbar at the top of each screen.
When working with the SYSPRO Installer application you will perform all installations against one of your deployment groups. A deployment group is a name that describes an installation instance of SYSPRO.
You can only have one deployment group per machine.
Deployment Groups home screen

The Deployment Groups screen contains two default groups which are configured for a new install. You can, however, select to create a new group (Add New Deployment Group button) or edit one of the existing ones (Edit button).
You can also refresh the Deployment Groups screen by pressing F5 inside the application.
| Field | Description and considerations |
|---|---|
|
Deployment Group Name |
Enter a unique name for the group. |
|
Deployment Group Description |
Enter a description of the group. |
|
Group Type |
|
|
Attach SYSPRO License |
This feature is still in development and will be released shortly.
|
| Install all Hotfixes by default |
Enable this option to ensure that all available hotfixes are installed when installing SYSPRO 8 for the first time, or when upgrading to a new release. This option is enabled by default. If you disable this option, Mandatory Hotfixes are still installed when installing SYSPRO 8 for the first time, or when updating to a new release. |
| Field | Description and considerations |
|---|---|
|
Deployment Group Name |
Enter a unique name for the group. |
|
Deployment Group Description |
Enter a description of the group. |
|
Group Type |
|
|
Attach SYSPRO License |
This function is not yet available. |
| Install all Hotfixes by default |
Enable this option to ensure that all available hotfixes are installed when installing SYSPRO 8 for the first time, or when upgrading to a new release. This option is enabled by default. If you disable this option, Mandatory Hotfixes are still installed when installing SYSPRO 8 for the first time, or when updating to a new release. |
|
Delete |
Delete the selected deployment group. The application requires at least 1 deployment group to exist. Therefore, if this is the only group existing on your system, you can't delete it. This function is only available if the deployment group has not yet been configured. |
| Details |
This displays the Deployment Group Details screen from where you can view the machines that form part of the selected deployment group, as well as which products and hotfixes are installed on each machine. You can export a text file of the products and hotfixes installed on a machine by using the Export function ( This function is only available if the deployment group has already been configured. |
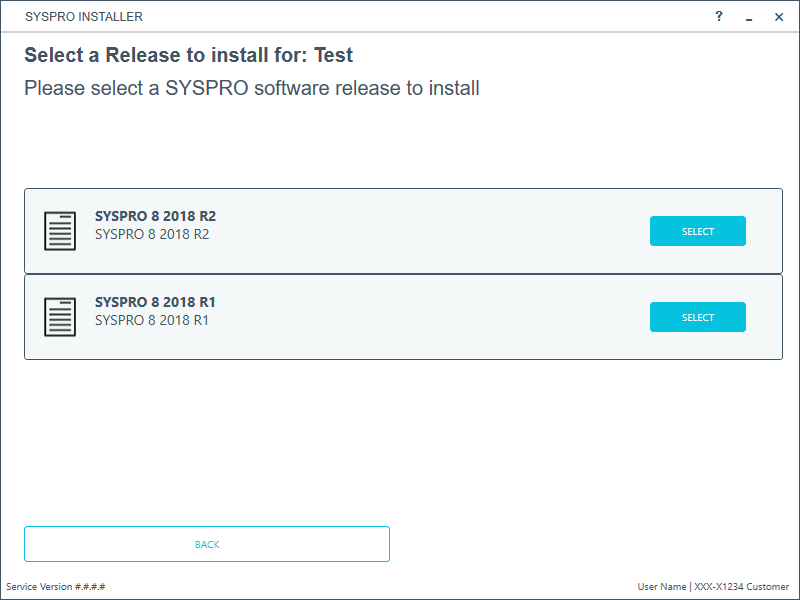
Pressing the Select option on the Deployment Groups screen allows you to select the release applicable for install for that deployment group.
We recommend that you install the most recent software release, but you may select any suitable version.
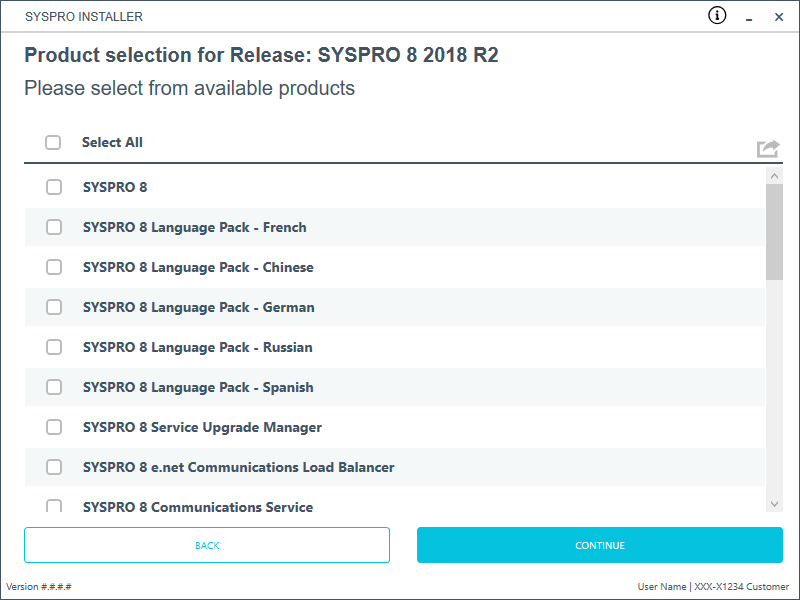
All products that are available for installation are displayed on the Product Selection screen. The choices displayed here may vary depending on the SYSPRO Release that you have selected for the current deployment group.
Products that have already been installed on your machine are displayed at the bottom of the list.
If you select a product that requires another product(s) to be installed as a prerequisite, those products are automatically added to the installation list, in the correct sequence.
For example:
The SYSPRO 8 Communications Service requires the SYSPRO 8 Service Upgrade Manager. Therefore both products are added to the list in the correct install sequence.
To install SYSPRO Avanti, select the following products:
-
SYSPRO 8 Avanti Initialization Service
-
SYSPRO Avanti
Once you have indicated all of your required products to install, select the Continue button.
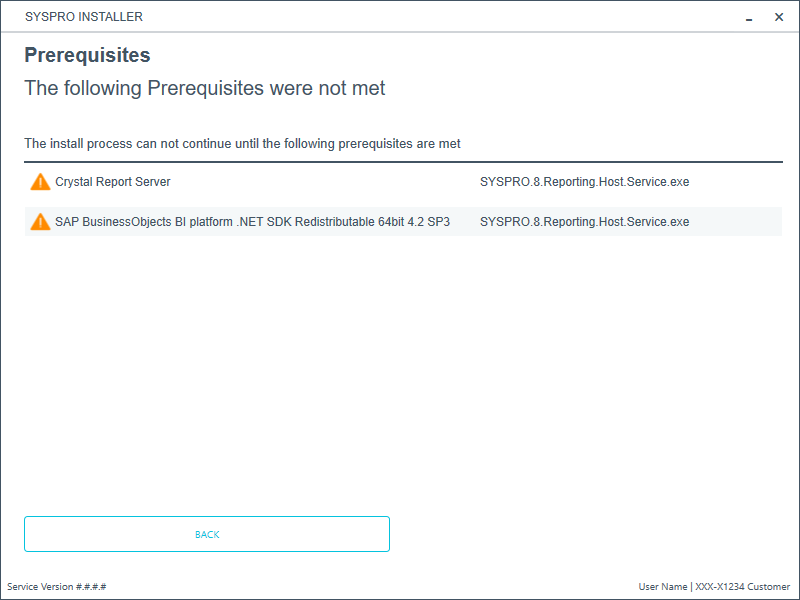
The SYSPRO Installer verifies your system against all prerequisites required for the products you select to install. Should any product fail a prerequisite check at this stage, the Prerequisites screen is displayed.
The following prerequisites are required for the SYSPRO Avanti services:
- SYSPRO 8 Server
- SYSPRO 8 Service Upgrade Manager
- SYSPRO 8 e.net Communications Load Balancer (valid endpoint configured in System Setup)
- Microsoft .NET Framework 4.6
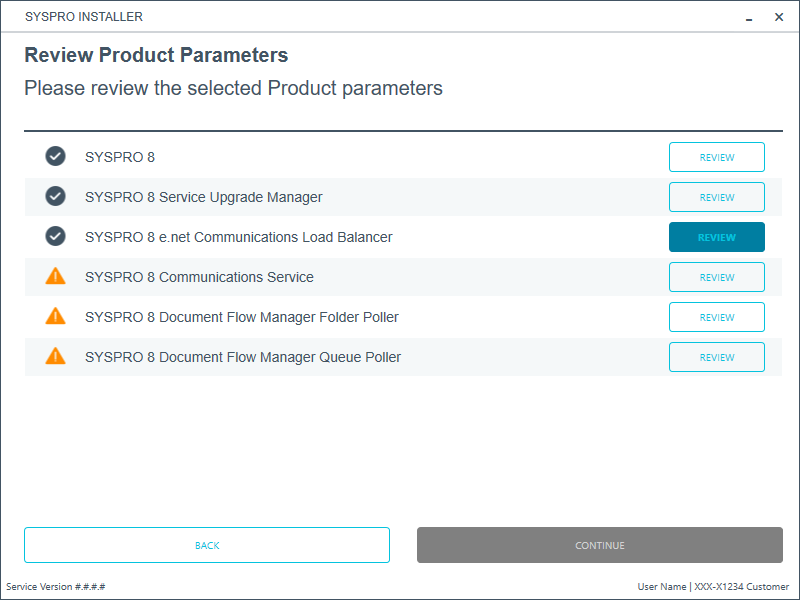
The Review Product Parameters screen allows you to review all parameters required for each product selected for install.
To view information about product specific parameters, please see the Referencing section: Product parameter details.
You cannot continue until all product parameters have been validated.
Click the Review button against each product that indicates a warning icon. This will display a parameters screen prompting you to verify and/or change various properties, before validating the entries.
Once validated, the warning icon changes to a confirmation tick, indicating that you can proceed to the next product's parameters.
The following provides details of each product's parameters and their considerations:
| Parameter | Description and considerations |
|---|---|
|
Do you want to upgrade the existing installation |
This
field is only applicable if you have SYSPRO 7 Update 1 installed.
Enabling this option upgrades your existing SYSPRO 7 Update 1 service/product. |
| Enter a SOAP port number |
Default provided: 30190 You can choose to accept the default provided, or manually change to that which you require. |
| Add port to firewall | For best practice, enable this option to ensure that the port number is added to your firewall. |
|
Destination Folder |
Default provided: C:\Program Files\SYSPRO\SYSPRO Avanti Initialization Service Accept the default provided, or change manually to match your preference. |
| Parameter | Description and considerations |
|---|---|
|
Do you want to upgrade the existing installation |
This
field is only applicable if you have SYSPRO 7 Update 1 installed.
Enabling this option upgrades your existing SYSPRO 7 Update 1 service/product. |
| Enter a SOAP port number |
Default provided: 30190 You can choose to accept the default provided, or manually change to that which you require. |
| SYSPRO Avanti Initialization Service Endpoint |
Default provided: net.tcp://localhost:30190/SYSPROInitializationService Accept the default provided, or change manually to match your preference. |
| Parameter | Description and considerations |
|---|---|
|
Do you want to upgrade the existing installation |
This
field is only applicable if you have SYSPRO 7 Update 1 installed.
Enabling this option upgrades your existing SYSPRO 7 Update 1 service/product. |
|
Destination Folder |
Default provided: C:\SYSPRO Accept the default provided, or change manually to match your preference. |
| Parameter | Description and considerations |
|---|---|
|
Do you want to upgrade the existing installation |
This
field is only applicable if you have SYSPRO 7 Update 1 installed.
Enabling this option upgrades your existing SYSPRO 7 Update 1 service/product. |
|
Enter a port number |
Default provided: 30140 Accept the default provided, or change manually to match your preference. |
|
Add port to firewall |
For best practice, enable this option to ensure that the port number is added to your firewall. |
|
Destination Folder |
Default provided: C:\Program Files\SYSPRO\SYSPRO 8 Service Upgrade Manager Accept the default provided, or change manually to match your preference. |
| Parameter | Description and considerations |
|---|---|
|
Do you want to upgrade the existing installation |
This
field is only applicable if you have SYSPRO 7 Update 1 installed.
Enabling this option upgrades your existing SYSPRO 7 Update 1 service/product. |
|
SYSPRO 8 Application Server Instance |
Default provided: 0 Accept the default provided, or
change manually to match your preference.
When SYSPRO 8 is installed, an available BaseDir entry is created for SYSPRO 8. This entry can be found under:
This is used by communication services, both client-server and e.net-related services, to target the SYSPRO 8 files under the specified path in the BaseDir entry. For 32 bit applications, the BaseDir entry can be found under:
|
|
Enter a SOAP port number |
Default provided: 30140 Accept the default provided, or change manually to match your preference. |
|
Add SOAP port to firewall |
Best practice recommends that you enable this option to ensure that the port number is added to your firewall. |
|
Enter a REST port number |
Default provided: 31002 Accept the default provided, or change manually to match your preference. |
|
Add REST port to firewall |
Best practice recommends that you enable this option to ensure that the port number is added to your firewall. |
|
Specify the number of load balancing processes |
Default provided: 5 Accept the default provided, or change manually to match your preference. |
|
Basic http port required |
Enable this option to define a port for the Basic HTTP protocol. |
|
Enter a Basic port number |
Default provided: 31003 Accept the default provided, or change manually to match your preference. |
|
Ws http port required |
Enable this option to define a port for the WS HTTP protocol. |
|
Enter a Ws port number |
Default provided: 31004 Accept the default provided, or change manually to match your preference. |
|
Destination Folder |
Default provided:
Accept the default provided, or change manually to match your preference. |
Read and accept the license terms and conditions before continuing with the install.
Select the Printable Version option to view a PDF version of the EULA in your default PDF software.
A summary of all products to be installed is displayed for you to review.
If you have previously downloaded the install files and have them available on another form of media, these can now be copied into the SYSPRO Deployment Downloads folder.
Ensure that you copy your files to the correct location.
Once you are satisfied with the list, continue by selecting the Begin Install button. Once you select the Begin Install button, the silent download of install files and installation of all selected products commences.
The appropriate status information is shown during the installation process.

The Install Complete screen is displayed with a summary of all products installed.
Optional Delete Product Media Files
To delete the product media files that were downloaded for your install, proceed as follows:
-
Enable the Delete downloaded product install media option and select Continue.
A confirmation screen is then displayed which lists the product media files to be deleted.
-
Review the items for deletion on the Delete Product Install Media screen and select Continue to proceed with the deletion process.
The app returns a confirmation page once the deletion process has completed, which indicates the files that were deleted.
This doesn't apply to SYSPRO Additional Software (i.e. SYSPRO Reporting Software, Additional services and SYSPRO Point of Sale).
To view an audit trail of all deleted files including date and operator details, access the log file saved to the release or SYSPRO Additional Software folder of your local SYSPRO Deployment folder.
For example:
File name DeletedMediaFiles_20201207143907.txt
We recommend the following additional configuration within Internet Information Services (IIS) to assist with optimal performance:
General IIS Configuration
Using the Windows Features application, ensure that the following features are enabled for Internet Information Services (IIS):
- Web Management Tools (including all sub features)
- Application Development Features (including all sub features)
- Common HTTP Features (including all sub features)
- Health and Diagnostics (including all sub features)
- Performance Features (including all sub features)
- Internet Information Services Hostable Web Core
- Media Features
IIS Configuration for all SYSPRO related application pools and virtual directories
This ensures that the application is always available.
Configure the Start Mode and Idle Time-out values against the application pool:
-
Open the Internet Information Services (IIS) Manager.
-
Within the Connections pane, navigate to the Application Pools folder.
-
From the Application Pools pane, right-click SYSPROAvanti and select the Advanced Settings option.
-
Define the Start Mode and Idle Time-out options as follows:
-
Start Mode = AlwaysRunning
-
Idle Time-out (minutes) = 0
-
-
Save your changes.
This assists with quicker response times within the application at all times.
-
Open the Internet Information Services (IIS) Manager.
-
Configure the application pool's recycling conditions to occur at a specified time:
-
Within the Connections pane, navigate to the Application Pools folder.
-
From the Application Pools pane, right-click on SYSPROAvanti and select Recycling.
The Edit Application Pool Recycling Settings window is displayed.
-
Enable the Specific time(s) option to recycle the application pool outside of normal operating hours, and define the entry as per your requirements.
-
Save your changes.
-
-
Ensure the application is preloaded when recycling:
-
Within the Connections pane, navigate to the Sites folder and locate the SYSPROAvanti site.
-
Right-click the SYSPROAvanti site and select Manage Application, followed by the Advanced Settings option.
-
Define the Preload Enabled option as True.
-
Save your changes.
-
This ensures that the site content used by clients is always up to date and that browser caching issues are avoided.
To ensure that the latest components are always in use by the 'client' browser, we recommend that you set web content to expire immediately.
-
Open the Internet Information Services (IIS) Manager.
-
Within the Connections pane, navigate to the Sites folder and locate the SYSPROAvanti site.
-
Once you have selected the SYSPROAvanti site, double-click the HTTP Response Headers option from the IIS section.
-
On the HTTP Response Headers screen, select the Set Common Headers option from the Actions pane.
The Set Common HTTP Response Headers window is displayed.
-
Select the Expire Web content option and enable the Immediately radio button.
-
Save your changes.
This setting can be changed at the site level, in which case the virtual directories hosted under this site will inherit this setting.
As there may be other applications hosted on any given site, we suggest that these be changed against each virtual directory instead, so as to not impact the other applications.
IIS configuration specific to list views in SYSPRO Avanti
The following suggested configuration enables the loading of larger list views in SYSPRO Avanti.
Define the maximum content length allowed in the Request Filtering options:
-
Open the Internet Information Services (IIS) Manager.
-
Within the Connections pane, navigate to the Sites folder and locate the SYSPROAvanti site.
-
Once you have selected the SYSPROAvanti site, double-click the Request Filtering option from the IIS section.
-
On the Request Filtering screen, select the Edit Feature Settings option from the Actions pane.
The Edit Request Filtering Settings window is displayed.
-
Define the Maximum allowed content length (Bytes) option as 2147483647.
-
Save your changes.
Define the maximum request length setting against the specific site:
-
Open the Internet Information Services (IIS) Manager.
-
Within the Connections pane, navigate to the Sites folder and locate the SYSPROAvanti site.
-
Once you have selected the SYSPROAvanti site, double-click the Configuration Editor option from the Management section.
-
On the Configuration Editor screen, select system.web/httpRuntime at the Section drop-down field.
-
Define the maxRequestLength entry as 2147483647.
-
Apply your changes.
| Check | Description |
|---|---|
|
1. Services |
Start up the SYSPRO Services. |
|
2. Licensing |
|
|
3. Data conversion |
The upgrade from SYSPRO 7 Update 1 to SYSPRO 8 converts all ISAM data into SQL tables. Therefore, we recommend that you run the SQL Server Diagnostic program to ensure database integrity. |
|
4. Port numbers |
Ensure that all port numbers configured in the System Setup program are correct. |
|
5. Security |
|
|
6. Web views |
Any web views created in SYSPRO 7 Update 1 must be renamed in order for them to appear in SYSPRO 8. Prior to SYSPRO 8 2019 R1, any customized web view by operator or role surfaced in both SYSPRO and SYSPRO Avanti.
From SYSPRO 8 2019 R1 onwards you must explicitly state whether a web view is targeted for SYSPRO or SYSPRO Avanti. Because any pre-existing web view is assumed to be for SYSPRO Avanti, if you want existing SYSPRO web views to appear in later versions of SYSPRO, you must rename the .JSON file to include a _SYSPRO extension (e.g. UX_OperatorCode_ProgramLZ_SYSPRO.JSON). The .JSON file resides in your \Base\Settings folder (or the Role_xxx folder if the user interface is configured by role). You can also rename the file using the Save as function from within the Visual Designer. You will be prompted to indicate the type of web view you want to save (i.e. Avanti or SYSPRO Client). |
|
7. Custom software |
Any previously installed custom software (developed in the same technology as SYSPRO) should be re-installed or verified that it functions as expected in SYSPRO 8. |
|
8. Reports |
Ensure that all Report Writer and SYSPRO Reporting Services reports work as required. |
|
9. Confirm software |
Verify that the software works as expected. |
|
10. Financial checks |
Check all your balances against the balances printed prior to the upgrade and conversion. |
|
11. Operator login |
|
|
12. Third party applications |
|
|
13. Custom tiles |
If you had custom tiles in the SYSPRO 7 Update 1Custom program folder, you need to manually move these to the \Plugin\CustomStore folder in SYSPRO 8. Custom tiles are named CX_Tile*.SQL.
|
|
14. Analytics |
If you are an Analytics user (and your existing Analytics site databases are on SYSPRO 7 Update 1) ensure that you manually migrate and update your site databases inside the Analytics program. |
|
15. Archive Migration (Optional) |
If during the data migration you elected not to convert your archive data, you have the option of performing this at a later stage using the Archiving Migration program. |
|
16. Bin to Serial Linkage (Optional) |
If you want to make use of the new improved Bin to Serial Linkage feature (which enables you to accurately determine where serials reside in a warehouse from the perspective of bins) enable the Associate serials by bin setup option (Setup Options > Configuration > Distribution > Inventory). For more information on this feature, please refer to the Bin to Serial Linkage reference guide. |
Copyright © 2021 SYSPRO PTY Ltd.