Contact Activity Posting
Post Activity
You use this program to record events or activities performed against contacts. These activities range from phone calls and Emails to meetings and tasks.
Toolbar and menu
| Field | Description |
|---|---|
| File | |
|
Post Activity |
Save the information you entered against the activity. |
|
Edit |
|
|
Edit Activity |
Maintain information for the activity. |
|
Options |
|
|
Preferences |
Define default values for adding activities. |
|
Post |
Save the information you entered against the activity. You can use the keyboard shortcut Alt + O to post the activity. |
|
Delete |
Delete the activity currently displayed. |
Preferences
This screen is displayed when you select Preferences from the Options menu. This enables you to define default values for fields when adding new activities.
| Field | Description |
|---|---|
|
Activity information |
|
|
Defaults |
The entries you make at these options will be the default entries displayed in these fields when you add a new activity. These fields can, however, be changed at the time of adding the activity. |
|
Activity type |
Define the default activity type to use for a new activity. |
|
Location |
Enter the default location to use for new activities. |
|
Regarding |
Enter a default category for new activities recorded. |
|
Result |
Define the default result to use. Results are used to record the outcome of the activity. |
|
Follow up flag |
Assign a default color coded flag to use for new activities. Setting this to Cleared indicates that no further action is required for the activity. |
|
Priority |
Assign the default priority to use for new activities. |
|
Reminder |
Assign the default time period after which you want the system to remind you of the activity. |
|
Activity duration |
Assign the default duration of the activity. |
|
User field 1 - 3 |
Enter the default text to use for the user defined fields against new activities. |
|
Attachments |
Define the default location of files to attach to a new activity. An attachment could be any document relating to the activity, such as the minutes of a meeting. |
|
Browse on Files location |
Define where to browse for attachment files. This will typically be where they are located according to your selection on the Attachment settings section of the Contact Management Setup program. Refer to Browse on Files and Folders for details on the limits that currently apply to browsing on files and folders. Select if the attachments are usually stored on the client machine. Select if the attachments are usually stored on the server. |
|
Remember last location |
Select this if you want the system to look for new attachments in the same location used for the last attachment. |
|
Default file location |
Enter the default path for attachments. This field is disabled if you selected the option: Remember last location. |
|
Attendee Information |
|
|
Follow up options |
|
|
Follow up setting when adding non-appointments and meetings |
Indicate your preference for follow up reminders for Activity types defined as Other or Task. Reminders for Appointment and Meeting type activities are always sent to all employees. Send the follow up reminder yourself only. Send the follow up reminder to yourself and all Attendees listed against the activity who are employees. You typically select this option if you tend to define activities such as tasks which involve more than one employee. This enables you to send reminders for these activities to all employees simultaneously. This applies for Activity types defined as Other or Task only. |
|
Always add myself as an attendee when posting activity against another contact |
Automatically add yourself as an attendee to activities you add for contacts other than yourself. This is useful if you want to configure a follow-up reminder for the activity, as you will then also be sent the reminder. |
Activity Information
The fields in this pane enable you to add or maintain activities.
| Field | Description |
|---|---|
|
Contact name |
Indicates the contact for whom the activity is defined and is displayed for information purposes. |
|
Activity type |
Enter the type of activity you want to record. This field is mandatory. You can select and maintain an activity type from the list of default activity types. |
|
Start date |
Enter the date on which the activity started. This field is mandatory. |
|
Start time |
Enter the time at which the activity took place. This field is mandatory. |
|
End date |
Enter the date on which the activity ended. If you do not enter an End date, then the system assumes the end date to be the same as the Start date. |
|
End time |
Enter the time at which the activity ended. This defaults to the Start time plus the time entered at the preference: Activity duration. |
|
Subject |
Enter the subject of the activity. Up to 255 characters can be entered. |
|
Location |
Enter the location at which the activity took place. Up to 255 characters can be entered. You can define your own location if the setup option Only allow selection from predefined list for the following activity fields- Location is not selected. |
|
Regarding |
Enter a category against which the activity must be recorded. You can define your own category if the setup option: Only allow selection from predefined list for the following activity fields- Regarding is not selected. |
|
User field 1 - 3 |
These fields can be defined against each activity and may hold any specific information you may want to enter for the Activity. You can define your own user fields if the setup option: Only allow selection from predefined list for the following activity fields- User field 1 - 3 is not selected. |
| Result | Record the outcome of the activity. This can be used to
indicate what follow-up is required for the activity.
You can define your own result if the setup option: Only allow selection from predefined list for the following activity fields- Result is not selected. |
|
Priority |
Assign a priority to the activity. |
|
Follow up flag |
Assign a color coded flag to the activity. This is only relevant when you post an activity against a contact linked to a SYSPRO operator. Setting this flag to Cleared indicates that no further action is required for this activity. |
|
Follow up date |
Enter a date on which the activity must be reviewed. A follow up reminder is sent only to you or to all employees defined as attendees against the activity depending on your selection at the preference: Follow up options. This field is not enabled for appointment or meeting type activities or if you set the Follow up flag to Cleared. meeting and appointment type activities use reminders and are calendar based (appear in the calendar and can be synchronized to Outlook). If you require a follow up date for a meeting, you could add a separate task activity (for the meeting) in the future, with a follow up date and time or you can allocate a period of time by means of an appointment, again in the future (i.e. after the meeting in question) using a reminder. |
|
Follow up time |
Enter a time when the activity must be reviewed. This field is not enabled for appointment or meeting type activities or if you set the Follow up flag to Cleared. meeting and appointment type activities use reminders and are calendar based (appear in the calendar and can be synchronized to Outlook). |
|
Reminder |
Indicate the time period before the activity when you want the system to remind you of the activity. This defaults to your entry at the preference: Reminder, but can be changed. Select None if you do not want to set a reminder for this activity. The Reminder field is only enabled for appointment and meeting type activities. |
|
All day event |
Select this if the meeting or appointment activity is an all day event and to indicate it as such in the calendar. This option is only enabled for appointment and meeting type activities. |
|
Show time as |
Indicate your involvement in the activity. This option is only enabled for appointment or meeting type activities. |
|
Task due date |
Indicate the date on which a task type activity must be completed. This field is only enabled for task type activities and is disabled if you set the Follow up flag to Cleared. |
|
Task % complete |
Indicate the level of completion of a task type activity. This field is only enabled for task type activities and is disabled if you set the Follow up flag to Cleared. |
|
Task Status |
Indicate the current status of a task type activity. This field is only enabled for task type activities and is disabled if you set the Follow up flag to Cleared. |
Notes
This pane enables you to capture free format notes relevant to the activity.
Once you have posted the activity, you need to select the Edit Activity option from the Edit menu to maintain these notes.
| Field | Description |
|---|---|
|
Font |
Change the font of the currently highlighted text. |
|
Cut |
Cut the highlighted text from the note. |
|
Copy |
Copy the highlighted text to the clipboard. |
|
Paste |
Paste notes from the clipboard. |
|
Undo |
Undo your previous editing action since last saving the note. |
|
Redo |
Redo the previous action you undid. This is the same as undoing the previous undo action. |
|
Bold |
Change the highlighted text to bold. If the text is already in bold then the bold formatting is removed. |
|
Italic |
Italicize the highlighted text. If the text is already in italics, then the italics formatting is removed. |
|
Underline |
Underline the currently highlighted text. If the text is already underlined, then the underline formatting is removed. |
|
Align Left |
Align the currently highlighted line to the left margin. |
|
Align Center |
Center the currently highlighted line. |
|
Align Right |
Select this to align the currently highlighted line to the right margin. |
|
Date Stamp |
Select this to paste the current system date and the current operator code into the note. |
Attachments
This pane enables you to maintain files attached to the activity.
An attachment could be a document containing the minutes of a meeting for example.
| Field | Description |
|---|---|
|
Add Attachment |
Add a document or multimedia object as an attachment to the activity. |
|
Delete Attachment |
Remove the currently highlighted attachment from the activity. |
Attendees
You use this pane to indicate other contacts involved in the activity. You would typically use this for tasks or meetings to record the contacts who attended the meeting.
| Field | Description |
|---|---|
|
Add Attendees |
Add a contact as an attendee for the activity. Select the browse icon to select the required attendee. |
|
Remove Attendee |
Select this to remove the currently highlighted attendee from the list of attendees for the activity. |
Notes and warnings
Program access
This program can be accessed by:
- selecting the New Activity option from the Activities listview on the Contact View tab of the Contact Query program
- pressing F8 and then F7 from anywhere within SYSPRO (this only applies if your operator code is linked to a contact and you are authorized to post an activity.
- selecting the Activity option from the SYSPRO Desktop (->).
Setting preferences
-
You use the Activity change preferences setup option (Contact Management Setup) to indicate which fields you require the system to update for all attendees when one attendee changes the activity.
-
If you selected the Preference: Always add myself as an attendee when posting activity against another contact, then you are automatically added as an attendee when you add an activity for any contact.
Selecting this preference does not prevent you from manually removing yourself as an Attendee from an activity. Similarly, if you do not select this preference, then you can still manually add yourself as an attendee to an activity you add.
Attendee considerations
-
By default, when an activity has two or more attendees, each attendee can set their own follow up date and time independently of each other. However some fields, such as the follow up flag, priority, location, etc., are propagated across all attendees when they are changed.
This is governed by the setup option: When activity changed for multiple attendees, propagate the selected fields to all attendees. If, for example, you do not want a single attendee to change the Follow up flag for all attendees, then you need to deselect Follow up against this setup option. Then, when one attendee changes the follow up flag, it will not be changed for all attendees against that activity.
-
When an activity is posted the program checks the attendees and for each known attendee an activity record is created. These activity records share the body and attachments. This means that only one of the attendees needs to post the activity and the system will publish the activity against all the attendees.
When you post an activity with attendees, the system automatically creates activities for the contacts listed as attendees. These activities include any attachments added to the original activity. Any attendee with security access to maintain activities can change the activity for all other attendees.
Setting reminders
-
If you have enabled automatic reminders (To-Do List pane) then you will be prompted with a pop up reminder window when an appointment or meeting activity is due, according to the time period you have specified.
-
If you are running a second or subsequent instance of SYSPRO you will not receive pop up reminders for those non-primary instances. The non-primary instances display the message 'Contact reminders only for prime instance'.
You can view your reminders from these non-primary instances using the Contact Query program.
-
If you have not enabled automatic reminders, you can select the Contact Reminders Query program from the main menu to view details of reminders.
-
If you indicated that you want to include meetings and appointments in your calendar, then when you set a reminder, an entry is also added to your SYSPRO calendar.
Activity considerations
You can only access activities for contacts to whom you have access.
If you are allowed to maintain information for a contact (based on the contact property, class, type, category and territory) then you can maintain, query and search on the activities attached to the contact.
The exception to this is when capturing an incoming email from MS Outlook, because you can access the email received activity for all recipients, regardless of your level of access to contacts.
Operator access to the following activities within this program can be restricted. You configure this using the Operators program.
| Activity | Description |
|---|---|
|
CMS Add attendees for existing activities |
Controls whether an operator can add attendees to activities using the Contact Activity Posting program. |
|
CMS Add unknown attendees for activities |
Controls whether an operator can add unknown attendees to an activity using the Contact Activity Posting program. |
|
CMS Delete attendees for existing activities |
Controls whether an operator can remove attendees from activities using the Contact Activity Posting program. |
|
CMS Add attachments for existing activities |
Controls whether an operator can remove attendees from activities using the Contact Management to Outlook Sync program. |
|
CMS Delete attachments for existing activities |
Controls whether an operator can delete attachments from activities using the Contact Activity Posting program. |
|
CMS Change activities |
Controls whether an operator can change information against activities using the Contact Activity Posting program. |
|
CMS Delete activities |
Controls whether an operator can delete activities using the Contact Activity Posting or the Contact Query program. |
Hints and tips
Alternative methods of adding yourself as an Attendee to an activity
- Select your organization and then to select yourself from the list of contacts.
- Select the My Organization Query program from the main SYSPRO menu.
- Select the Activity option from the SYSPRO Desktop (->). Using this method of adding an Activity automatically adds you as an attendee to the activity.
Error messages
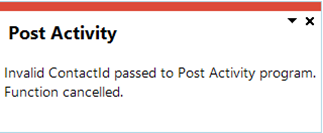
This message is displayed if you access the Contact Activity Posting program and a default contact hasn't been linked to the current operator.
To resolve this, link your operator code to a valid contact by following these steps:
-
Access the Operator Maintenance program and select the operator for which you want to create a default contact.
-
Select the Contact menu and then select Contact details.
The following warning message is displayed:

-
Select Ok.
The Contacts window is displayed.
-
Select the default contact for the operator in the listview and click on Select.
The default contact is the account that is associated with the operator, e.g. the default contact for the Admin operator could be John Doe.
Copyright © 2026 SYSPRO PTY Ltd.