Master Data Take On
This program lets you use SYSPRO's Setup business objects to capture new master data in SYSPRO or update and delete existing data.
The program processes data that you either enter manually (or copy) into the Import Details grid or import from an Excel spreadsheet.
Amendment journals are generated, according to the requirements defined against the various setup programs.
This program is typically a take on program and is not intended for daily use by operators.
Getting Started
Access control
-
Ensure that the relevant operator activities and electronic signatures have been enabled for your login credentials.
Activities
Operator access to the following activities within this program can be restricted. You configure this using the Operators program.
| Activity | Description |
|---|---|
| Allowed to import from client | Controls whether an operator can use a SYSPRO import program to import data from a client machine (in a client/server environment). |
eSignatures
Electronic Signatures provide security access, transaction logging and event triggering. This enables you to increase control over your system changes.
Access to the following eSignature transactions within this program can be restricted at Operator, Group, Role or Company level. You configure this using the eSignature Setup program.
| eSignature Transaction | Description |
|---|---|
| Import Master Data |
Controls access to the Import function of the Master Data Take On program. |
| Import Master Data Column Sequence |
Controls access to the Sequence Columns function of the Master Data Take On program. |
Navigation
-
You can run the program from the SYSPRO Ribbon bar (->->).
You can also use the Run a program function together with the Setup business object parameter (e.g. ->-> opens the program and loads the AR Customer Maintenance business object).
Restrictions and limits
Business objects
-
Because the Master Data Take On program is a generic program that takes the information supplied in the Import Details grid and passes it to the relevant business object, it is restricted by the limitations and functionality available in the relevant business object.
These objects are listed in the Program column of the Data to be Imported listview and only the business objects to which you are allowed access are enabled.
-
Currently, none of the business objects cater for Structured General Ledger. Because the Master Data Take On program makes extensive use of business objects to import data, it also does not cater for Structured General Ledger.
-
To perform the required function, you need access to the e.net setup business object as well as the function you want to perform using that business object.
-
For example: If you have access to the e.net setup business object for suppliers, but you are denied access to deleting a supplier, then an Operator denied access to activity message is displayed on validation of the data grid when you attempt to delete a supplier.
-
Columns
-
Although the listview is limited to 100 columns, a maximum of 98 columns can be selected from a table for import (the first column is used for validation checking and the last column for error description).
-
The program does not support your regional settings. It is a generic program and columns are not defined as alpha, numeric or date because the fields can change depending on the setup program.
Each column is therefore defined as an alpha field and whatever value is supplied to this program is merely passed to the business object that is called.
Duplicates
-
The program identifies key elements, so duplicate key entries are not allowed.
Importing directly from an Excel spreadsheet
-
When importing directly from an Excel spreadsheet:
-
Special characters are not supported.
To import special characters, you need to copy and paste the values from Excel into the grid.
Although this method is slower, it is currently the only way in which special characters can be imported.
-
Numeric values must be formatted as text.
-
The import data must be located in the first sheet in the Excel workbook.
-
The Excel column headings must be the same as the XML element names.
The easiest way to achieve this is to export the Excel table from the Import Details pane for the relevant data file, and then populate the spreadsheet.
-
As the Excel spreadsheet is converted to an XML file on validation, the column sequence is not an issue (i.e. the XML can be created in any order).
-
The number of elements is not limited to 99, because the grid infrastructure is not used.
-
Importing using the grid
-
The input provided in the grid of this program must be in the same format as the input you would supply to a business object.
-
All date fields must be in the format: CCYY-MM-DD, regardless of your regional settings. If the date in the import file is in any other format, then the imported date defaults to the SYSPRO company date. This is the norm for all date formats when importing data in SYSPRO.
-
All numeric fields must be in the format: ZZZZZ.99, regardless of your regional settings (i.e. using a decimal point). For example: 44,55 (using a decimal comma) is interpreted as 4455.000.
-
-
A blank line is automatically created as the first line in the grid, even when only pasting data into the grid.
The Master Data Take On program's existing behavior to set focus on the blank line was designed as a graceful transition into the grid for users who intend to manually enter data, thereby limiting the need for an additional click before they start working in the grid.
The blank line in the grid must be manually removed before the data can be imported.
Validation
-
The program performs no validation. Validation is only performed by the business object which is called. It does not, therefore, prevent you from entering too many characters for a field (e.g. if you supply a branch code, the program will allow you to supply more than 15 characters).
Custom form data
-
Duplicate key entries are not identified when importing custom form data.
-
When importing custom form data for AR product classes (i.e. using the ARPCL FormType) where you want to add an entry for a global product class, you must first enter spaces in the KeyField column (10 characters) to account for where the branch would normally be entered for a branch product class.
-
When importing custom form data for BOM structures (i.e. using the BOMMAT FormType) you need to supply the full BomStructure key (ParentPart, Version, Release, Route, SequenceNum, Component). If you have indicated that you don't require version and release, then you need to enter spaces for each of these fields (five characters) when supplying the key.
Troubleshooting and FAQs
Only one KeyField per item/key node is allowed, but the key field can consist of more than one field.
It is important to note is that all characters of the first field (including trailing zeros) have to be entered at the KeyField column before entering the next key field. Trailing zeros are not required for the last field entered.
For example:
The key consist of the stock code (30 characters) and warehouse (10 characters) fields, and you want to import stock code A100 and warehouse FG:
At the KeyField of the Import Details pane, enter stock code A100 followed by 26 spaces (to make up the 30 characters of the stock code field) before adding the value FG for the warehouse.
As trailing spaces after the last key column are ignored, you don't need to add 8 spaces after entering the warehouse value FG.
You can do this using the Master Data Take On functionality or the BOM Structure Maintenance business object.
When using Master Data Take On to import BOM structure maintenance records that use alternate units of measure, enable the Ignore Warning field.
When using the BOM Structure Maintenance business object, set the <IgnoreWarnings> parameter to Y.
The following message will be displayed if you select select the Custom option and the CUSDTO.IMP file has not yet been defined:
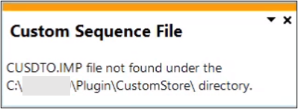
Before you can select the Custom option from the Sequence dropdown, you must define a custom list (CUSDTO.IMP file) using the steps below.
-
Copy the IMPDTO.IMP file from the base\store directory.
-
Paste the copied file into the Server Plugin\CustomStore directory.
-
Rename the IMPDTO.IMP file to CUSDTO.IMP.
-
Right-click on the CUSDTO.IMP file and select Properties, and ensure that the Read-only attribute is disabled.
-
Open the CUSDTO.IMP file with a plain text editor to edit the file accordingly.
You'd typically pass a blank value to a field or option when updating data where you want to assign a default value.
For example:
You want to assign a default credit checking method to a particular customer when importing data, but this has already been defined (i.e. using the Credit checking method option within the Customers program or against the CreditCheckFlag element of the AR Customer Maintenance business object.
-
Open the Master Data Take On program (SYSPRO Ribbon bar > Import > Quantum Architecture).
-
Select the Update option from the Method toolbar drop-down.
This option is selected because you're attempting to overwrite or replace existing data.
-
Navigate to the Master Data to Import listview.
-
Right-click any area on the column headers section to display a context-sensitive menu.
-
Select the Field Chooser option and drag the Program field on to the listview.
This displays the six-character code associated with a program or business object linked to the data that you want to update.
-
Navigate to the Accounts Receivable section and select the Customers data hyperlink to begin the import.
Focus is now set to the Import Master Data listview.
-
Indicate the unique customer code associated with the customer that you want to import data for using the Customer field.
In this example we are using customer 15.
-
Optionally indicate the relevant details associated the customer, such as the Name, Salesperson, Branch, Telephone etc.
Ensure that the entry against the Treat spaces as preference (accessible within the Option pane) is [ ].
You can't leave this preference without any entry if you want to pass a blank value to a business object. It is important to note that a space is a character itself. An entry of [ ] indicates that a space needs to be passed to the business object.
A blank value passed to the CreditCheckFlag parameter in the AR Customer Maintenance business object indicates that the default Credit checking configuration (Setup Options > Configuration > Distribution > Sales Orders) must be used since no other parameter has been specified.
-
Against the CreditCheckFlag field indicate [ ] (i.e. you want to pass a blank value) which is the entry against the Treat spaces as preference.
Currently, the value within the CreditCheckFlag is T which indicates that the credit checking method is based on the invoice terms defined against the customer.
The Credit checking method against a customer can be defined as:
-
Company method (represented by a blank space or value in the business object).
-
None (represented by N in the business object).
-
Check terms (represented by T in the business object).
-
Check credit limit (represented by L in the business object).
-
Check terms and check credit limit (represented by B in the business object).
-
-
Select the Import function from the toolbar.
The data is updated based on your entries in the Import Details listview.
This function is only enabled when all records are valid (i.e. changes need to be validated).
The process outlined above should have replaced the credit checking method associated with a customer with a blank value (i.e. the default Credit checking configuration (Setup Options > Configuration > Distribution > Sales Orders) is used).
The following steps assume that you have not already added the Listview toolbar to the Data to be Imported pane. If you have already done this, then process to step 3.
-
Right-click the header row of the Data to be Imported pane.
-
Click Customize from the context menu and select Show Listview Toolbar.
-
Click on the Toolbar Options function (triangle icon next to the Clear Search icon).
-
Select the Add or Remove Buttons option.
-
Select the Standard option.
-
Select the Expand All Groups and/or Collapse All Groups options from the context menu.
The expand and collapse groups functions should now be available from the toolbar.
Element errors
-
Errors created by a missing required element in the grid are output to the last column of the grid, providing the error is the last one in the row. If there are multiple errors, then only the last error is written to the last column.
-
the Multimedia Setup business object allows you to set the <OutputErrorsAsXml> input parameter to Y if you want the program to display errors on screen (so that you can correct the parameter) instead of generating exception errors that closes the program.
User Interface
Toolbar and menu
| Field | Description |
|---|---|
| New Import |
Select this to change the criteria in the Options pane. The Options pane is disabled once a program is selected from the Data to Import listview. |
| Validate | This checks the validity of the data you entered into
the Import Details grid, or Excel
spreadsheet, before importing information. When processing directly from an Excel spreadsheet, the program converts the spreadsheet into an XML file and then calls the relevant business object for validation. If validation fails, the errors are displayed in the Import Results pane. The XML file is deleted if validation fails, or once the import is complete. The Import function is enabled when all the records are valid. The ASSSAS, ASSSDP, IOPSSL, IOPSPO and BOMSRO programs are excluded from the key validation routine (i.e. the routine that checks all the key columns in the data grid to ensure each line is unique before calling the business object). These programs are validated by the business object. |
| Import | This function is enabled when all the records are
valid, and processes the data according to the
Import Method indicated. When notes are imported, an RTF document containing the text is created in the \Work\Notes folder and ADMNOT is updated. This option is disabled as soon as any changes are made in the Import Details pane (i.e. changes must be validated before the Import function is re-enabled). |
| Ignore warning | This ignores any warning messages displayed during the import process. |
| Apply if entire document valid | This processes the data only if all the rows in the
Import Details grid are valid (i.e. all
rows in the grid are treated as a batch and processing fails
if any row is invalid). If you don't select this option, then valid rows are processed and invalid rows are ignored. The Apply if entire document valid option must be disabled when Upsert is selected in the Method dropdown. |
| Method |
You need to indicate the function you want to perform on the database (i.e. Add, Update, Delete or Upsert). Not all methods are available for all business objects (e.g. some business objects do not include an Update or Delete function). The Upsert functionality is limited to the Use data grid import method.
|
Options
| Field | Description | ||||
|---|---|---|---|---|---|
| Data source | |||||
| Import method |
|
||||
| File location | In a client-server environment, you need to indicate whether the Excel file is located on the server or on the client machine. If the file is located on the client machine, it is copied to the server during the validation stage. | ||||
| File name | The name of the Excel spreadsheet to be processed, including the path to the file. You must supply the file name before selecting a program from the Data to Import listview. | ||||
| Preferences | |||||
| Treat spaces as | This lets you specify a number of user-defined
characters that you want the program to treat as
spaces. The Master Data Take On program will change the character(s) to spaces for fields in the database that accept spaces to add/update fields. For example: In the Stock Code On Hold Maintenance program, to release a stock code that is on hold or partial hold, the StockOnHold flag needs to be set to spaces. However, the import program does not recognise a space as a request to update the StockOnHold flag to release the hold, so you will need to enter some character(s) in the StockOnHold field and then use the Treat spaces as option to indicate that the character you used must be treated as a space (the default entry displayed at this field is [space]). Avoid alpha and numeric characters in the array. Instead, we recommend you use special characters such as !@#$%^&* or an array of combinations which are unlikely to be used in other fields of the file being imported. This field is disabled if the Import method is defined as From Excel file. |
||||
|
Show additional information |
This allows you to show additional information for multi-line headers. |
Data to be Imported
| Column | Description |
|---|---|
|
Sequence |
This allows you to sequence the imported data by Module, Implementation or Custom. If you select Custom in the Sequence field and do not have a custom list already defined and saved, refer to the How do I define a custom list for sequencing? in the Troubleshooting and FAQs section.
|
| Data | This displays a list of SYSPRO business objects that are available for processing. The list resides in the IMPDTO.IMP file of the \Base\Store folder. The objects available depend on the Method selected. |
| No of existing records | This indicates the number of records that currently exist for the selected item (e.g. an entry of 4 against Currencies indicates that four currencies are currently defined for the company). |
| Program | This is the 6-character program name associated with the business object. To display this column you need to drag it from the Field Chooser window (activated by right-clicking the header of the pane). |
| Sequence column file path | This displays the path of the customized sequence column settings file. If it has not been customized, then the word Default is displayed. This column is accessed from the Field Chooser. |
Import Details
This editable listview grid enables you to paste the required data from an Excel spreadsheet, or to manually enter the data for the selected business object. When copying from an Excel spreadsheet, ensure that the first column of the spreadsheet is blank to accommodate the Validation status column (i.e. the first column) in the listview.
The listview columns correspond to the schema information defined for the relevant business object listed in the Program column of the Data to be Imported listview.
The data table relevant to each business object is listed in the IMPDTO.IMP file in your \Base\Store folder.
Refer to the respective Business Object Schema for any information required for a specific column.
An asterisk (*) in a column heading denotes a key column.
The last column in the listview is titled Error description, and displays the first error encountered during the validation process.
Use the Export to Excel option to save data entered manually.
| Field | Description | ||||||||
|---|---|---|---|---|---|---|---|---|---|
| Sequence Columns | This lets you change the column sequence as well as
exclude or include columns. Any change to the sequence is stored in the IMPSEQ_Operator_Program file of the \Base\Settings folder (e.g. IMPSEQ_Admin_ARSSCS). An asterisk (*) against a Column name denotes a key column. Delete this file to restore the default sequence. You cannot re-sequence columns if you are sorting on a column name. |
||||||||
| This prints the contents of the pane. | |||||||||
| Export to Excel | This exports the grid to Excel, together with any data entered. You can export a blank grid to Excel and use this as the template to create your import data in the Excel spreadsheet. | ||||||||
| Search text | This filters the rows displayed in the grid. | ||||||||
| Clear | This clears the search text field. | ||||||||
| Edit |
|
||||||||
| Validation flag | A tick in the first column indicates that the row is valid and can be imported. |
Copyright © 2026 SYSPRO PTY Ltd.