Document Services: AP Invoice Automation

The AP Invoice Automation feature centers on a form recognition solution (powered by Azure Cognitive Services) that enables the digitization of AP invoice data directly from physical forms, streamlining data entry and expediting the three-way invoice matching process.
SYSPRO data is extracted from invoices and automatically matched to existing information in the system. A key advantage is its integration with the holistic SYSPRO solution to offer a single point of communication, eliminating the need for disparate systems. License bundles of Document Services credits allow for the seamless integration and use within the three-way GRN matching solution.
Exploring
-
Streamlined, automated invoice processing
-
Identification of discrepancies, enabling focused exception management
-
User-friendly drag-and-drop or upload option within the existing AP Invoice Posting program to process invoices
-
Efficient extraction and validation against SYSPRO data, including matching of the purchase order number and invoice detail lines to GRNs (goods received notes)
-
Managing unmatched invoice lines (where no corresponding GRN entries were found) by manual allocation
-
End-to-end real time visibility via access to the supplier document using the Supplier Query program
The programs related to this feature are accessed from the Program List of the SYSPRO menu:
- Program List > Accounts Payable
A Goods received note refers to the mechanism whereby you capture accrual values for items received into stock that have not yet been invoiced.
A purchase order is the document used to define the details of a product or service provided by a seller to a buyer. It becomes a temporary legal contract to buy products or services once the seller accepts it.
Once the need for goods or services is identified and the pre-purchase activities (e.g. requisitioning, supplier sourcing and price negotiation) are complete, a purchase order for the goods is placed with the relevant supplier.
Suppliers provide a mechanism for you to raise purchase orders within SYSPRO, as well as being used as a selection criterion to generate reports.
You can configure group suppliers to facilitate group and intercompany group payments (i.e. processing a single large remittance to a primary supplier instead of multiple payments to many individual suppliers).
Static information configured against a supplier is used to determine applicable tax, discounts, etc., when processing purchasing transactions.
Documents received from a supplier (e.g. invoices, credit notes, debit notes, etc.) are stored against the supplier and let you keep track of the company's liabilities.
You maintain supplier details using the Suppliers program and you create group suppliers using the AP Group Suppliers program (Program List > Accounts Payable > Setup).
Starting
To use this feature, the following must be installed and configured:
-
SYSPRO 8 Cognitive Service
-
The machine or server where this service is installed must have an active internet connection.
-
For the SYSPRO 8 Cognitive Service to work, the __SRS operator is required. This a standard operator which is created by the system.
-
To use this feature, the following setup option(s) must be configured:
-
Cognitive service
-
Service endpoint
-
Data center for AP Invoice OCR
-
-
-
If you are using SYSPRO 8 2023, you must apply Hotfix KB8100581 before you can make use of the Current Balance, Refresh the Current Credit Balance and Top Up options in the Consumption Based Licensing Log program.
-
The Document Services – AP Invoice Automation module is not licensed separately, but there is a cost associated as credit bundles must be purchased to use the API that extracts the data from invoices. One credit is used each time an invoice is uploaded and analyzed.
When deploying the capability at operator level directly within the AP Invoice Posting program, the process is as follows:
-
Open the AP Invoice Posting program.
-
Select Document Automation from the Customization gear.
A toast notification informs you that Document Automation has been added to the webview and that you need to re-launch the program to use the feature.
-
When re-launching the program, the new control is added to the bottom-left of the program by default.
-
Select the Reset Layout option from the Customization gear to re-position the control within the program.
-
Exit and reload the program.
The Document Automation control will be added to the left as a form on its own.
When deploying the capability at role level directly within the AP Invoice Posting program, the process is as follows:
-
Select the Customization gear, hover over Design Web Views by Role and select the relevant role from the list.
A toast notification informs you that you have entered design mode for the role.
-
Open the AP Invoice Posting program.
-
Select Add Document Automation from the Customization gear.
A toast notification informs you that Document Automation has been added to the webview and that you need to re-launch the program to use the feature.
-
When you relaunch the program, the Document Automation control is added to the bottom-left of the program by default.
-
Select the Reset Layout option from the Customization gear to re-position the control within the program.
A toast notification informs you that the layout has been reset.
-
Select the Stop Designing by Role option from the Customization gear.
When the role for which the AP Invoice Automation feature has been deployed logs in and launches the AP Invoice Posting program, the control displays.
To view the Document Automation control in the correct layout, operators within the role may need to select the Reset Layout option from the Customization gear when they first access the program and relaunch it.
When deploying the capability at operator level directly within the AP Invoice Posting program, the process is as follows:
-
Open the AP Invoice Posting program.
-
Right-click on the Transaction pane header and select Add Document Automation from the Customized Pane option.
The Document Automation control is added to the top-left of the program as a form on its own by default.
When deploying the capability at role level directly within the AP Invoice Posting program, the process is as follows:
-
Navigate to Ribbon bar > Administration > Design UI Layouts.
-
Select the role for which you need to deploy the AP Invoice Automation feature in the Role dropdown.
-
Select Start Design Mode.
The Design Mode in Progress window displays.
-
Open the AP Invoice Posting program.
-
Right-click on the Transaction pane header and select Add Document Automation from the Customized Pane option.
The Document Automation control is added to the top-left of the program as a form on its own by default.
-
Exit the program.
-
Select Exit Design Mode in the Design Mode in Progress window.
When the role for which the AP Invoice Automation feature has been deployed logs in and launches the AP Invoice Posting program, the control displays.
You can secure this feature by implementing a range of controls against the affected programs. Although not all these controls are applicable to each feature, they include the following:
- You restrict operator access to activities within a program using the Operator Maintenance program.
- You can restrict operator access to the fields within a program (configured using the Operator Maintenance program).
- You can restrict operator access to functions within a program using passwords (configured using the Password Definition program). When defined, the password must be entered before you can access the function.
- You can restrict access to the eSignature transactions within a program at operator, group, role or company level (configured using the Electronic Signature Configuration Setup program). Electronic Signatures provide security access, transaction logging and event triggering that gives you greater control over your system changes.
- You can restrict operator access to programs by assigning them to groups and applying access control against the group (configured using the Operator Groups program).
- You can restrict operator access to programs by assigning them to roles and applying access control against the role (configured using the Role Management program).
Solving
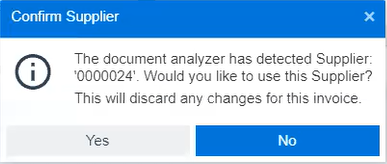
This message is displayed once you have uploaded a document at the Document Analyzer pane within the AP Invoice Posting program and the system detected a supplier.
Select Yes to confirm that the system detected the correct supplier.
Select No if you want to manually allocate the invoice to a different supplier.
Yes, all existing validations, such as GRN matching variances as well as existing calculations, such as discounts remain unchanged and are taken into account by the AP Invoice Posting program when the AP Invoice Automation feature is used.
Yes, you can by following these steps:
-
Open the Supplier Query program.
-
Select the hyperlink at the Invoice field within the Invoices listview and then select the View Supplier Invoice option.
The original invoice that was uploaded is displayed.
The document for each transaction is stored in the APInvoiceDocument table. As a result, the table will continuously grow as transactions are saved.
You can purchase document credits by accessing the SYSPRO Customer Portal directly from within the Consumption Based Licensing Log program. To do this, simply select the Top Up button.
Once you have opened and signed into the SYSPRO Customer Portal page within your browser:
-
Select Top Up.
The Transaction Top Up window is displayed.
-
Select the amount of credits you would like to purchase in the Total field.
-
Enter a reference in the Reference field.
-
Select Submit.
-
In SYSPRO, select the Refresh the Current Credit Balance button in the Consumption Based Licensing Log program to reflect the purchased credits.
You can view your available credits in the Current Balance field within the Consumption Based Licensing Log program. Select the Refresh the Current Credit Balance button to refresh the field if required.
The following document types are supported in the SYSPRO Desktop and SYSPRO Web UI (Avanti):
|
Model
|
|
Image: JPEG/JPG |
Image: TIFF |
Image: PNG |
Image: BMP |
|---|---|---|---|---|---|
| Read | Yes | Yes | Yes | Yes | Yes |
| Layout | Yes | Yes | Yes | Yes | Yes |
| General Document | Yes | Yes | Yes | Yes | Yes |
| Prebuilt | Yes | Yes | Yes | Yes | Yes |
| Custom | Yes | Yes | Yes | Yes | Yes |
The __SRS operator is automatically created by the system when installing SYSPRO Reporting Services. It is required for the SYSPRO 8 Cognitive Service to work.
If, for some reason, this operator is deleted, you can copy another one of the __SYSTEM operators to ensure that the default permissions are correct. You can do this by following these steps:
-
Open the Operator Maintenance program.
-
Browse for or enter one of the __SYSTEM operator codes (e.g., __ESP).
-
Select the Copy Operator button.
-
Enter __SRS in the Copy to operator field.
-
Enter SYSPRO Reporting Services in the New name field.
-
Enter __SRS in the New network user name field.
-
Select Copy....
The operator is created and the settings are copied. The default permissions are therefore retained.
Ensure that the operator is assigned to a valid SYSPRO company in the Defaults tab within the Operator Maintenance program.
Alternatively, you can create a new operator named __SRS using the Operator Maintenance program. Ensure the following:
-
The operator belongs to the ADMIN operator group.
-
The default company to which the operator is assigned is a valid SYSPRO company.
Using
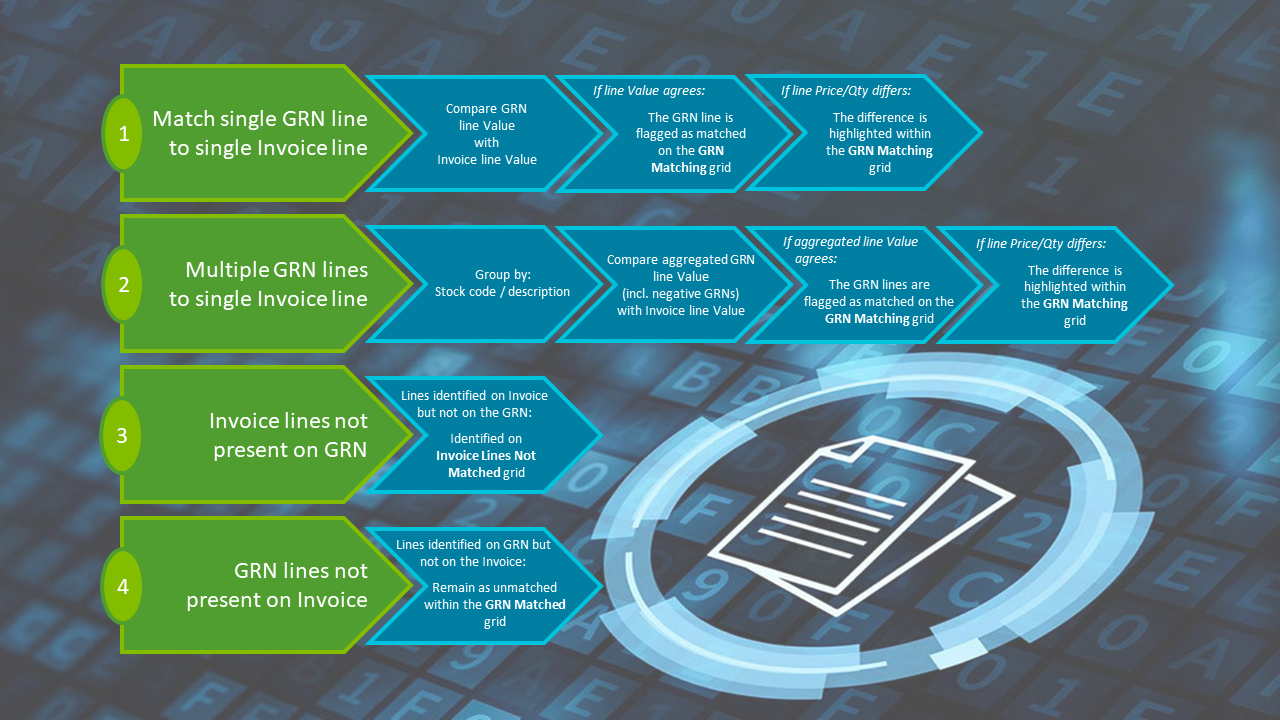
The matching algorithm within the Document Services: AP Invoice Automation feature relies on the following mapping between the supplier invoice information and the GRN matching grid within the AP Invoice Posting program:
| Invoice | GRN grid |
|---|---|
|
ProductCode |
|
|
Description |
|
|
Quantity |
|
|
Amount |
|
|
UnitPrice |
|
-
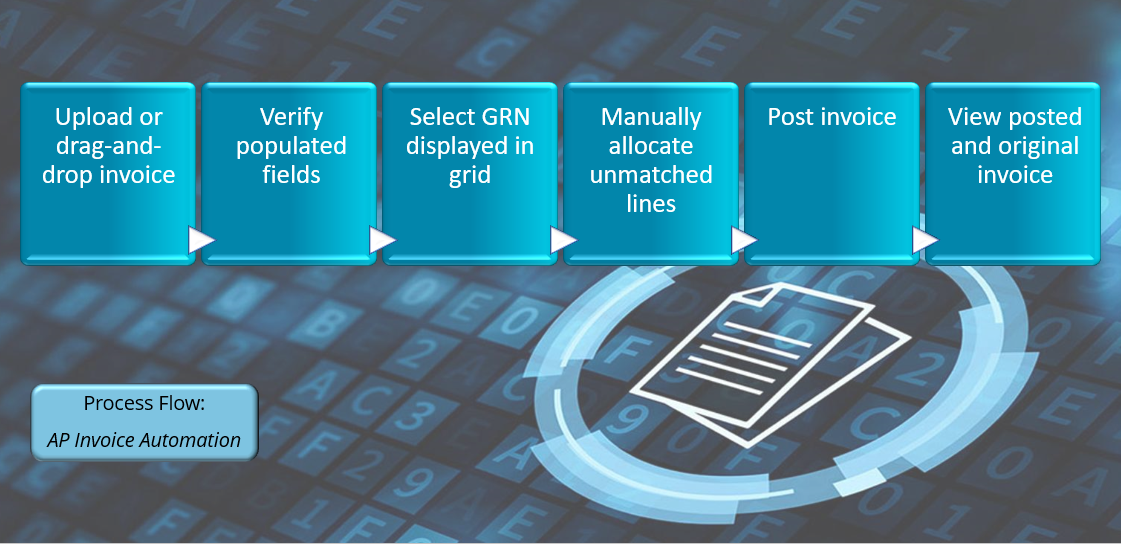
Open the AP Invoice Posting program and navigate to the Document Analyzer form.
If the Document Analyzer pane is not displayed, follow the steps outlined within the Deployment section to do the initial setup..
-
Upload your sample invoice into the form's upload field (either by drag-and-drop, or upload selection).
-
Once the analysis is complete, the system prompts you to confirm the matched supplier. Ensure that the Document Analyzer correctly identifies the supplier.
-
Verify that the following fields are populated correctly from the uploaded file (i.e. invoice):
-
Invoice number
-
Transaction amount
-
Invoice date
-
Tax amount
-
-
Navigate to the GRN Matching grid and confirm the following:
-
The grid is automatically updated with the GRN linked to the purchase order referred to on the supplier Invoice.
-
The GRN lines are matched accordingly.
-
-
Navigate to the Unmatched Invoice Lines form and confirm that the Invoice Lines not Matched grid is automatically updated with all invoice lines that were not automatically matched to the GRN lines.
-
Post the invoice and exit the program.
-
Once the invoice is posted, open the Supplier Query program and verify that the document can be viewed accordingly.
The following indicates areas in the product that may be affected by implementing this feature:
Program List > Accounts Payable > Invoice Processing
This program lets you process incoming invoices, credits and debits from suppliers.
We have added the following to accommodate the AP Invoice Automation feature:
-
You can upload or drag-and-drop the supplier invoice at the Document Analyzer pane.
-
You can view and allocate invoice lines that couldn't be matched to the GRN lines at the Unmatched Invoice line pane or grid.
Program List > Accounts Payable
This program lets you view data relating to your suppliers in the in the Accounts Payable module.
You can select the View Supplier Invoice option from the hyperlink at the Invoice field (within the Invoices listview) to view the original document that was uploaded and saved against the invoice.
Program List > Administration > Consumption Based Licensing
This program enables you to view your current document credit balance, as well as access the SYSPRO Customer Portal for credit replenishment when using Document Services.
Copyright © 2025 SYSPRO PTY Ltd.


