SYSPRO Container Controller

This application is used to deploy containers using prebuilt images to host multiple “servers”, and therefore supports scaling out the SYSPRO Web UI (Avanti) solution.
Exploring
The SYSPRO Container Automation Service is used to perform the following tasks:
-
Update the SYSPRO Application Gateway Service configuration file with the new endpoints (i.e. IP addresses) of the restarted containers when a server is restarted.
-
Continuously monitor the containers and their performance, so that containers are added or removed as required.
Service Deployment
This service is deployed with a delayed start start-up configuration as it has a dependency on the local Docker engine. This is because the Docker containers must be started and running when the SYSPRO Container Automation Service is initiated.
Service Configuration
The service is mainly driven by the configuration values defined within the Monitor_Automation section of the application.config and custom.config files.
An important value within these files is the ConfigureServiceSecondsCheck key value, as this determines the interval at which the service checks the state of the containers. Any changes in the custom.config file are then automatically merged in and applied as part of this check.
Container Monitoring
The SYSPRO Container Automation Service starts an instance of the SYSPRO Container Controller application which it uses to monitor the containers.
This instance is then automatically removed once the service stops.
Each container is like a mini-virtual machine, without many of the overheads of a traditional VM.
A container image is a static, lightweight, standalone and executable package of software that includes everything needed to run an application:
-
Executable code
-
Runtime
-
System tools
-
System libraries
-
Settings
This enables it to run an isolated process on information technology (IT) infrastructure.
Starting
-
SYSPRO Application Gateway Service service
One of the key requirements for the SYSPRO Web UI scalability solution using containers is that the Host computer must be running Windows Server 2022.
The reasons for this include:
-
The Web UI Container includes what is known as a Server Image, and the Web UI component requires the latest image that is only supported on Windows Server 2022.
-
Earlier Windows Server versions don't fully support the technology required to run the SYSPRO Web UI at scale.
Important Licensing and Cost Considerations - Windows Server 2022 Standard vs. Datacenter edition:
The SYSPRO Web UI Scalability solution using containers allows you to configure the number of containers providing the level of scalability required.
Our validation has shown that you may easily have 10 or 20 containers (or more) running concurrently, depending on the number of users required.
-
The Windows Server 2022 Standard Edition supports an unlimited number of containers - however, there is a licensing cost depending on your Microsoft commercial agreement.
-
The Windows Server 2022: Datacenter Edition includes a license that supports an unlimited number of containers on a single server without additional license costs.
The additional, initial cost of the Datacenter edition allows flexibility regarding the number of containers without additional costs – especially if you later decide to add more Web UI users.
We have used Windows Server 2022: Datacenter Edition in all our testing of this solution.
It is up to you to decide the most cost-effective deployment and licensing, although the Datacenter Edition would be our preferred option.
SYSPROs validation of the Web UI scalability solution using containers took the form of two base server configurations:
The number or users represents the number of unique Web UI processes running on the app server.
Server A - 100 user configuration
-
Azure server: Standard D16s v5
-
15 Containers
-
8 Cores (16 virtual CPUs) Intel Xeon – Platinum 8370C 2.80GHZ
-
64 GB RAM
Server B - 200 user configuration
-
Azure server: Standard D32s v5
-
20 Containers
-
16 Cores (32 virtual CPUs) Intel Xeon – Platinum 8370C 2.80GHZ
-
128 GB RAM
In all cases, the validation had a target CPU load of 40-70% with a maximum of 90% for short intervals.
The number of containers to be configured should be based on the planned number or Web UI users.
For guidelines on how to calculate this, view the How do I determine the number of containers required FAQ within this article.
You can access and download the SYSPRO Container Controller application from the following URL:
https://syspro8install.azureedge.net/containerfiles/SYSPRO.Container.Controller.exe
Once you have downloaded the install file, proceed with the installation wizard which takes you through the install process.
Solving
The SYSPRO Container Controller software supports a configuration file named application.json. This file passes variables that are used within the deployment process and general functionality.
The application also supports a custom.json file that is read in and applied over the application.json file.
Considerations:
-
This file exists in the same folder as the executable.
-
The custom.json file can have all the settings of the application.json file, but takes precedence as the settings are applied over the application.json file settings.
This is because every new release of this file will contain a new version of the application.json file that overrides the previous one.
| Variable | Description |
|---|---|
|
PeakContainers |
This indicates the number of containers that you want to use, and enables you to deploy and start containers with a single click in the app. We have determined that the best performance is achieved by calculating 10 instances of the SYSPRO Web UI (Avanti) running per container, with an additional 5 containers to ensure peak performance. In other words, if you want to run 100 instances of the SYSPRO Web UI (Avanti), you require 15 containers in total: 100 instances ÷ 10 instances per container = 10 containers. 10 containers + 5 extra containers = 15 containers. |
|
EnvVars (List) |
These entries are environmental variables (used by SYSPRO to tweak environments) that will be injected into the container. These can also be used specifically in containers when automating a single deployment process, to ensure ongoing maintenance isn't required. |
|
Service Credentials |
These credentials are used to run the containers. These are important in the sense that bulk insert errors can occur if your SQL server is hosted on a separate server. This user is created as a local user on the container. If you select to use SYSPROServices, then this user is created as .\SYSPROServices on the container. You will then need to create an identical local user (i.e. same username and password) on the SQL server and ensure that this user has full access to the BCP folder that is shared from the SQL server’s side. |
|
Tags (List) |
These entries indicate the Docker tags associated with the containers. These are read-only tags and not used by SYSPRO in any way. |
|
PathToClusterJson |
This indicates the path to where the configuration file for the SYSPRO Container Controller resides. This is used to automatically update the .config file with a list of SYSPRO 8 Avanti Initialization Service endpoints generated from each container’s network IP address. This file is dynamically consumed by the SYSPRO Application Gateway Service and therefore doesn't require a restart of this service in any way. |
|
Mounts (List) |
Mounts (similar to mapped drives) are used by each container. The main SYSPRO folder (default C:\SYSPRO) must be mapped here to allow for the SYSPRO.EXE processes to be launched in the container’s desktop session. You can add additional mounts here if required, using the following format: Number: source||destination |
|
ContainersAISPort |
This indicates the port on which the SYSPRO 8 Avanti Initialization Service will be started on. Default = 30190. |
|
ContainerNaming |
This tag is used as a naming mask to indicate the container's “machine name”. The last 3 characters are used to allocate numbers, with a maximum of 999. For example: If you name this Acme000 and you create 5 containers: Each container would then be named Acme001 through to Acme005. |
|
MaxContainerSessions |
This is used within the container monitor function to determine how many sessions each container can handle and is limited to a maximum of 50 sessions per container. By default, this is set to 15 (i.e. SYSPRO recommended maximum). We have determined that the best performance is achieved by calculating 10 instances of the SYSPRO Web UI (Avanti) running per container, with an additional 5 containers to ensure peak performance. In other words, if you want to run 100 instances of the SYSPRO Web UI (Avanti), you require 15 containers in total: 100 instances ÷ 10 instances per container = 10 containers. 10 containers + 5 extra containers = 15 containers. |
|
OutputContainerDeploymentLog |
This lets you write out a log file. To use this capability, enter a file name against this entry. The log file is then written out to the application folder of the SYSPRO Container Controller. Take note that this could be a large file as all outputs are appended. |
|
Monitor_Automation |
This section contains flags specific to the monitor automation process. While the SYSPRO Container Automation Service is running, these tags are used to verify if the average sessions per container is higher than a set value (i.e. AutoDeployIfContainerAvg). If the number of sessions exceeds this, then the system automatically deploys another container to assist with the load. However, this only happens if the AutoDeployAsNeeded value is set to true. The system then continues to start new containers until such time as the limit of the ContainerDeployedLimit entry is reached. The SYSPRO Container Automation Service will update the configuration file in case of a server restart. When a server restarts, all the containers that last ran will be restarted. And because they are assigned new IP addresses, the SYSPRO Application Gateway Service Service configuration files need to be updated with the new details. This service does exactly that. But, it also runs the same monitoring function as the monitoring screen. The ConfigureServiceSecondsCheck tag, which defaults to 30, indicates the interval (in seconds) that you want the service to perform this validation. While monitoring, the application might start new containers, prefixed with AUTO. These containers are also monitored and if found to be idle and not running any sessions, they are removed gracefully. The AutoContainerZeroSessionsIdleMinutes setting indicates the amount of minutes a container can be idle with no sessions, before it is removed. |
|
IZUsername | IZPassword |
These tags can be used to automate your login to the application (i.e. these can be used if you don’t want to enter your credentials every time the app starts up). |
|
Debugging |
With debugging enabled, the following is automatically logged:
The following keys are available for debugging:
|
We recommend limiting the number of instances of the Web UI that each user can access concurrently:
-
The Maximum number of instances allowed setup option (Setup Options > System Setup > System-Wide Personalization) enables you to manage how many instances are allowed for your system.
Each instance of the Web UI consumes the same amount of app server resources:
-
A single Web UI user with two instances, is identical to two Web UI users, each with a single instance.
-
If you allow each user to open two Web UI instances, then each of these is considered a ‘User’ when it comes to scaling.
Each application utilizes a portion of reserved memory called “desktop heap”. As a resource it is finite and so can be exhausted, at which point the following may occur:
-
Programs may show erratic behavior and no longer function as expected.
-
Processes end for no apparent, obvious or consistent reason (i.e. the error message is not always the same when one is received).
-
error messages may appear when you attempt to start new programs or try to use programs that are already running.
Unfortunately there are no longer tools available to monitor this. The last version of Microsoft Windows that was capable of monitoring desktop heap usage was Windows XP/Server 2003, after which Microsoft deprecated the kernel system driver that could be used to analyse and monitor this (in conjunction with a tool called “dheapmon”).
This memory does not relate or change with the addition or removal of physical memory, and so should not be confused with this in any way.
-
64-bit Microsoft Windows has a default interactive desktop heap size of 20MB.
-
Lower values increase performance at the risk of crashing any process which can run out of resources.
-
Microsoft do not recommend that you set a value that is over 20480 for the interactive desktop heap.
-
Because the non-interactive desktop heap is mapped into the address space of each and every process', this value should not be set to an arbitrarily high value, but should only be increased sufficiently to allow all the desired applications to run.
-
Many server applications will spawn multiple processes for each user request. SYSPRO is one such application where each client session has one or more processes running on the server for that client.
-
Every increment of 512 K will support approximately 2,500 windows, menus, pens, icons, etc.
-
Microsoft Windows has a system wide memory limit of 48Mb for all the above desktop heaps. If this limit is exceeded there might not be enough memory to create an error message dialog box. As a result, the requested operation fails without any indication.
-
It is best to ensure that the number being specified is divisible by 64.
-
Once the value is changed the operating system will need to be restarted in order for the changes to take effect.
The size of each desktop heap allocation is controlled by the following registry value:
HKEY_LOCAL_MACHINE\System\CurrentControlSet\Control\Session Manager\SubSystems\Windows
The default data for this registry value will look something like the following (all on one line):
%SystemRoot%\system32\csrss.exe ObjectDirectory=\Windows SharedSection=1024,20480,768 Windows=On SubSystemType=Windows ServerDll=basesrv,1 ServerDll=winsrv:UserServerDllInitialization,3 ServerDll=sxssrv,4 ProfileControl=Off MaxRequestThreads=16
For the SYSPRO Container Controller, the optimal entries for the desktop heap would be:
-
SharedSection: 1024 must be the third entry within value
-
MaxRequestThreads: value of 32
For example:
Taking the above into consideration, the registry value would be:
%SystemRoot%\system32\csrss.exe ObjectDirectory=\Windows SharedSection=1024,20480,1024 Windows=On SubSystemType=Windows ServerDll=basesrv,1 ServerDll=winsrv:UserServerDllInitialization,3 ServerDll=sxssrv,4 ProfileControl=Off MaxRequestThreads=32
Take great care when updating the registry as it could cause catastrophic problems if done incorrectly. Therefore, we recommend that you create a restore point as a backup.
When deploying SYSPRO containers, the system checks for a folder named CertificateStore inside the SYSPRO root directory, which is typically C:\SYSPRO\CertificateStore.
If this folder exists, the deployment automatically searches for .cer files within that folder and installs them inside the container's Trusted Root certificate store.
The .cer files can be created by exporting a license without a password from your server's certificate store.
Using
-
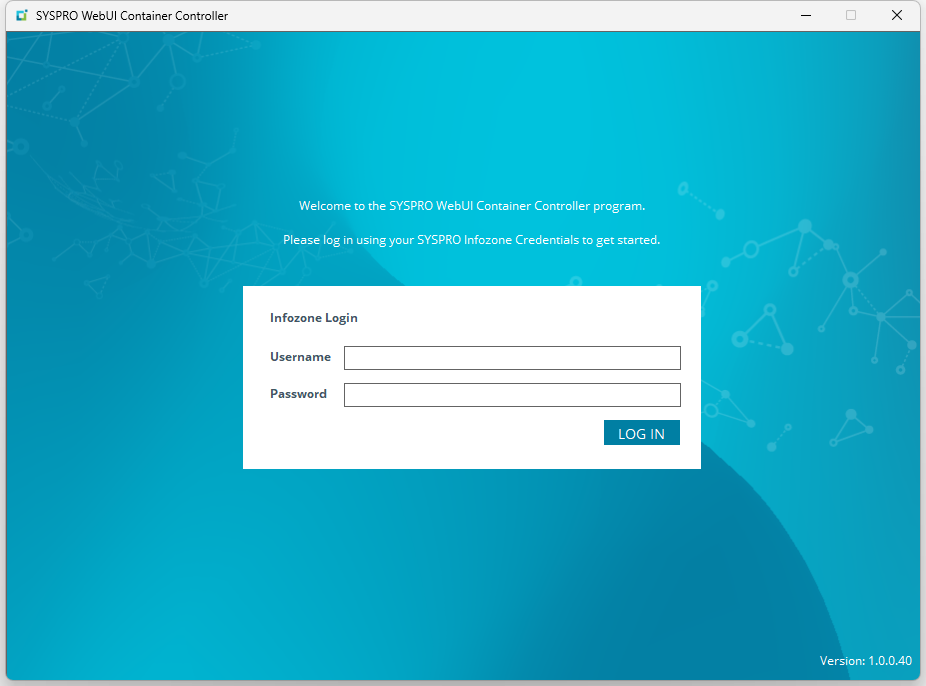
You can view the current version of the SYSPRO Container Controller application from the bottom right-hand corner of the login screen.
The following explains how to use the SYSPRO Container Controller:
-
Launch the application and login using your InfoZone credentials.
-
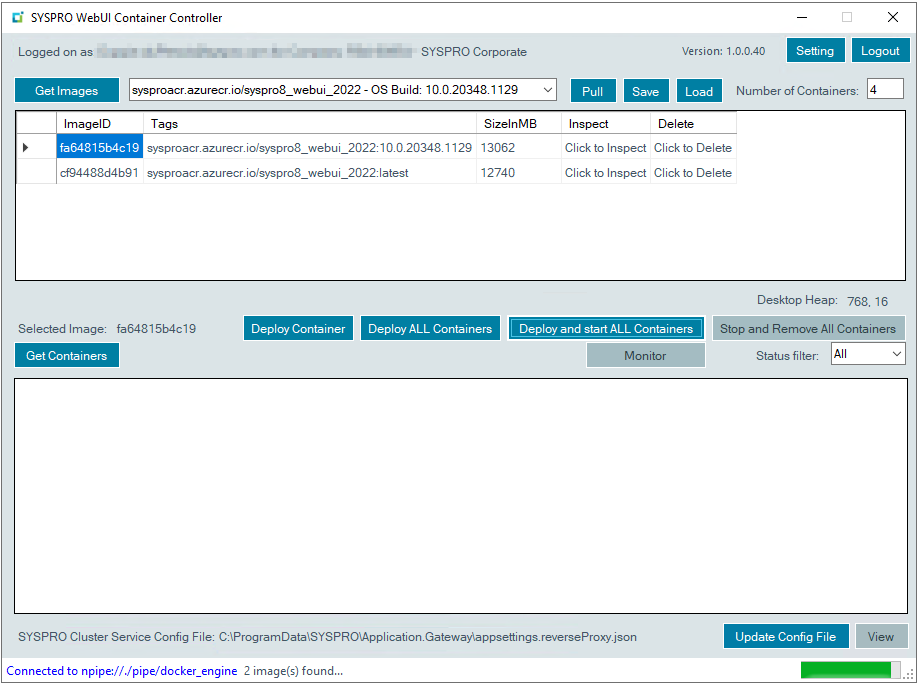
Once you have logged on, the application retrieves the Docker images.
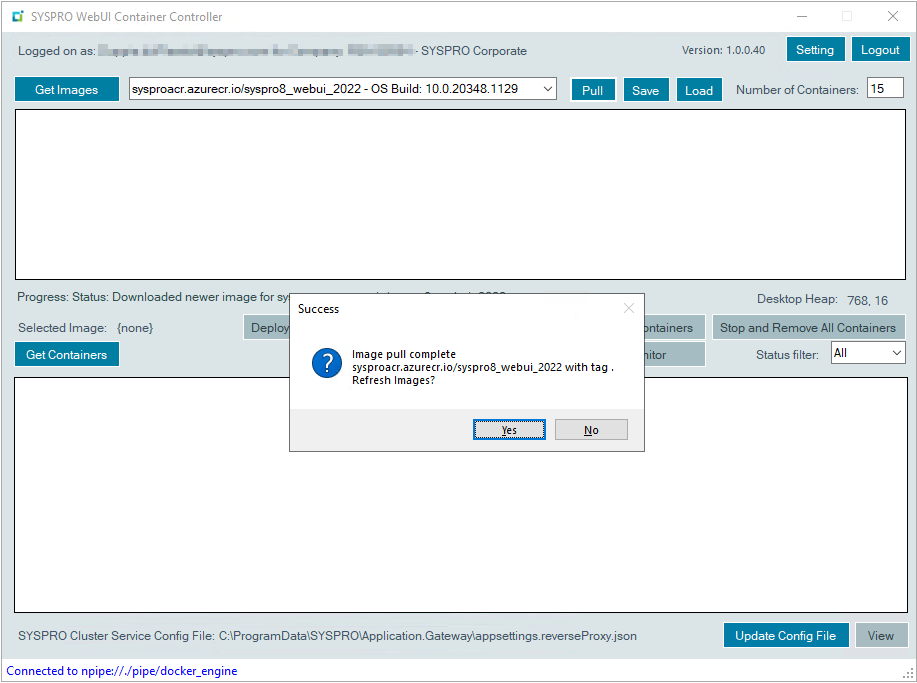
If however you don't have any images as yet, you can select one of the SYSPRO images from the dropdown, followed by the Pull function. This retrieves the image so that it can be used for deployment.
-
Once the retrieval process has completed, a Success message is displayed:
From the message box displayed, select Yes to refresh the images within the application's listview.
-
From here, you can either deploy your containers manually or by using bulk deployment:
 Manual Deployment
-
Select the Deploy Container function to manually deploy a container using the selected image.
The container is deployed but not started, and placed into a status of Created.
-
Select the Start link within the Action column to manually start the container.
A confirmation message is displayed once the container has started.
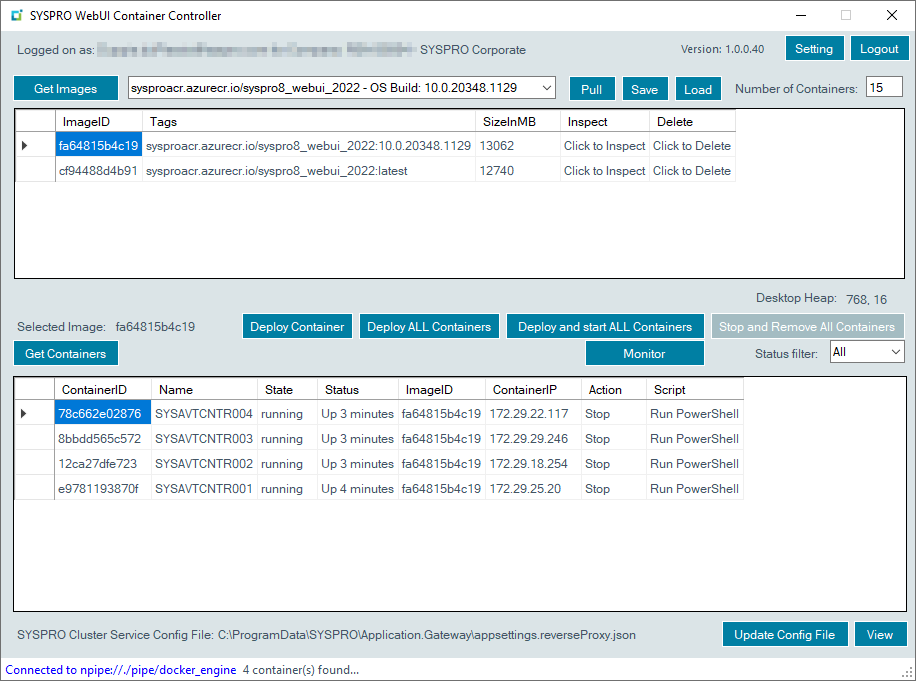
The container is placed into a status of Running and an IP address is assigned to the ContainerID.
You can use the Stop link within the Action column to stop the container, which then places it into a status of Exited.
You can use the Delete link within the Action column to remove this container.
 Bulk Deployment
-
Select the Deploy ALL Containers function to deploy the number of containers you require using the selected image.
The containers are deployed but not started, and placed into a status of Created.
You can then select to start each container manually.
-
Alternatively, you can select the Deploy and start ALL Containers function to deploy and automatically start the number of containers you require using the selected image.
The application performs a check to determine how many containers are running versus how many are required, and then prompts you to confirm the difference.
-
A confirmation message is displayed once the containers have started.
The containers are placed into a status of Running and IP addresses are assigned to the ContainerID of each container.
-
-
Once your containers are running, the application prompts for the configuration file to be updated:
Select Yes to update the SYSPRO Application Gateway Service with endpoints based on the new containers' IP addresses.
-
The ContainersAISPort value is used to build the endpoint addresses that are updated in the configuration file.
-
The configuration file is then automatically consumed by the SYSPRO Container Automation Service and the containers are used immediately, therefore no restart of the SYSPRO Application Gateway Service is required.
-
-
Select the Monitor Containers function for an overview of each container’s state in terms of SYSPRO sessions.
This is useful to keep track of the container load so that you can reduce or increase the number of containers as the load decreases or increases.
-
The Container Monitor screen is displayed and provides details about how many sessions are within each container:
The Container Monitor can also be used to start up new containers as required.
This functionality is driven by the Monitor_Automation section of the configuration file, which contains the following settings:
-
AutoDeployAsNeeded
-
AutoDeployIfContainerAvg
-
ContainerDeployedLimit
The AutoDeployAsNeeded setting enables the automation feature. When this is defined as True, the application will start up new containers if it finds that the average sessions per container is higher than the number defined against the AutoDeployIfContainerAvg setting.
The application will continue to start up new containers (1 at a time per refresh cycle) until such time as the average is within the limits again (i.e. the number defined against the ContainerDeployedLimit setting).
The new containers will start up with AUTO replacing the first 5 characters of the machine name.
Another part of the monitor's function is to monitor the automatically created servers. If the application finds that these servers have no sessions running, then they are automatically removed on the first check after 30 minutes.
Referencing
Logon Screen
Enter your user name for the InfoZone.
Enter your password for the InfoZone.
Select this to log into the application once you have entered your credentials.
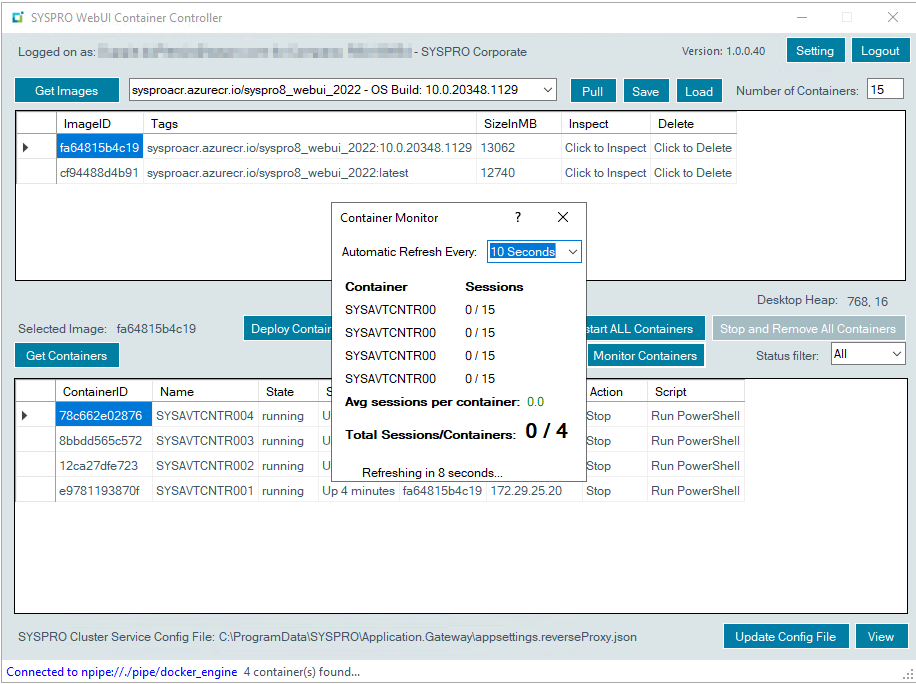
SYSPRO WebUI Container Controller
The following provides context to the various information and functionality of the application's main screen.
| Field | Description |
|---|---|
|
Logged on as... |
This indicates your InfoZone user name (i.e. email address) and customer account number. |
|
Version: x.x.x.xx |
This indicates the current version of the SYSPRO Container Controller application. |
|
Setting |
This lets you access and maintain the configuration file settings for the SYSPRO Container Automation Service. |
|
Logout |
This logs you out of the application and returns you to the login screen. |
|
Image pane |
This top panel of the main screen provides information and functions related to the Docker images. |
|
Container pane |
This bottom panel of the main screen provides information and functions related to your containers. |
|
Status |
The status bar (at the bottom of the screen) indicates the current status of Docker Engine connection. |
This section is where you can manage your Docker images.
Docker images are prebuilt by SYSPRO for different releases of Windows and are specifically tailored towards a single function.
In the case of the SYSPRO Container Controller, these are used for running the SYSPRO 8 Avanti Initialization Service.
| Field | Description |
|---|---|
|
Get Images |
This function retrieves all of the images that are already installed against your Docker Engine. |
|
Image selection |
This dropdown contains all images built and supported by SYSPRO. |
|
Pull |
This function retrieves the selected image from the Docker Engine. If the image you are pulling is a larger size (e.g. 2GB+-) a progress update bar is displayed below the Images listview. |
|
Save |
This saves the selected image to your local drive for quicker retrieval in future. |
|
Load |
This loads the previously saved image from your local drive. |
|
Number of Containers |
This indicates the number of containers required. |
|
Images listview |
The Images listview is populated with a list of images retrieved and includes information about each image, such as ID, Tag and Size. This function lets you delete an image from your Docker Engine. |
|
Desktop Heap |
This indicates the current desktop heap. |
|
Selected Image |
This indicates the image that you have selected within the Images listview. |
This section is where you can deploy the selected image as containers on the server.
The application also updates the SYSPRO Application Gateway Service files to dynamically use these deployed containers.
| Field | Description |
|---|---|
|
Get Containers |
This function retrieves a list of containers that have already been deployed. |
|
Deploy Container |
This function lets you deploy a container using the selected image. The container is then deployed (but not started) and placed into a status of Created. |
|
Deploy ALL Containers |
This function lets you deploy the total number of required containers using the selected image. |
|
Deploy and start ALL containers |
This function lets you deploy and automatically start the total number of required containers using the selected image. The application performs a check to determine how many containers are running versus how many are required, and then prompts you to confirm the difference. |
|
Stop and remove ALL containers |
This function stops and deletes all containers. |
|
Monitor |
This function launches the Container Monitor screen. The Container Monitor screen is an "always-on-top" modal window that displays an overview of how many sessions are within each container. This is useful to keep track of the container load so that you can reduce or increase the number of containers as the load decreases or increases. |
|
Status filter |
This lets you filter the view by the current status of the containers. For example:
|
|
Containers listview |
The Containers listview is populated with a list of containers and includes the following information:
This function lets you action the selected container with one of the following tasks:
This function lets you open a Windows PowerShell session within the container. |
|
SYSPRO Cluster Service Config File |
This indicates the location of the SYSPRO Container Automation Service file which will be updated. |
|
Update Config File |
This lets you retrieve all of the IP addresses from the containers and update the configuration file. |
|
View |
This lets you view the configuration file in your default text editor. |
This screen is displayed when you select the Monitor Containers function and provides an overview of each container’s state in terms of SYSPRO sessions.
| Field | Description |
|---|---|
|
Automatic Refresh Every |
This lets you configure the monitor screen to automatically refresh every:
Select Disable if you don't want the monitor to refresh. |
|
Container | Sessions |
This section provides a breakdown of your running containers and their respective SYSPRO sessions. The MaxContainerSessions configuration setting is used to determine how many sessions are used, with a maximum of 50 sessions per container allowed. |
|
Summary data |
The following overview information is included within the monitor:
|
|
Refreshing in... |
This notification indicates when the next refresh will occur. Unless you selected Disable at the Automatic Refresh Every option, in which case this notification indicates that the refresh is disabled. |
This screen is displayed when you select the Setting function and enables you to change the settings for the SYSPRO Container Automation Service.
Once you make any changes to the defaults provided, your customized settings are recorded within the custom.json file.
This lets you revert any customization of your settings to the defaults provided by SYSPRO.
| Field | Description |
|---|---|
|
General Settings |
This section lets you change the following settings:
|
|
Container Specific Settings |
This section lets you change the following settings:
|
|
Auto Deployment Settings |
This section lets you define your preferences for the automatic deployment of containers. |
|
Infozone Settings |
This section lets you set your default InfoZone credentials so that you don't have to enter them every time you log into the application. |
|
Debugging Settings |
This section lets you define your debugging requirements. |
Copyright © 2025 SYSPRO PTY Ltd.

