Tax Return

This program lets you generate a report that consolidates sales tax information for ease of submitting tax returns to authorities.
The report is designed to meet the MTD tax requirement as set out by UK legislation.
Exploring
Starting
You restrict operator access to activities within a program using the Operator Maintenance program.
Controls whether an operator can modify the SRS menu in any way.
Controls whether an operator can create or maintain a report form.
Controls whether an operator can create or maintain report themes.
Controls whether an operator can purge archived SRS reports.
This activity, together with the activity SRS View all archived items, controls whether an operator can view archived reports.
-
If neither of these two activities is enabled, then the operator can only view archived reports that they have created.
-
If this activity is enabled and the activity SRS View all archived items is disabled, then the operator can only view archived reports generated by members of the operator group to which the operator belongs.
-
If this activity is disabled and the activity SRS View all archived items is enabled, then this activity has no effect and the operator can view all archived reports.
Controls whether an operator can view archived reports, regardless of whether the SRS View operator group archived items activity is enabled.
Controls whether an operator can create, edit and delete report schedules.
Controls whether an operator can change the priority of reports in the queue (server-side printing).
Controls whether an operator can delete a report in the report queue (server-side printing).
Only reports run by the logged in operator can be deleted.
Controls whether an operator can view all company reports (server-side printing).
Controls whether an operator can purge reports from the report queue of a company (server-side printing).
This enables the Purge Manager button on the report queue toolbar, from where an operator can purge reports by date, operator or report status.
You can restrict operator access to programs by assigning them to groups and applying access control against the group (configured using the Operator Groups program).
-
You must print a report before submitting a tax return (if you have not yet printed the report).
To print a report, do the following:
- Select the Unprinted option in the Reprint field and process the report.
- Run the report again to submit the tax return.
- Select the Reprint excluding submitted option in the Reprint field. This enables the Submit tax return option.
- Select the Submit tax return option and process the report.
- Although you can reprint a report as often as required, you can only submit it once. You submit a report using the Submit tax return option.
The Submit tax return option is only enabled if the Reprint excluding submitted option is selected in the Reprint field.
-
The date printed in the footer of each report refers to the system date when the report was generated (i.e. the company or temporary company date is ignored). In a client/server environment, the client system date is used.
Solving
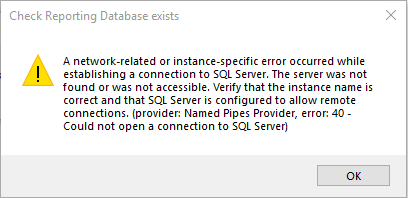
This message appears when you can't connect to an instance of the SQL Server Database Engine on a single server. There could be a number of reasons for this:
- Incorrect SQL server name
- Incorrect default settings
- Incorrect firewall settings
- The SQL Server Database Engine does not have permission to allow remote connections
Ensure that your SQL Server name is configured to match the name of the server instance under the Object Explorer pane of Microsoft SQL Server Management Studio.
- Press the Win+R keys to launch the Run dialog.
- Type services.msc.
-
Select OK.
This launches the Services window.
- In the right-hand pane, select the SQL Server (MSSQLSERVER) service from the list (MSSQLSERVER being the name of the SQL Server instance).
- Right-click the service and ensure that Start has been selected. The option won't be available if already selected.
To run Services, you need to run this program as an Administrator.

-
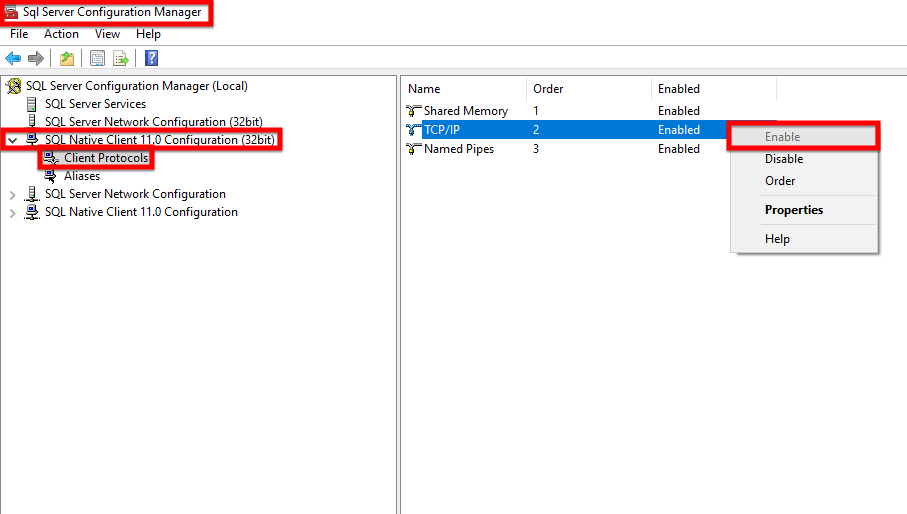
Launch Microsoft SQL Server Configuration Manager.
Select Yes when prompted with the User Account Control window. This opens the Microsoft SQL Server Configuration Manager window.
- In the left-hand pane, select the SQL Native Client 11.0 Configuration (32bit) drop-down.
- Select Client Protocols from the dropdown.
-
Right-click the TCP/IP option and click Enable.
If already selected, the status of this option displays Enabled.
-
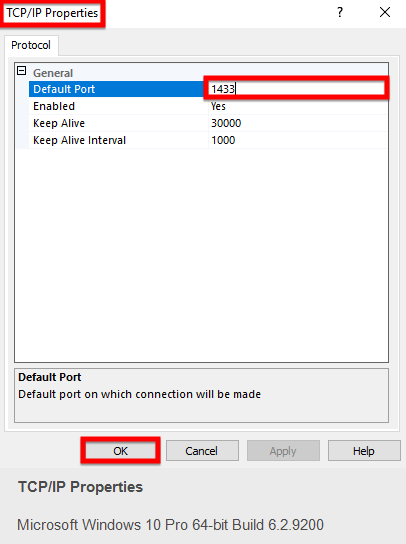
Select Properties for the TCP/IP option.
-
Change the value in the Default Port field to 1433.
-
Select OK.

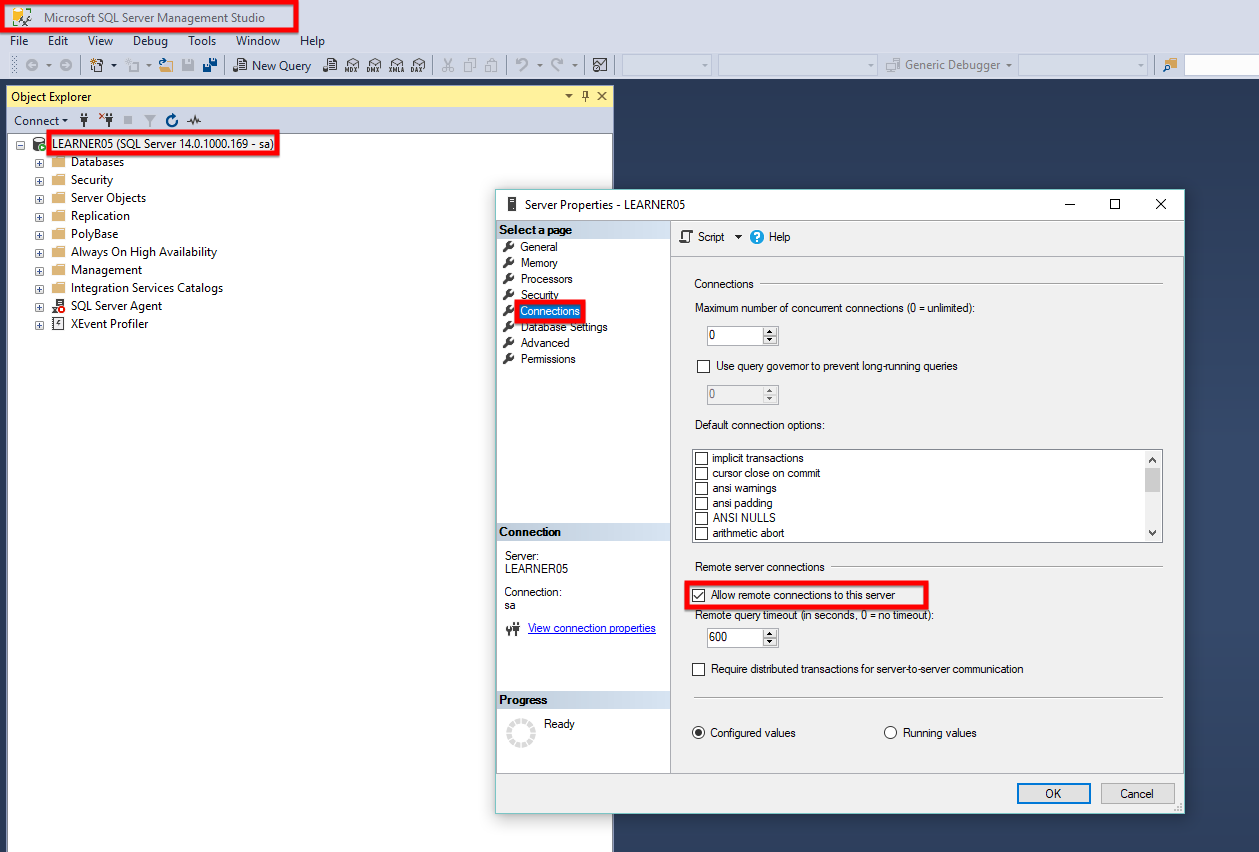
- Launch Microsoft SQL Server Management Studio.
- Right-click the server name and select Properties.
- From the Server Properties window, select the Connections option.
- In the Remote server connections section, enable the Allow remote connections to this server option.
- Select OK.
SQL Server instances use port 1433 by default. Ensure that the Windows Firewall exception on the server for TCP ports 1433 is added so that SQL Server will run.
- Open Control Panel.
- Select Windows Defender Firewall.
-
Select Allow an app or feature through Windows Defender Firewall.
This launches the Allowed apps window.
- From the Monitoring drop-down, select Firewall.
- Check the list for Microsoft SQL Server Management Studio. If it is not listed, select Allow another app.
- Navigate to the location where Microsoft SQL Server Management Studio is stored and select OK.
- Select OK to close the Allowed apps window.
This message appears when you try to print a report, but haven't yet configured a printer for SYSPRO Reporting Services.
You need to configure your printer requirements:
-
From the Print Setup screen (SYSPRO Ribbon bar > Setup > Print Setup) select the printer to which you want to print reports.
-
Optionally, specify any preferences.
-
Select Apply and exit.
The name of the selected printer is then displayed in the status bar next to the print icon.
Using
Before running this report for the first time, you need to:
-
Define your tax return periods.
There are two methods you can use, depending on whether you need to use tax submission dates defined by your regional legislature or GL period end dates:
-
Using the use tax submission dates defined by your regional legislature:
The Tax Return Period Maintenance program lets you define the start and end dates for each of your tax periods and years according to the tax submission dates defined by your regional legislature.
The dates entered don't need to correspond to module periods or financial year periods.
To use the dates entered in this program ensure that the Use GL periods for tax returns setup option (Setup Options > Tax > Company Tax Options) is not enabled (if tax periods have been configured to use GL periods, then the dates entered in this program are ignored).
-
Using GL period end dates:
This method lets you use the GL period end dates instead of the dates defined in the Tax Return Period Maintenance program. You must enable the Use GL periods for tax returns setup option (Setup Options > Tax > Company Tax Options).
The change only takes effect once you reload SYSPRO.
-
-
Run the Tax Return Setup conversion utility program so that any previously processed transactions can be reported correctly on the Tax Return report.
A message is displayed if the conversion is successful.
Ensure that all your data is backed up before continuing. If you have run the conversion before then existing data is overwritten.We don't recommend running this utility after you have changed the tax period. -
Run the Sales Analysis Update program.
This program lets you extract the daily sales transactions recorded in the Accounts Receivable and Sales Orders modules and update the appropriate records.
The program also ensures that the tables used by the Tax Return program are updated.
You can run the program as often as required. The frequency depends on the volume of sales orders processed and is typically run daily or weekly to ensure that the data reflected on your Sales Analysis reports is accurate and up to date.
-
Run the Tax Return Status program. Alternatively, you can use the Executive View pane to add customized panes to have a Detail or Summary view without needing to run the Tax Return Status program.
-
Run the Tax Return program.
This program lets you generate a report that consolidates sales tax information for ease of submitting tax returns to authorities.
The report is designed to meet the MTD tax requirement as set out by UK legislation.
You must print a report before submitting a tax return, if you haven't already printed one.
To print a report, do the following:
- Select the Unprinted option in the Reprint field and process the report.
- Run the report again to submit the tax return.
- Select the Reprint excluding submitted option in the Reprint field. This enables the Submit tax return option.
- Select the Submit tax return option and process the report.
-
Tax information is taken from the following modules:
- Accounts Receivable (via the Sales Analysis module)
- Cash Book
- Sales Orders
- General Ledger
-
Accounts Payable
-
Tax on Settlement discount is only included on the report when a Default tax code in the Settlement discount drop-down is defined (Setup Options > Tax > Accounts Payable) and the tax code for settlement discount against the released invoice is not spaces.
-
The tax on settlement discount entries are printed on the report with a PS (AP Tax on Settlement discount) in the Source column.
If an invoice was released in a previous version of the Payment Cycle Maintenance or AP Release Invoices to Pay by Review programs, then the settlement discount Tax code field will be blank by default. Unless this was changed before the invoice was paid, no settlement discount tax will appear on this report for that invoice.
- QST tax on Settlement discount is currently not included on the report.
- Accounts Receivable tax on Adjustments is included on the report. It's considered an Output Tax and is denoted by AS in the Source column.
- Accounts Receivable tax on Settlement discount is included on the report. It's considered an Output Tax and is denoted by AR in the Source column.
- The For the period block is not printed when the Use GL periods for tax returns setup option is enabled (Setup Options > Tax > Company Tax Options).
- The layout of the Summary report is based on the VAT100 system used in the United Kingdom.
- The tax for transactions posted in the Cash Book Deposits and Withdrawals program (where the transaction amount equals the tax amount) is displayed in Block 4 and Block 5 only when an Exclusive Tax basis was used. If an Inclusive tax basis was used, then the tax breakdown reflects incorrectly as it is assumed that a portion of the invoice amount reflects merchandise.
-
The following sections are printed on the last page of the report:
Field Description Block 1
This block displays the total tax amount on all Output tax types based on the Sales Orders, Accounts Receivable and the Cash Book modules.
This is the VAT due on all goods and services supplied by the business for the period range defined in the report.
This forms a part of the Output VAT for the period specified.
Block 2 This block displays the total tax amount on EC Acquisitions of Input type tax based on the Accounts Payable module.
This is the VAT due on all goods (including their related costs) bought from VAT-registered suppliers in other EU member states. These purchases are referred to as acquisitions. Related costs cover the supplier's costs in creating the supply, such as packing, transport or insurance. This amount may be reclaimed as Input VAT, according to criteria, which can reflect in Block 4.
This block is blank if EC VAT is not installed.
Block 3 This is the sum of Block 1 and Block 2.
This block displays the Output VAT for the period specified.
Block 4 This block displays the total amount of deductible VAT (Input tax) charged on business purchases based on the Accounts Payable and Cash Book modules.
The value of tax on settlement discount is shown as negative. When processing a Void check, the sign is reversed.
Block 5 This block displays the difference between Block 3 and Block 4, where the smaller figure is subtracted from the larger figure.
If the figure in Block 3 is greater than the figure in Block 4 the difference is the amount that the business is liable to pay. If the figure in Block 3 is less than Block 4, the business is due to be paid the balance. This is subject to queries that the tax authority may need to make.
The value of tax on settlement discount is shown as positive. When processing a Void check, the sign is reversed.
Block 6 This displays the total value of all your business sales and other specific outputs, excluding VAT.
The tax codes defined in Tax code excluded from return field are omitted in the calculation of the figure in this block.Block 7 This block displays the total value of your purchases and expenses excluding VAT. The calculation for this figure also includes the value of imports, acquisitions from VAT-registered suppliers in other EU member states and reverse charge transactions.
The value of tax on settlement discount is shown as negative. When processing a Void check, the sign is reversed.
The tax codes defined in Tax code excluded from return field are omitted in the calculation of the figure in this block.Block 8 This block displays the total value of all supplies of goods to other EU member states with Purchase Type 2 and Tax Status E (exempt), including directly related costs such as freight and insurance.
This block includes the value of any goods dispatched from the UK to a destination in another member state (even if no sale is involved, or if the sale is invoiced outside of the EU).
This block includes values for both taxable and non-taxable EC members.
VAT is omitted from the calculation of this figure.
This block is blank if EC VAT is not installed.
The tax codes defined in Tax code excluded from return field are omitted in the calculation of the figure in this block.Block 9 This block displays the total value of all acquisitions of goods from VAT-registered suppliers in other EU member states, including directly related costs such as freight and insurance.
VAT is omitted from the calculation of this figure.
This block is blank if EC VAT is not installed.
The tax codes defined in Tax code excluded from return field are omitted in the calculation of the figure in this block.
-
You can improve the performance and speed when producing SRS reports (or running batch programs) by enabling the Tickover refreshes on reports/batches option against an operator (SYSPRO Ribbon bar > Setup > Operators).
The field indicates how often the system must notify the operator of its progress when producing reports or running batch programs and can be defined by time (i.e. seconds or minutes) or record count (i.e. number of rows processed).
For example:
Changing the default tickover refresh rate from 1 row to 5000 could improve performance if the operator was processing a large number of stock codes, as it's probably not necessary to view each individual stock code as the program runs.
Referencing
| Field | Description |
|---|---|
|
Report type |
This option generates a detailed report of tax return transactions. Tax return transactions are displayed with information which could be required for query purposes (e.g. invoice number, tax code, submission status). As with the Summary report, this option also generates a report for each detailed section (block) together with an explanation in a legislated format. This option generates a report for each detailed section (block) together with an explanation in a legislated format. |
| Reprint |
Indicate the tax return transactions for which you want to generate the report according to criteria such as printed and submission status. This option prints unprinted transactions for the range selected. The selection of this option reflects on the Tax Return Status report, decreasing the total number of reports in Total not printed column. Selecting this option updates the printed status of the transactions that are generated in the report.
This option prints all previously printed transactions for the selected range. Selecting this option does not affect data returned in the Tax Return Status report. No fields are updated.
This option prints all previously printed transactions that have not been submitted for the selected range. This option ensures that entries that have already been reprinted are submitted. Selecting this option enables the Submit Tax Return option. If it isn't selected it doesn't affect data returned on the Tax Return Status report.
This option prints all printed and submitted transactions for the selected range based on the month and the year of tax returns. Selecting this option doesn't affect data returned on the Tax Return Status report. No fields are updated.
|
| Submit tax return |
Indicate whether you want to mark all transactions to be generated in the report for tax return submission. Selecting this option updates the status of the Total submitted column of the Tax Return Status program. The month for which the tax return is submitted is extracted from the final month of the Tax Period defined in the Include tax return to selection. The year for which the tax return is submitted is extracted from the Tax Year field. This option is only enabled when the Reprint excluding submitted option is selected. It is vital that you print the report before you submit it.
|
|
Include tax return from |
|
|
Tax period |
Indicate the tax period from which you want to generate the report. |
|
Tax year |
Indicate the tax year from which you want to generate the report. |
|
Tax code excluded from return |
|
|
Tax code |
Indicate the tax codes to exclude from the report. The tax codes specified are only excluded from Block 6 through to Block 9 of the report. Separate multiple tax codes with a comma (without any spaces between each separate tax code).
|
|
Include tax return to |
|
|
Tax period |
Indicate the last tax period for which to generate the report. This will include the entire tax period specified. The month for which the tax return is submitted is extracted from the final month of the period defined in this field. |
|
Tax year |
Indicate the last tax year for which you want to generate the report. This will include the entire tax year specified. The year for which the tax return is submitted is extracted from this field. |
Select a standard or user-defined theme you want to apply to the report.
You can't define a report theme if the Disable theme selection option is ticked .
This enables the Email Options function which lets you define the parameters required for emailing the report.
The Office Automation and Messaging module is not required for emailing documents from SYSPRO Reporting Services.
Selecting this option enables the Export Options function which lets you output the report to a specific format and save it to a specific location.
You can also export the report from the Report Preview screen.
Export formats can be page-based and record-based. Page-based formats typically preserve these properties as closely as possible, while record-based formats prioritize data rather than layout and formatting. Some record-based formats are only data-exchange formats (e.g. Adobe Acrobat PDF).
Depending on the format you select, the layout (e.g. object position, object size and relationships between these attributes and other objects) and formatting (e.g. font style, text color, text alignment, background color, etc) may not be perfectly preserved.
This exports (saves) your report with the current data without modifying the original report.
[Page-based]. The exported documents are intended for printing and redistribution. Acrobat format will export both layout and formatting in a manner that is consistent with how the report looks on the Preview tab.
Acrobat format embeds the TrueType fonts that appear in the document. (Non-TrueType fonts are not supported.)
This export format does not support Microsoft font-linking technology, which is used to provide support for some extended character sets such as Chinese HKCS. Therefore, the fonts used in the report must contain all of the required glyphs.
The following URL types are supported for hyperlinks: http:, https: and mailto:.
[Page-based]. You would typically select this if you wanted to create a report that wanted to publish on a website or email to a recipient. An HTML page containing the entire report is generated in the directory you specify. Once published or emailed, the report can be viewed without requiring SYSPRO programs.
This format preserves the layout and formatting of the report by using DHTML.
All the images in the report are saved externally and a hyperlink is inserted in the exported HTML output. Therefore, this export format can generate more than one file in the output.
[Page-based]. This converts your report contents into Excel cells on a page-by-page basis. Contents from multiple pages are exported to the same Excel worksheet.
The export program creates multiple worksheets to accommodate data if a worksheet becomes full and there is more data to export.
If a report object covers more than one cell, then the export program merges cells to represent a report object.
Microsoft Excel has a limit of 256 columns in a worksheet, so any report object (or part thereof) that is added to cells beyond 256 columns is not exported.
This export format retains most of the formatting, but it doesn't export line and box objects from your report.
The Export page header and page footers option lets you include the header and page footer information when exporting the report. Options include: None, Once per report or On each page.
The exported file contains text and drawing objects to represent report objects. Individual objects are placed in text frames.
This format is intended for use in applications such as fill-out forms, where the space for entering text is reserved as empty text objects.
Almost all of the formatting is retained in this export format. However, text objects can't be placed outside the left edge of the page (e.g. if you have text objects in your report that are placed before the left edge of the printable area, they will be pushed right - most noticeable in reports with wide pages).
This exports the report to a plain text file. For client-side reporting, you can specify the characters per inch and number of lines per page.
This is the location (full path and file name) to which you want to save the report.
The file name can't contain characters that are reserved in XML (e.g. ' : & ' > <).
This lets you define parameters for printing the report to a specific printer or PDF printer.
You can define the default paper size to use for your specific reports using the Default printing paper size option ().
This displays the report on the screen after processing all output options selected.
This option is selected by default if the Report Preview option is enabled from the (SYSPRO Ribbon bar > Setup > Report Preview).
This option has no effect when using server side printing. Once the report is requested by the client, it is sent directly to the server for processing which enables the client to continue working or even to shut down. When a report has been processed, it must be opened from the SRS Report Queue.
Saves your selections for future runs of the report.
This field can be controlled using the Always archive report and Disable archive report options ().
Archiving reports lets you identify which reports were run, when they were run and by whom. This is also useful for customized SRS reports. In addition, reports are readily available for printing, reprinting or emailing.
This resets all the options on all the tab pages to the SYSPRO default selections.
This generates the report according to your selections.
At least one output method must be selected on the Output Options tab before you can select to process the report.

This emails the report.

This halts processing of the current report.

This exports the report to an Excel spreadsheet.
| Option | Description |
|---|---|
| Export to Excel options | |
|
Constant column width |
This fixes the width for all exported columns. If selected, enter the required value into the Constant column width field. |
|
Column width based on objects in the |
Select the part of the report on which you want to base the column width. |
|
Export page header and page footers |
This lets you include the header and page footer information when exporting the report. Options include: None, Once per report or On each page. This effectively lets you include details of the operator who created the report. |
|
Create page breaks for each page |
This adds the page breaks as designed in Crystal Reports. Don't select this option to add page breaks automatically in Excel. |
|
Convert date values to string |
This keeps the date formatting of the report in Excel. |
|
Show gridlines |
This adds grid lines to the report in Excel. |
|
Page range |
Select the pages you want to export. |
| Option | Description |
|---|---|
| Export to Excel options | |
|
Constant column width |
This fixes the width for all exported columns. If selected, enter the required value into the Constant column width field. |
|
Column width based on objects in the |
Select the part of the report on which you want to base the column width. |
|
Options |
|
|
Export object formatting |
This exports the report formatting to Excel (i.e. ensuring that the data types are maintained). |
|
Export images |
This exports images in the report to Excel. |
|
Use worksheet functions for summaries |
This converts report summaries to Excel functions (i.e. numbers with formulas). |
|
Maintain relative object position |
This keeps the objects in the report in the same position when exported to Excel. |
|
Maintain column alignment |
This keeps the alignment the same as the report. |
|
Export page header and footer |
This lets you include the header and page footer information when exporting the report. This effectively lets you include details of the operator who created the report. |
|
Simplify page headers |
This exports only the last row of the page header section. |
|
Show group outlines |
This adds the lines that separate the report groups in Excel. |

This exports the contents of the report as a text file. When you select this option, the report contents are displayed in a Notepad editor.

This applies a selection formula to the report to filter the data without re-running the report, making the report easier to read by only displaying certain records.
This option is not available for archived and scheduled reports.
| Option | Description |
|---|---|
|
Record |
Specify criteria for displaying records in the report. |
|
Group |
Specify criteria for displaying group data in the report. |
|
Saved Data |
This displays the report with the saved data. This applies to reports previously exported or reports which you designed and against which data was saved using the Save data report option. Any changes made to the database after the report is saved doesn't affect the report (i.e. the program does not refer to the database when generating the report). |
|
Clear all selection formulas |
This clears any previously specified selection formulas (using the Select Expert option) for the current run of the program. |

This queries the database to redisplay the report on the screen at the selected page.
This only applies when generating a report that extracts data directly from a database (i.e. not when using a business object to extract the data).

This exports the report (as well as sub-reports) to a comma-separated-values (CSV) file.
Each record in the file is typically a single line and each field in the record is delimited by a specific delimiter (e.g. a comma).
| Option | Description |
|---|---|
|
CSV export options |
|
|
Delimiter |
Indicate the character you want to use to wrap around each field in the record. This defaults to " (double quotes). |
|
Separator |
Indicate the character you want to use to separate the fields or columns in a record. This defaults to , (comma). |
|
Tab |
Select this to use a Tab as the delimiter for separating the fields in each record. When you select this option, the Separator field is disabled. |
|
Mode |
Indicates what to do with the page and group sections of the report when exported. Exports the report to the file to resemble the rpt format of the report. |
|
Path |
Indicate the location to which you want to export the report. |
|
Report sections |
|
|
Report and page sections |
Select whether you want to write all report headers and footers and page headers and footers to the export file. |
|
Isolate report or page sections |
This writes all report headers and footers and page headers and footers to the export file, but isolates them in the file. This creates a bigger file which resembles the rpt version of the report where everything is more spaced out and easier to read. Otherwise the report and page headers and footers are included in each record of the file. |
|
Group sections |
|
|
Group sections |
Select whether you want to write all group headers and footers to the export file. |
|
Isolate group sections |
This writes all group headers and footers to the export file, but isolates them in the file. This creates a bigger file which resembles the rpt version of the report where everything is more spaced out and easier to read. Otherwise the group headers and footers are included in each record of the file. |

This exports the report to a specific format, location and enables you to specify the page ranges to export where applicable.

This saves the report to a specific location. This defaults to Crystal Reports (*.rpt).
When you export a single document, the default file name is created using the document type and the key field (e.g. customer number, invoice number, quotation number, purchase order number, etc). When you export a batch of documents, the last document number or key field is used as a reference in the file name.
This option lets you export reports individually (i.e. only the main report, or any of the sub-reports you are current displaying).

This outputs the report to a printer.

This lets you copy highlighted text to the clipboard.

This lets you view the parameters and parameter values entered for the report using the Crystal Report Designer.

This displays the values of the primary key sequence used in grouped reports (e.g. Inventory Valuation) in a tree view.

This lets you locate text within the report.

This lets you change the size of the report displayed on the screen. It has no effect on the printed size of the report.

This lets you close the currently displayed tab and is only applicable to reports that contain sub-reports (this doesn't apply to the Preview tab).
Copyright © 2021 SYSPRO PTY Ltd.