SYSPRO Reporting Services API
Exploring
SYSPRO's SYSPRO Reporting Services API lets developers produce SRS documents using the SYSPRO Reporting Service Server infrastructure.
At a very high-level, the SRS Service is the engine that produces SRS documents. This feature is now accessible to developers via an API that lets them query the SYSPRO database and produce the required document.
Once produced the document can be stored for later use, or printed, or emailed.
Developers can also choose to access the document via the report queue or via the API for further automation.
Once the documents are generated, they are added to the document printing queue (SRS Document Queue) from where they can be viewed, executed and managed.
Starting
Before using the SYSPRO Reporting Services API, ensure that Server-side Printing is working correctly in SYSPRO.
The following is required:
Server
- Reporting Host Service
-
Crystal Reports Server Embedded (CR 2013) SP8
-
SAP BusinessObjects BI platform .Net SDK Redistributable 64-bit 4.2. SP3
Client
-
Browser pop-ups must be enabled
This is only applicable for previewing PDFs in a web-browser application.
SYSPRO configuration requirements
-
Server side reporting (configured within the SYSPRO System Setup program)
-
e.Net Service Details (configured within the SYSPRO System Setup program)
-
When emailing a document, only one email address can be entered in the To and CC lines.
-
Known limitations:
The following are known limitations, which will be addressed during the lifetime of SYSPRO 8:
-
Batch printing is currently not supported.
-
Documents that are printed using this architecture are currently not added to the document archive.
The generated documents are stored in the SRS document queue used for server side printing and will be visible from the SRS Document Queue program. However, they are not added to the document archive.
There will be no PDF file in the SRS Document Printing archive folder, nor will the document be visible in the Document Archive Viewer.
-
This functionality is limited to the following document types:
-
Invoice
-
Delivery note
- Order acknowledgment
-
Support for other documents and reports will be made available in the future.
-
-
Solving

Why don't you drop us a line with some useful information we can add here?
Using
The SYSPRO Reporting Host Service install file is named: SYSPRO.8.REPORTING.HOST.SERVICE.EXE.
It is deployed with the SYSPRO Installer and can be installed automatically when SYSPRO 8 is installed
We recommend stopping the SYSPRO Reporting Host Service before any updates are done and restarting it thereafter. This will release any e.net business objects which may be held by the service.
-
From the System Setup program, select the Reporting tab.
-
Configure the required settings:
Field Action Reporting configuration
Select Server-side reporting using SQL.
SQL Server name
- Enter the name of the SQL Server instance that contains the _SRS database.
Reporting authentication
Select the type of authentication you will use.
If you select Windows authentication, ensure that the user name supplied can create a database and has read/write permissions.The first time that the SYSPRO Reporting Host Service is started, the ADMIN operator is copied to the _SRS operator code.
-
Save your changes.
Ensure that you can successfully print the document type using SYSPRO before trying to print it using the API.
All API calls are done via the SRS library.
-
Create a new project and create the DLLs as a reference.
Use the base address from SYSPRO when creating an instance of the class at the Reporting Service field System Setup.
-
Use the five available methods to query and generate documents.
-
Open the solution.
-
Select the Solution Explorer (View > Solution Explorer).
-
Right-click on References in the Solution Explorer pane of the project and select Add Reference.
-
Select Browse and navigate to the \Base folder.
-
Select SYSPROSRSClientLibrary.dll and select Add.
-
Ensure the assembly is checked in the list of assemblies and select OK.
Referencing
The exposed API methods can be used in a number of ways:
-
Authentication.
-
Controlling login and logout.
-
Controlling the formats of the documents.
This lets customers with login credentials access their data to generate documentation from third-party applications. External or third-party applications like SYSPRO Espresso can request the information from the API and, once received, apply it to generate the required documents.
The SYSPROSRSDocumentAPI.dll assembly (located in the \Base folder) allows an application like SYSPRO Espresso to call the SYSPRO Reporting Host Service in order to create the sales order documents.
The following API methods are exposed:
| Method | Description |
|---|---|
|
AuthSysproUser |
This controls and authorizes the logging on of users. This method returns a session ID. |
|
AuthenticateSysproGUID |
This controls and authorizes access of users that are already logged in. This method returns a session ID. |
|
LogOffUserSession |
This logs off sessions of stand-alone applications. |
|
DetermineDocument Options |
This provides a list of formats for the selected document type. This method returns XML with details of available documents and formats. It only returns SRS formats and looks at the control file (i.e. sales order control file), to determine which formats are defined for SRS according to the governing business rules.
For the Sales Order Document Printing functionality, this method returns the following that can be used to determine which document types can be printed:
|
|
ProduceDocument |
This generates the document to print on the host server. When previewing the document, it is returned in a HEX encoded format of a PDF document A third-party developer will have to convert the content back to ASCII format, before saving it to disk.
The input XML is passed to the business object, which in turn communicates with the Document Print program. The SYSPRO Reporting Host Service uses the XML returned from the Document Print program, to generate the document using the selected format. The following codes are used for the sales order documents types:
|
Get document details
None
<Query>
<Option>
<Function>GETDOCDET</Function>
</Option>
<Filter>
<OrderNumber FilterType='S' FilterValue='791' />
</Filter>
</Query>
<DocumentControl Language="05" Language2="EN" CssStyle="" DecFormat="1"
DateFormat="01"
Role="01" Version="8.0.001" OperatorPrimaryRole="   ">
<DocumentInformation>
<SalesOrder>000791</SalesOrder>
<OrderStatus>9</OrderStatus>
<Translated_OrderStatus>Complete</Translated_OrderStatus>
<ActiveFlag>N</ActiveFlag>
<Translated_ActiveFlag>No</Translated_ActiveFlag>
<CancelledFlag />
<Translated_CancelledFlag>No</Translated_CancelledFlag>
<SODocumentType>O</SODocumentType>
<Translated_SODocumentType>Order</Translated_SODocumentType>
<CanPrintAcknowledgement>false</CanPrintAcknowledgement>
<CanRePrintAcknowledgement>false</CanRePrintAcknowledgement>
<CanPrintDeliveryNote>false</CanPrintDeliveryNote>
<CanRePrintDeliveryNote>false</CanRePrintDeliveryNote>
<CanGenerateInvoice>false</CanGenerateInvoice>
<Documents>
<Invoice>
<InvoiceNumber>100506</InvoiceNumber>
<InvoiceSource>O</InvoiceSource>
<Translated_InvoiceSource>Order</Translated_InvoiceSource>
<DateLastInvPrt>2015-04-08</DateLastInvPrt>
</Invoice>
</Documents>
<Formats>
<Format>
<DocumentType>Order Acknowledgement</DocumentType>
<FormatCode>0</FormatCode>
<FormatName>Order Acknowledgemen</FormatName>
</Format>
<Format>
<DocumentType>Delivery Note</DocumentType>
<FormatCode>0</FormatCode>
<FormatName>Delivery Note</FormatName>
</Format>
<Format>
<DocumentType>Invoice</DocumentType>
<FormatCode>0</FormatCode>
<FormatName>Invoice</FormatName>
</Format>
</Formats>
</DocumentInformation>
</DocumentControl>
Produce document
<DocumentControl>
<DocumentType>SalesOrder</DocumentType>
<Print>False</Print>
<Email>False</Email>
<Preview>True</Preview>
<XmlOnly>False</XmlOnly>
<PrinterDetails>
<PrinterName />
<PrintCopies>1</PrintCopies>
<PrintCollate>True</PrintCollate>
</PrinterDetails>
<CanPrintAcknowledgement>false</CanPrintAcknowledgement>
<EmailDetails>
<EmailFromAddress />
<EmailToAddress />
<EmailCCAddress />
<EmailToAddress />
<EmailBodyText />
</EmailDetails>
</DocumentControl>
<Query>
<Option>
<Function>ONLINE</Function>
<DocumentType>I</DocumentType>
<Format>0</Format>
<Reprint>Y</Reprint>
</Option>
<Filter>
<OrderNumber FilterType='S' FilterValue='000791' />
<InvoiceNumber FilterType='S' FilterValue='100506' />
</Filter>
</Query>
<Query>
<Document>
<Status />
<DocumentGuid/>
<ErrorMessage/>
<StatusPreview/>
<DocumentHex>HEX Encoded PDF file</ DocumentHex >
<Document>
</Query>
The following sample code is provided to assist you to use the API.
Create the SYSPROSRSClient object
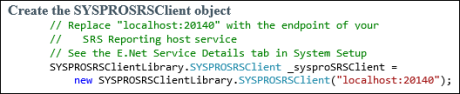
// Replace "localhost:20140" with the endpoint of your
// SRS reporting host service
SYSPROSRSClientLibrary.SYSPROSRSClient _sysproSRSClient =
new SYSPROSRSClientLibrary.SYSPROSRSClient("localhost:20140");
Authenticate to the service using operator and company code

string sessionId = _sysproSRSClient.AuthenticateSYSPROUser
({OperatorCode}, {OperatorPassword}, {CompanyCode}, {CompanyPassword});
Authenticate to the service you use

string sessionId = _sysproSRSClient.AuthenticateSYSPROGuid({GUID});
Determine the available document options
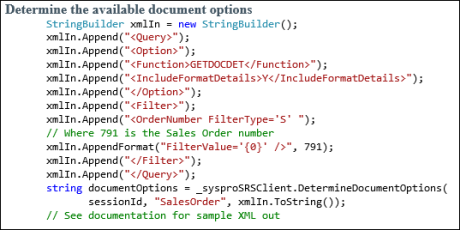
StringBuilder xmlIn = new StringBuilder();
xmlIn.Append("<Query>");
xmlIn.Append("<Option>");
xmlIn.Append("<Function>GETDOCDET</Function>");
xmlIn.Append("<IncludeFormatDetails>Y</IncludeFormatDetails>");
xmlIn.Append("</Option>");
xmlIn.Append("<Filter>");
xmlIn.AppendFormat("<OrderNumber FilterType='S' FilterValue='{0}' />", 791);
// Where 791 is the Sales Order number
xmlIn.Append("</Filter>");
xmlIn.Append("</Query>");
string documentOptions = _sysproSRSClient.DetermineDocumentOptions(
_sessionId, "SalesOrder", xmlIn.ToString());
// See documentation for sample XML out
Produce the document
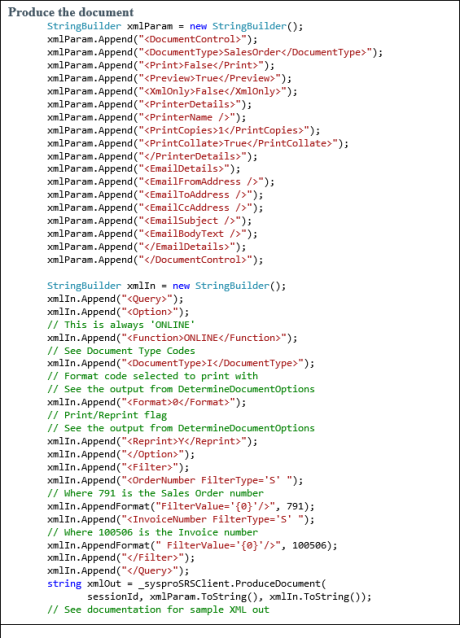
StringBuilder xmlParam = new StringBuilder();
xmlParam.Append("<DocumentControl>");
xmlParam.Append("<DocumentType>SalesOrder</DocumentType>");
xmlParam.Append("<Print>False</Print>");
xmlParam.Append("<Preview>True</Preview>");
xmlParam.Append("<XmlOnly>False</XmlOnly>");
xmlParam.Append("<PrinterDetails>");
xmlParam.Append("<PrinterName />");
xmlParam.Append("<PrintCopies>1</PrintCopies>");
xmlParam.Append("<PrintCollate>True</PrintCollate>");
xmlParam.Append("</PrinterDetails>");
xmlParam.Append("<EmailDetails>");
xmlParam.Append("<EmailFromAddress />");
xmlParam.Append("<EmailToAddress />");
xmlParam.Append("<EmailCcAddress />");
xmlParam.Append("<EmailSubject />");
xmlParam.Append("<EmailBodyText />");
xmlParam.Append("</EmailDetails>");
xmlParam.Append("</DocumentControl>");
StringBuilder xmlIn = new StringBuilder();
xmlIn.Append("<Query>");
xmlIn.Append("<Option>");
// This is always 'ONLINE'
xmlIn.Append("<Function>ONLINE</Function>");
// See Document Type Codes
xmlIn.Append("<DocumentType>I</DocumentType>");
// Format code selected to print with - see output from DetermineDocumentOptions
xmlIn.Append("<Format>0</Format>");
xmlIn.Append("<Reprint>Y</Reprint>");
Print/Reprint flag - see output from DetermineDocumentOptions
xmlIn.Append("</Option>");
xmlIn.Append("<Filter>");
xmlIn.AppendFormat("<OrderNumber FilterType='S' FilterValue='{0}' />",791);
//Where 791 is the Sales Order number
xmlIn.AppendFormat("<InvoiceNumber FilterType='S' FilterValue='{0}' />",100506);
// Where 100506 is the Invoice number
xmlIn.Append("</Filter>");
xmlIn.Append("</Query>");
string xmlOut = _sysproSRSClient.ProduceDocument(
sessionId, xmlParam.ToString(), xmlIn.ToString());
// See documentation for sample XML out
Retrieve the document content from the HEX encoded string from the output XML
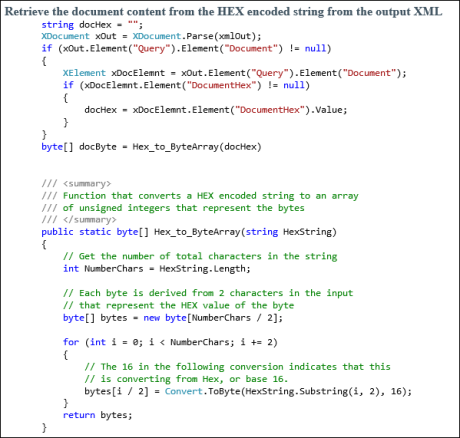
// Document Content is HEX encoded as it may contain invalid XML characters, i.e. NULL characters
string hexString = {Get content from XML};
hexString = hexString.Replace(" ", "");
byte[] arrASCII = new byte[hexString.Length / 2];
for (int i = 0; i < hexString.Length; i += 2)
{
arrASCII[i / 2] = (byte)Convert.ToByte(hexString.Substring(i, 2), 16);
Logoff from the SYSPRO session
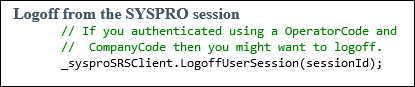
// If you authenticated using a OperatorCode and
// CompanyCode then you might want to logoff.
_sysproSRSClient.LogoffUserSession(sessionId);